基于URL地址的权限管理
基于 URL 地址的权限管理主要是通过过滤器 FilterSecurityInterceptor 来实现的。如果开发者配置了基于 URL 地址的权限管理,那么 FilterSecurityInterceptor 就会被自动添加到 Spring Security 过滤器链中,在过滤器链中拦截下请求,然后分析当前用户是否具备请求所需要的权限,如果个具备,则抛出异常。
FilterSecurityInterceptor 将请求拦截下来之后,会交给 AccessDecisionManager 进行处理,AccessDecisionManager 则会调用投票器进行投票,然后对投票结果进行决策,最终决定请求是否通过。
基本用法
首先创建一个 Spring Boot 项目,引入 Web 依赖和 Spring Security 依赖,然后项目中添加如下配置:
@Configuration
public class SecurityConfig extends WebSecurityConfigurerAdapter {

    @Override
    protected void configure(AuthenticationManagerBuilder auth) throws Exception {
        auth.inMemoryAuthentication()
                .withUser("javaboy")
                .password("{noop}123")
                .roles("ADMIN")
                .and()
                .withUser("江南一点雨")
                .password("{noop}123")
                .roles("USER")
                .and()
                .withUser("itboyhub")
                .password("{noop}123")
                .authorities("READ_INFO");
    }
}
在这段配置中,我们定义了三个用户:
-
javaboy:具有 ADMIN 角色。
-
江南一点雨:具有 USER 角色。
-
itboyhub:具有 READ_INFO 权限。
对于复杂的权限管理系统,用户和角色关联,角色和权限关联,权限和资源关联;对于简单的权限管理系统,用户和权限关联,权限和资源关联。无论是种,用户都不会和角色以及权限同时直接关联。反映到代码上就是 roles 方法和 authorities 方法不能同时调用,如果同时调用,后者会覆盖前者。我们来看一下它的源码( org.springframework.security.core.userdetails.User):
public UserBuilder roles(String... roles) {
    List<GrantedAuthority> authorities = new ArrayList<>(
            roles.length);
    for (String role : roles) {
        Assert.isTrue(!role.startsWith("ROLE_"), () -> role
                + " cannot start with ROLE_ (it is automatically added)");
        authorities.add(new SimpleGrantedAuthority("ROLE_" + role));
    }
    return authorities(authorities);
}

public UserBuilder authorities(GrantedAuthority... authorities) {
    return authorities(Arrays.asList(authorities));
}

public UserBuilder authorities(Collection<? extends GrantedAuthority> authorities) {
    this.authorities = new ArrayList<>(authorities);
    return this;
}

public UserBuilder authorities(String... authorities) {
    return authorities(AuthorityUtils.createAuthorityList(authorities));
}
可以看到,无论是给用户设置角色还是设置权限,最终都会来到 authorities(Collection<? extends GrantedAuthority>) 方法,在该方法中直接给用户的 authorities 属性重新赋值,所以如果同时调用了 roles 方法和 authorities 方法,那么后者就会覆盖前者。同时大家要注意,Spring Security 会自动给用户角色添加 ROLE_ 前缀。
接下来我们配置权限拦截规则,重写 configure(HttpSecurity) 方法即可:
@Override
protected void configure(HttpSecurity http) throws Exception {
    http.authorizeRequests()
            .antMatchers("/admin/**").hasRole("ADMIN")
            .antMatchers("/user/**").access("hasAnyRole('USER','ADMIN')")
            .antMatchers("/getinfo").hasAuthority("READ_INFO")
            .anyRequest().access("isAuthenticated()")
            .and()
            .formLogin()
            .and()
            .csrf().disable();
}
这段请求拦截规则的含义如下:
-
用户必须具备 ADMIN 角色才可以访问
/admin/**格式的地址。 -
用户必须具备 USER 和 ADMIN 任意一个角色,才可以访问
/user/**格式的地址。 -
用户必须具备 READ_INFO 权限,才可以访问 /getinfo 接口。
-
剩余的请求只要是认证后的用户就可以访问。
这段配置其实很好理解,但是有一些需要注意的地方:
-
大部分的表达式都有对应的方法可以直接调用,例如我们上面调用的 hasRole 方法对应的就是 hasRole 表达式。开发者为了方使可以直接调用 hasRole 方法,但是 hasRole 方法最终还是会被转为表达式,当表达式执行结果为 true,这个请求就可以通过,否则请求不通过。
-
Spring Security 会为 hasRole 表达式自动添加上 ROLE_ 前缀,例如上面的 hasRole("ADMIN") 方法转为表达式之后,就是 hasRole('ROLE_ADMIN'),所以用户的角色也必须有 ROLE_ 前缀,而我们上面案例中的用户是基于内存创建的,会自动给用户角色加上 ROLE_ 前缀;hasAuthority 方法并不会添加任何前缀,而在用户定义时设置的用户权限也不会添加任何前缀。一言以蔽之,基于内存定义的用户,会自动给角色添加 ROLE_ 前缀,而 hasRole 也会自动添加 ROLE_ 前缀;基于内存定义的用户,不会给权限添加任何前缀,而 hasAuthority 也不会添加任何前缀。如果大家的用户信息是从数据库中读取的,则需要注意 ROLE_ 前缀的问题。
-
可以通过 access 方法来使用权限表达式,access 方法的参数就是权限表达式。
-
代码的顺序很关键,当请求到达后,按照从上往下的顺序依次进行匹配。
配置完成后,我们再提供四个测试接口:
@RestController
public class HelloController {
    @GetMapping("/hello")
    public String hello() {
        return "hello";
    }

    @GetMapping("/admin/hello")
    public String admin() {
        return "hello admin";
    }

    @GetMapping("/user/hello")
    public String user() {
        return "hello user";
    }

    @GetMapping("/getinfo")
    public String getInfo() {
        return "getinfo";
    }

}
最后启动项目,进行测试。如果使用 javaboy/123 进行登录,则前三个接口都可以访问; 如果使用 江南一点雨/123 进行登录,则只能访问 /hello 和 /user/hello 两个接口; 如果使用 itboyhub/123 进行登录,则可以访问 /getinfo 接口。
角色继承
如果需要配置角色继承,则只需要提供一个 RoleHierarchy 实例即可:
@Configuration
public class SecurityConfig extends WebSecurityConfigurerAdapter {
    @Bean
    RoleHierarchy roleHierarchy() {
        RoleHierarchyImpl hierarchy = new RoleHierarchyImpl();
        hierarchy.setHierarchy("ROLE_ADMIN > ROLE_USER");
        return hierarchy;
    }

    @Override
    protected void configure(AuthenticationManagerBuilder auth) throws Exception {
        // 省略
    }

    @Override
    protected void configure(HttpSecurity http) throws Exception {
        http.authorizeRequests()
                .antMatchers("/admin/**").hasRole("ADMIN")
                .antMatchers("/user/**").access("hasRole('USER')")
                .antMatchers("/getinfo").hasAuthority("READ_INFO")
                .anyRequest().access("isAuthenticated()")
                .and()
                .formLogin()
                .and()
                .csrf().disable();

    }
}
/user/** 需要 USER 角色才能访问,但是由于 ROLE_ADMIN 继承自 ROLE_USER,所以自动具备 ROLE_USER 的权限,因此如果用户具有 ROLE_ADMIN 角色也可以访问 /user/** 格式的地址。
自定义表达式
如果内置的表达式无法满足需求,开发者也可以自定义表达式。
假设现在有两人接口:
@RestController
public class HelloController {
    @GetMapping("/hello/{userId}")
    public String hello(@PathVariable Integer userId) {
        return "hello " + userId;
    }

    @GetMapping("/hi")
    public String hello2User(String username) {
        return "hello " + username;
    }
}
第一个接口,参数 userId 必须是偶数方可请求成功; 第二个接口,参数 username 必须是 javaboy 方可请求成功,同时两个接口都必须认证后才能访问(这里主要是展示用法,所以大家不必红结于业务)。如果我们想通过自定义表达式实现这一功能,只需要按照如下方式定义:
@Component
public class PermissionExpression {
    public boolean checkId(Authentication authentication, Integer userId) {
        if (authentication.isAuthenticated()) {
            return userId % 2 == 0;
        }
        return false;
    }

    public boolean check(HttpServletRequest req) {
        return "javaboy".equals(req.getParameter("username"));
    }
}
自定义 PermissionExpression 类并注册到 Spring 容器中,然后在里边定义相应的方法。
-
checkId 方法:用来检查参数 userId,同时传入了 authentication 对象,通过 authentication 对象可以判断出当前用户是否已经登录。如果方法返回 true,则表示校验通过,否则表示校验未通过。
-
check 方法:用来检验请求 request,只要拿到了 request,就能拿到所有请求相关的参数,也就可以做任何校验。
最后在 SecurityConfig 中添加如下路径匹配规则:
@Override
protected void configure(HttpSecurity http) throws Exception {
    http.authorizeRequests()

            // 省略其他
            .antMatchers("/hello/{userId}").access("@permissionExpression.checkId(authentication,#userId)")
            .antMatchers("/hi").access("isAuthenticated() and @permissionExpression.check(request)")
            // 省略其他
}
在 access 方法中,我们可以通过 @ 符号引用一个 Bean 并调用其中的方法。在 checkId 方法调用时,并 #userId 就表示前面的 userId 参数;在 check 方法中,我们用了两表个表达式,需要同时满足 isAuthenticated() 和 check() 方法都为 true,该请求才会通过。
原理剖析
有的读者可能觉得权限管理系统很复杂,其实复杂的是系统设计,单纯从技术上来说,还是比较容易的。接下来我们就来简单梳理一下 Spring Security 中基于 URL 地址进行权限管理的一个大致原理。
AbstractSecurityInterceptor
首先处于 “上帝视角” 的类是 AbstractSecurityInterceptor,该类统筹着关于权限处理的一切。该类中的方法很多,这里只需要关注其中的三个方法:beforeInvocation、afterInvocation 和 finallyInvocation。
在这三个方法中,beforeInvocation 中会调用前置处理器完成权限校验,afterInvocation 中调用后置处理器完成权限校验,finallyInvocation 则主要做一些校验后的清理工作。
我们先来看 beforeInvocation:
protected InterceptorStatusToken beforeInvocation(Object object) {
    if (!getSecureObjectClass().isAssignableFrom(object.getClass())) {
        throw new IllegalArgumentException(
                "Security invocation attempted for object "
                        + object.getClass().getName()
                        + " but AbstractSecurityInterceptor only configured to support secure objects of type: "
                        + getSecureObjectClass());
    }

    Collection<ConfigAttribute> attributes = this.obtainSecurityMetadataSource()
            .getAttributes(object);

    if (attributes == null || attributes.isEmpty()) {
        if (rejectPublicInvocations) {
            throw new IllegalArgumentException(
                    "Secure object invocation "
                            + object
                            + " was denied as public invocations are not allowed via this interceptor. "
                            + "This indicates a configuration error because the "
                            + "rejectPublicInvocations property is set to 'true'");
        }

        publishEvent(new PublicInvocationEvent(object));

        return null; // no further work post-invocation
    }

    if (SecurityContextHolder.getContext().getAuthentication() == null) {
        credentialsNotFound(messages.getMessage(
                "AbstractSecurityInterceptor.authenticationNotFound",
                "An Authentication object was not found in the SecurityContext"),
                object, attributes);
    }

    Authentication authenticated = authenticateIfRequired();

    // Attempt authorization
    try {
        this.accessDecisionManager.decide(authenticated, object, attributes);
    }
    catch (AccessDeniedException accessDeniedException) {
        publishEvent(new AuthorizationFailureEvent(object, attributes, authenticated,
                accessDeniedException));

        throw accessDeniedException;
    }

    if (publishAuthorizationSuccess) {
        publishEvent(new AuthorizedEvent(object, attributes, authenticated));
    }

    // Attempt to run as a different user
    Authentication runAs = this.runAsManager.buildRunAs(authenticated, object,
            attributes);

    if (runAs == null) {
        if (debug) {
            logger.debug("RunAsManager did not change Authentication object");
        }

        // no further work post-invocation
        return new InterceptorStatusToken(SecurityContextHolder.getContext(), false,
                attributes, object);
    }
    else {
        SecurityContext origCtx = SecurityContextHolder.getContext();
        SecurityContextHolder.setContext(SecurityContextHolder.createEmptyContext());
        SecurityContextHolder.getContext().setAuthentication(runAs);

        // need to revert to token.Authenticated post-invocation
        return new InterceptorStatusToken(origCtx, true, attributes, object);
    }
}
方法比较长,我们大概梳理一下:
-
首先调用 obtainSecurityMetadataSource 方法获取 SecurityMetadataSource 对象,然后调用其 getAttributes 方法获取受保护对象所需要的权限。如果获取到的值为空,此时; 如果 rejectPublicInvocations 变量为 true,表示受保护的对象拒绝公开调用,则直接抛出异常;如果 rejectPublicInvocations 变量为 false,表示受保护对象允许公开访问,此时直接返回 null 即可。
-
接下来到 SecurityContextHolder 中查看当前用户的认证信息是否存在。
-
调用 authenticateIfRequired 方法检查当前用户是否已经登录。
-
调用 accessDecisionManager.decide 方法进行决策,该方法中会调用投票器进行投票,如果该方法执行抛出异常,则说明权限不足。
-
接下来调用 runAsManager.buildRunAs 方法去临时替换用户身份,不过默认情况下,runAsManager 的实例是 NullRunAsManager,即不做任何替换,所以返回的 runAs 对象为 null。如果 runAs 为 null,如则直接创建一个 InterceptorStatusToken 对象返回即可;否则将 SecurityContextHolder 中保存的用户信息修改为替换的用户对象,然后返回一个 InterceptorStatusToken 对象。InterceptorStatusToken 对象中保存了当前用户的 SecurityContext 对象,假如进行了临时用户替换,在替换完成后,最终还是要恢复成当前用户身份的,恢复的依据就是 InterceptorStatusToken 中保存的原始 SecurityContext 对象。
这就是 beforeInvocation 的大致工作流程,其实一个核心功能就是调用 accessDecisionManager.decide 方法进行权限验证。
我们再来看 finallyInvocation 方法:
protected void finallyInvocation(InterceptorStatusToken token) {
    if (token != null && token.isContextHolderRefreshRequired()) {
        SecurityContextHolder.setContext(token.getSecurityContext());
    }
}
如果临时替换了用户身份,那么最终要将用户身份恢复,finallyInvocation 方法所做的事情就是恢复用户身份。这里的参数 token 就是 beforeInvocation 方法的返回值,用户原始的身份信息都保存在 token 中,从 token 中取出用户身份信息,并设置到 SecurityContextHolder 中去即可。
最后我们再来看看 afterInvocation 方法:
protected Object afterInvocation(InterceptorStatusToken token, Object returnedObject) {
    if (token == null) {
        // public object
        return returnedObject;
    }

    finallyInvocation(token); // continue to clean in this method for passivity

    if (afterInvocationManager != null) {
        // Attempt after invocation handling
        try {
            returnedObject = afterInvocationManager.decide(token.getSecurityContext()
                    .getAuthentication(), token.getSecureObject(), token
                    .getAttributes(), returnedObject);
        }
        catch (AccessDeniedException accessDeniedException) {
            AuthorizationFailureEvent event = new AuthorizationFailureEvent(
                    token.getSecureObject(), token.getAttributes(), token
                            .getSecurityContext().getAuthentication(),
                    accessDeniedException);
            publishEvent(event);

            throw accessDeniedException;
        }
    }

    return returnedObject;
}
afterInvocation 方法接收两个参数,第一个参数 token 就是 beforeInvocation 方法的返回值,第二个参数 returnObject 则是受保护对象的返回值。afterInvocation 方法的核心工作就是调用 afterInvocationManager.decide 方法对 returnObject 进行过滤,然后将过滤后的结果返回。
这就是 AbstractSecurityInterceptor 类中三大方法的作用。
FilterSecurityInterceptor
在 13.4.1 小节的案例中,我们使用了基于 URL 地址的权限管理,此时最终使用的是 AbstractSecurityInterceptor 的子类 FilterSecurityInterceptor,这是一个过滤器。当我们在 configure(HtpSecurity) 方法中调用 http.authorizeRequests() 开启 URL 路径拦截规则配置时,就会通过 AbstractInterceptUrlConfigurer#configure 方法将 FilterSecurityInterceptor 添加到 Spring Security 过滤器链中。
对过滤器而言,最重要的当然就是 doFilter 方法了,我们来看看 FilterSecurityInterceptor#doFilter 方法:
public void doFilter(ServletRequest request, ServletResponse response,
        FilterChain chain) throws IOException, ServletException {
    FilterInvocation fi = new FilterInvocation(request, response, chain);
    invoke(fi);
}

public void invoke(FilterInvocation fi) throws IOException, ServletException {
    if ((fi.getRequest() != null)
            && (fi.getRequest().getAttribute(FILTER_APPLIED) != null)
            && observeOncePerRequest) {
        // filter already applied to this request and user wants us to observe
        // once-per-request handling, so don't re-do security checking
        fi.getChain().doFilter(fi.getRequest(), fi.getResponse());
    }
    else {
        // first time this request being called, so perform security checking
        if (fi.getRequest() != null && observeOncePerRequest) {
            fi.getRequest().setAttribute(FILTER_APPLIED, Boolean.TRUE);
        }

        InterceptorStatusToken token = super.beforeInvocation(fi);

        try {
            fi.getChain().doFilter(fi.getRequest(), fi.getResponse());
        }
        finally {
            super.finallyInvocation(token);
        }

        super.afterInvocation(token, null);
    }
}
在 doFilter 方法中,首先构建了受保护对象 FilterInvocation,然后调用 invoke 方法。
在 invoke 方法中,如果当前过滤器已经执行过了,则继续执行剩下的过滤器,否则就调用父类的 beforeInvocation 方法进行权限校验,校验通过后继续执行剩余的过滤器,然后在 finally 代码块中调用父类的 finallyInvocation 方法,最后调用父类的 afterInvocation 方法。可以看到,前置处理器和后置处理器都是在 invoke 方法中触发的。
AbstractInterceptUrlConfigurer
AbstractInterceptUrlConfigurer 主要负责创建 FilterSecurityInterceptor 对象,AbstractInterceptUrlConfigurer 有两个不同的子类,两个子类创建出来的 FilterSecurityInterceptor 对象略有差异:
-
ExpressionUrlAuthorizationConfigurer
-
UrlAuthorizationConfigurer
通过 ExpressionUrlAuthorizationConfigurer 构建出来的 FilterSecurityInterceptor,使用的投票器是 WebExpressionVoter,使用的权限元数据对象是 ExpressionBasedFilterInvocationSecurityMetadataSource,所以它支持权限表达式。
通过 UrlAuthorizationConfigurer 构建出来的 FilterSecurityInterceptor,使用的投票器是 RoleVoter 和 AuthenticatedVoter,使用的权限元数据对象是 DefaultFilterInvocationSecurityMetadataSource,所以它不支持权限表达式。
这是两者最主要的区别。
当我们在 configure(HttpSecurity) 方法中开启权限配置时,一般是通过如下方式:
@Override
protected void configure(HttpSecurity http) throws Exception {
    http.authorizeRequests()
            .antMatchers("/admin/**").hasRole("ADMIN")
            .antMatchers("/user/**").access("hasAnyRole('USER', 'ADMIN')")
            ...
}
http.authorizeRequests()方法实际上就是通过 ExpressionUrlAuthorizationConfigurer 来配置基于 URL 地址的权限管理,所以在配置时可以使用权限表达式。使用 ExpressionUrlAuthorizationConfigurer 进行配置,有一个硬性要求,就是至少配置一对 URL 地址和权限之间的映射关系。如果写成下面这种,就会出错:
@Override
protected void configure(HttpSecurity http) throws Exception {
    http.authorizeRequests()
            .and()
            .formLogin()
            .and()
            .csrf().disable();
}
这个配置中不存在 URL 地址和权限之间的映射关系,所以当项自启动时,会抛出如下异常:
Caused by: java.lang.IllegalstateException: At least one mapping is required
(i.e.authorizeReguestsO.anyReguestO.authenticatedO
如果使用 UrlAuthorizationConfigurer 去配置 FilterSecurityInterceptor,则不存在此要求,即代码中可以一条映射关系都不用配置,只需要 URL 路径和权限之间的映射关系完整即可,这在动态权限配置中非常有用。
不过在 Spring Security 中,使用 UrlAuthorizationConfigurer 去配置 FilterSecurityInterceptor 并不像使用 ExpressionUrlAuthorizationConfigurer 去配置那么容易,没有现成的方法,需要我们手动创建,代码如下:
@Override
protected void configure(HttpSecurity http) throws Exception {
        ApplicationContext applicationContext = http.getSharedObject(ApplicationContext.class);
        http.apply(new UrlAuthorizationConfigurer<>(applicationContext))
            .getRegistry()
            .mvcMatchers("/admin/**").access("ROLE_ADMIN")
            .mvcMatchers("/user/**").access("ROLE USER");
        http
            .formLogin()
            .and()
            .csrf().disable();
}
开发者自己创建一个 UrlAuthorizationConfigurer 对象出来,并调用其 getRegistry() 方法去开启 URL 路径和权限之间映射关系的配置。由于 UrlAuthorizationConfigurer 中使用的投票器是 RoleVoter 和 AuthenticatedVoter,所以这里的角色需要自带 ROLE_ 前缀(因为 RoleVoter 的 supports 方法中会判断角色是否带有 ROLE_ 前缀)。
使用 UrlAuthorizationConfigurer 去配置 FilterSecurityInterceptor 时,需要确保映射关系完整,如果像下面这样,就会出错:
@Override
protected void configure(HttpSecurity http) throws Exception {
        ApplicationContext applicationContext = http.getSharedObject(ApplicationContext.class);
        http.apply(new UrlAuthorizationConfigurer<>(applicationContext))
            .getRegistry()
            .mvcMatchers("/admin/**").access("ROLE_ADMIN")
            .antMatchers("/user/**");
        http
            .formLogin()
            .and()
            .csrf().disable();
}
没有配置 user/** 所需要的权限,此时启动项目就会报出如下错误:
Caused by: java.lang.IllegalstateException: An incomplete mapping was found
for [Ant [pattern='/user/*']]. Try completing it with something like
requestUrls().<something>.hasRole('USER')
另外需要注意的是,无论是 ExpressionUrlAuthorizationConfigurer 还是 UrlAuthorizationConfigurer,对于 FilterSecurityInterceptor 的配置来说都在其父类 AbstractInterceptUrlConfigurer#configure 方法中,该方法中并未配置后置处理器 afterInvocationManager,所以在基于 URL 地址的权限管理中,主要是前置处理器在工作。
这就是 ExpressionUrlAuthorizationConfigurer 和 UrlAuthorizationConfigurer 两个配置类的区别。
动态管理权限规则
在前面的案例中,我个配置的 URL 拦截规则和请求 URL 所需要的权限者都是通过代码来配置的,这样就比较死板,如果想要调整访问某一个 URL 所需要的权限,就需要修改代码。
动态管理权限规则就是我们将 URL 拦截规则和访问 URL 所需要的权限者都保存在数据库中,这样,在不改变源代码的情况下,只需要修改数据库中的数据,就可以对权限进行调整。
数据库设计
简单起见,我们这里就不引入权限表了,直接使用角色表,用户和角色关联,角色和资源关联,设计出来的表结构如图 13-9 所示。
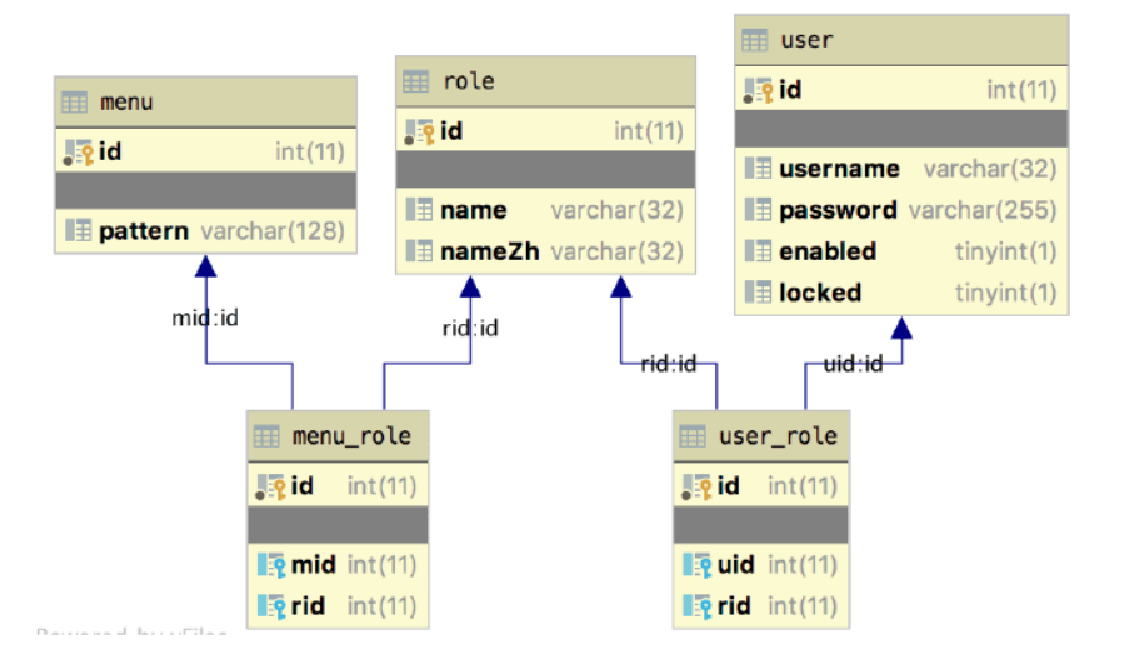
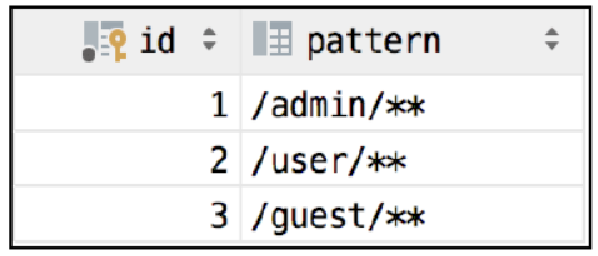
menu 表是相当于我们的资源表,它里边保存了访问规则,如图13-10所示。
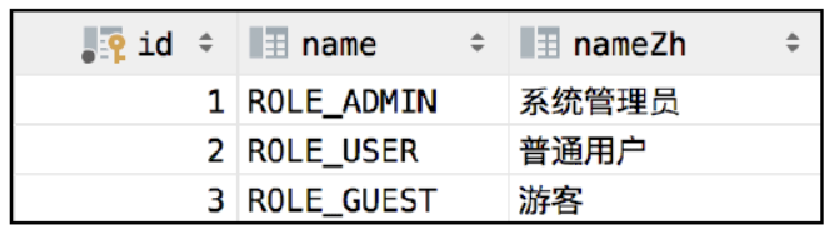
role 是角色表,里边定义了系统中的角色,如图13-11所示
user 是用户表,如图13-12所示。

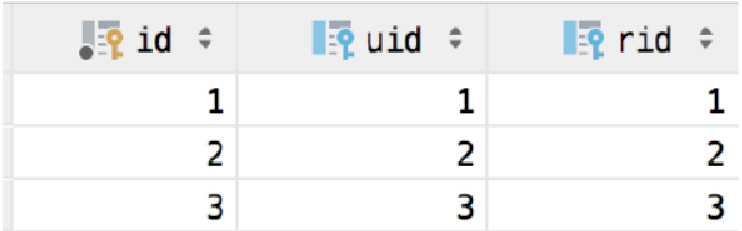
user_role 是用户角色关联表,用户具有哪些角色,可以通过该表体现出来,如图 13-13所示。
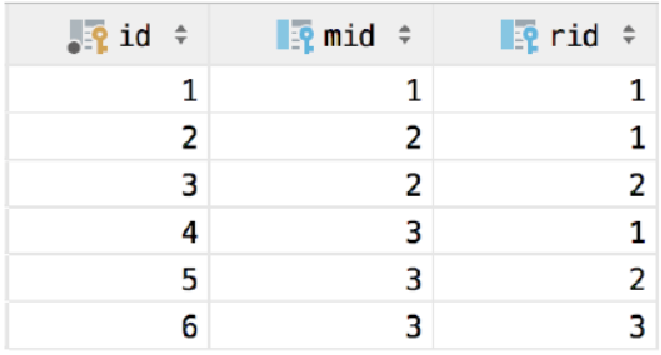
menu_role 是资源角色关联表,访问某一个资源,需要哪些角色,可以通过该表体现出来,如图13-14所示。
至此,一个简易的权限数据库就设计好了(在本书提供的案例中,有 SQL 脚本)。
实战
项目创建
创建 Spring Boot 项目,由于涉及数据库操作,这里选用目前大家使用较多的 MyBatis 框架,所以除了引入 Web、Spring Security 依赖之外,还需要引入 MyBatis 以及 MySQL 依赖。
最终的 pom.xml 文件内容如下:
<dependency>
    <groupId>org.springframework.boot</groupId>
    <artifactId>spring-boot-starter-security</artifactId>
</dependency>
<dependency>
    <groupId>org.springframework.boot</groupId>
    <artifactId>spring-boot-starter-web</artifactId>
</dependency>
<dependency>
    <groupId>org.mybatis.spring.boot</groupId>
    <artifactId>mybatis-spring-boot-starter</artifactId>
    <version>2.1.3</version>
</dependency>
<dependency>
    <groupId>mysql</groupId>
    <artifactId>mysql-connector-java</artifactId>
    <scope>runtime</scope>
</dependency>
项目创建完成后,接下来在 application.properties 中配置数据库连接信息:
spring.datasource.username=root
spring.datasource.password=123
spring.datasource.url=jdbc:mysql:///security13?useUnicode=true&characterEncoding=UTF-8&serverTimezone=Asia/Shanghai
配置完成后,我们的准备工作就算完成了。
创建实体类
根据前面设计的数据库,我们需要创建三个实体类。
首先来创建角色类 Role:
public class Role {

    private Integer id;
    private String name;
    private String nameZh;

    // 省略 getter/setter
}
然后创建菜单类 Menu:
public class Menu {
    private Integer id;
    private String pattern;
    private List<Role> roles;

    // 省略 getter/setter
}
菜单类中包含一个 roles 属性,表示访问该项资源所需要的角色。
最后我们创建 User 类:
public class User implements UserDetails {
    private Integer id;
    private String password;
    private String username;
    private boolean enabled;
    private boolean locked;
    private List<Role> roles;

    @Override
    public Collection<? extends GrantedAuthority> getAuthorities() {
        return roles.stream().map(r -> new SimpleGrantedAuthority(r.getName())).collect(Collectors.toList());
    }

    @Override
    public String getPassword() {
        return password;
    }

    @Override
    public String getUsername() {
        return username;
    }

    @Override
    public boolean isAccountNonExpired() {
        return true;
    }

    @Override
    public boolean isAccountNonLocked() {
        return !locked;
    }

    @Override
    public boolean isCredentialsNonExpired() {
        return true;
    }

    @Override
    public boolean isEnabled() {
        return enabled;
    }

    public void setId(Integer id) {
        this.id = id;
    }

   // 省略其他 getter/setter
}
由于数据库中有 enabled 和 locked 字段,所以 isEnabled() 和 isAccountNonLocked() 两个方法如实返回,其他几个账户状态方法默认返回 true 即可。在 getAuthorities() 方法中,我们对 roles 属性进行遍历,组装出新的集合对象返回即可。
创建 Service
接下来我们创建 UserService 和 MenuService,并提供相应的查询方法。
先来看 UserService:
@Service
public class UserService implements UserDetailsService {
    @Autowired
    UserMapper userMapper;

    @Override
    public UserDetails loadUserByUsername(String username) throws UsernameNotFoundException {
        User user = userMapper.loadUserByUsername(username);
        if (user == null) {
            throw new UsernameNotFoundException("用户不存在");
        }
        user.setRoles(userMapper.getUserRoleByUid(user.getId()));
        return user;
    }
}
这段代码应该不用多说了,不熟悉的读者可以参考本书 2.4 节。
对应的 UserMapper 如下:
@Mapper
public interface UserMapper {
    List<Role> getUserRoleByUid(Integer uid);

    User loadUserByUsername(String username);
}
UserMapper.xml:
<!DOCTYPE mapper
        PUBLIC "-//mybatis.org//DTD Mapper 3.0//EN"
        "http://mybatis.org/dtd/mybatis-3-mapper.dtd">
<mapper namespace="org.javaboy.base_on_url_dy.mapper.UserMapper">

    <select id="loadUserByUsername" resultType="org.javaboy.base_on_url_dy.model.User">
        select * from user where username=#{username};
    </select>

    <select id="getUserRoleByUid" resultType="org.javaboy.base_on_url_dy.model.Role">
        select r.* from role r,user_role ur where ur.uid=#{uid} and ur.rid=r.id
    </select>
</mapper>
再来看 MenuService,该类只需要提供一个方法,就是查询出所有的 Menu 数据,代码如下:
@Service
public class MenuService {
    @Autowired
    MenuMapper menuMapper;
    public List<Menu> getAllMenu() {
        return menuMapper.getAllMenu();
    }
}
MenuMapper:
@Mapper
public interface MenuMapper {
    List<Menu> getAllMenu();
}
MenuMapper.xml:
<!DOCTYPE mapper
        PUBLIC "-//mybatis.org//DTD Mapper 3.0//EN"
        "http://mybatis.org/dtd/mybatis-3-mapper.dtd">
<mapper namespace="org.javaboy.base_on_url_dy.mapper.MenuMapper">

    <resultMap id="MenuResultMap" type="org.javaboy.base_on_url_dy.model.Menu">
        <id property="id" column="id"/>
        <result property="pattern" column="pattern"></result>
        <collection property="roles" ofType="org.javaboy.base_on_url_dy.model.Role">
            <id column="rid" property="id"/>
            <result column="rname" property="name"/>
            <result column="rnameZh" property="nameZh"/>
        </collection>
    </resultMap>

    <select id="getAllMenu" resultMap="MenuResultMap">
        select m.*,r.id as rid,r.name as rname,r.nameZh as rnameZh from menu m left join menu_role mr on m.`id`=mr.`mid` left join role r on r.`id`=mr.`rid`
    </select>

</mapper>
需要注意,由于每一个 Menu 对象都包含了一个 Role 集合,所以这个查询是一对多,这里通过 resultMap 来进行查询结果映射。
至此,所有基础工作都完成了,接下来配置 Spring Security。
配置Spring Security
回顾 13.3.6 小节的内容,SecurityMetadataSource 接口负责提供受保护对象所需要的权限。在本案例中,受保护对象所需要的权限保存在数据库中,所以我们可以通过自定义类继承自 FilterInvocationSecurityMetadataSource,并重写 getAttributes 方法来提供受保护对象所需要的权限,代码如下:
@Component
public class CustomSecurityMetadataSource implements FilterInvocationSecurityMetadataSource {
    @Autowired
    MenuService menuService;
    AntPathMatcher antPathMatcher = new AntPathMatcher();

    @Override
    public Collection<ConfigAttribute> getAttributes(Object object) throws IllegalArgumentException {
        String requestURI = ((FilterInvocation) object).getRequest().getRequestURI();
        List<Menu> allMenu = menuService.getAllMenu();
        for (Menu menu : allMenu) {
            if (antPathMatcher.match(menu.getPattern(), requestURI)) {
                String[] roles = menu.getRoles().stream().map(r -> r.getName()).toArray(String[]::new);
                return SecurityConfig.createList(roles);
            }
        }
        return null;
    }

    @Override
    public Collection<ConfigAttribute> getAllConfigAttributes() {
        return null;
    }

    @Override
    public boolean supports(Class<?> clazz) {
        return FilterInvocation.class.isAssignableFrom(clazz);
    }
}
自定义 CustomSecurityMetadataSource 类并实现 FilterInvocationSecurityMetadataSource 接口,然后重写它里边的三个方法:
-
getAttributes:该方法的参数是受保护对象,在基于 URL 地址的权限控制中,受保护对象就是 FilterInvocation,该方法的返回值则是访问受保护对象所需要的权限。在该方法里边,我们首先从受保护对象 FilterInvocation 中提取出当前请求的 URL 地址,例如 /admin/hello,然后通过 menuService 对象查询出所有的菜单数据(每条数据中都包含访问该条记录所需要的权限),遍历查询出来的采单数据,如果当前请求的 URL 地址和菜单中某一条记录的 pattern 属性匹配上了(例如 /admin/hello 匹配上
/admin/**),那么我们就可以获取当前请求所需要的权限。从 menu 对象中获取 roles 属性,并将其转为一个数组,然后通过 SecurityConfig.createList 方法创建一个 Collection<ConfigAttribute> 对象并返回。如果当前请求的 URL 地址和数据库中 menu 表的所有项都匹配不上,那么最终返回 null。如果返回 null,那么受保护对象到底能不能访问呢?这就要看 AbstractSecurityInterceptor 对象中的 rejectPublicInvocations 属性了,该属性默认为 false, 表示当 getAtributes 方法返回 null 时,允许访问受保护对象(回顾 13.4.4 小节中关于 AbstractSecurityInterceptor#beforeInvocation 的讲解。 -
getAllConfigAttributes:该方法可以用来返回所有的权限属性,以便在项目启动阶段做校验,如果不需要校验,则直接返回 null 即可。
-
supports:该方法表示当前对象支持处理的受保护对象是 FilterInvocation。
CustomSecurityMetadataSource 类配置完成后,接下来我们要用它来代替默认的 SecurityMetadataSource 对象,具体配置如下:
@Configuration
public class SecurityConfig extends WebSecurityConfigurerAdapter {
    @Autowired
    CustomSecurityMetadataSource customSecurityMetadataSource;
    @Autowired
    UserService userService;

    @Override
    protected void configure(AuthenticationManagerBuilder auth) throws Exception {
        auth.userDetailsService(userService);
    }

    @Override
    protected void configure(HttpSecurity http) throws Exception {
        ApplicationContext applicationContext = http.getSharedObject(ApplicationContext.class);
        http.apply(new UrlAuthorizationConfigurer<>(applicationContext))
                .withObjectPostProcessor(new ObjectPostProcessor<FilterSecurityInterceptor>() {
                    @Override
                    public <O extends FilterSecurityInterceptor> O postProcess(O object) {
                        object.setSecurityMetadataSource(customSecurityMetadataSource);
                        object.setRejectPublicInvocations(true);
                        return object;
                    }
                });
        http.formLogin()
                .and()
                .csrf().disable();
    }
}
关于用户的配置无需多说,我们重点来看 configure(HttpSecurity) 方法。
由于访问路径规则和所需要的权限之间的映射关系已经保存在数据库中,所以我们就没有必要在 Java 代码中配置映射关系了,同时这里的权限对比也不会用到权限表达式,所以我们通过 UrlAuthorizationConfigurer 来进行配置。
在配置的过程中,通过 withObjectPostProcessor 方法调用 ObjectPostProcessor 对象后置处理器,在对象后置处理器中,将 FilterSecurityInterceptor 中的 SecurityMetadataSource 对象替换为我们自定义的 customSecurityMetadataSource 对象即可。
测试
接下来创建 HelloController,代码如下:
@RestController
public class HelloController {
    @GetMapping("/admin/hello")
    public String admin() {
        return "hello admin";
    }

    @GetMapping("/user/hello")
    public String user() {
        return "hello user";
    }

    @GetMapping("/guest/hello")
    public String guest() {
        return "hello guest";
    }


    @GetMapping("/hello")
    public String hello() {
        return "hello";
    }
}
最后启动项目进行测试。
首先使用 admin/123 进行登录,该用户具备 ROLE_ADMIN 角色,ROLE_ADMIN 可以访问 /admin/hello、/user/hello 以及 /guest/hello 三个接口。
接下来使用 user/123 进行登录,该用户具备 ROLE_USER 角色,ROLE_USER 可以访问 user/hello 以及 /guest/hello 两个接口。
最后使用 javaboy/123 进行登录,该用户具备 ROLE_GUEST 角色,ROLE_GUEST 可以访问 /guest/hello 接口。
由于 /hello 接口不包含在 URL-权限映射关系中,所以任何用户都可以访问 /hello 接口,包括匿名用户。如果希望所有的 URL 地址都必须在数据库中配置 URL-权限映射关系后才能访问,那么可以通过如下配置实现:
http.apply(new UrlAuthorizationConfigurer<>(applicationContext))
        .withObjectPostProcessor(new ObjectPostProcessor<FilterSecurityInterceptor>() {
            @Override
            public <O extends FilterSecurityInterceptor> O postProcess(O object) {
                object.setSecurityMetadataSource(customSecurityMetadataSource);
                object.setRejectPublicInvocations(true);
                return object;
            }
        });
通过设置 FilterSecurityInterceptor 中的 rejectPublicInvocations 属性为 true,就可以关闭 URL 的公开访问,所有 URL 必须具备对应的权限才能访问。