授权服务器与资源服务器
前面的 GitHub 授权登录主要向大家展示了 OAuth2 中客户端的工作模式。对于大部分的开发者而言,日常接触到的 OAuth2 都是开发客户端,例如接入 QQ 登录、接入微信登录等。不过也有少量场景,可能需要开发者提供授权服务器与资源服务器,接下来我们就通过一个完整的案例向大家演示如何搭建授权服务器与资源服务器。
搭建授权服务器,我们可以选择一些现成的开源项目,直接运行即可,例如:
-
Keycloak:RedHat 公司提供的开源工具,提供了很多实用功能,例如单点登录、支持 OpenID、可视化后台管理等。
-
Apache Oltu:Apache 上的开源项目,最近几年没怎么维护了。
这里随便举出两例,类似的开源项目很多(这也是 Spring Security 官方一开始说不提供授权服务器的原因之一)。企业应用中,建议使用成熟的开源项目搭建授权服务器。
当然我们也可以使用 Spring Security 最新发布的 Spring Authorization Server 来搭建授权服务器。截至本书写作时,spring-authorization-server 发布了 0.0.1 版,但是这个版本功能较少而且问题较多,因此这里依然使用较早的 spring-security-oauth2 来搭建授权服务器,可能有一些类过期了,不过这不影响的大家理解授权服务器的功能。
接下来我们将搭建一个包含授权服务器、资源服务器以及客户端在内的 OAuth2 案例。
项目规划
首先把项目分为三部分:
-
授权服务器:采用较早的 spring-security-oauth2 来搭建授权服务器。
-
资源服务器:采用最新的 Spring Security 5.x 搭建资源服务器。
-
客户端:采用最新的 Spring Security 5.x 搭建客户端。
同时为了避免测试时互相影响,我们需要修改电脑的 hosts 文件,在 hosts 文件中增加如下解析规则:
127.0.0.1  auth.javaboy.org
127.0.0.1  res.javaboy.org
127.0.0.1 client.javaboy.org-
auth.javaboy.org:表示授权服务器域名。
-
res.javaboy.org:表示资源服务器域名。
-
这 client.javaboy.org:表示客户端域名。
为了完整地演示 OAuth2 案例,我们一共需要三个项目,其中:
-
授权服务器端口为 8881。
-
资源服务器端口为 8882。
-
客户端端口为 8883。
项目规划完成。
项目搭建
授权服务器搭建
创建一个名为 auth_server 的 Spring Boot 项目,引入 Web 依赖和 spring-security-oauth2 依赖,代码如下:
<dependency>
    <groupId>org.springframework.boot</groupId>
    <artifactId>spring-boot-starter-web</artifactId>
</dependency>
<dependency>
    <groupId>org.springframework.security.oauth</groupId>
    <artifactId>spring-security-oauth2</artifactId>
    <version>2.5.0.RELEASE</version>
</dependency>
接下来提供一个 Spring Security 的基本配置:
@Configuration
public class SecurityConfig extends WebSecurityConfigurerAdapter {

    @Bean
    PasswordEncoder passwordEncoder() {
        return new BCryptPasswordEncoder();
    }
    @Override
    protected void configure(AuthenticationManagerBuilder auth) throws Exception {
        auth.inMemoryAuthentication()
                .withUser("javaboy")
                .password(passwordEncoder().encode("123"))
                .roles("ADMIN")
                .and()
                .withUser("sang")
                .password(passwordEncoder().encode("123"))
                .roles("USER");
    }

    @Override
    @Bean
    public AuthenticationManager authenticationManagerBean() throws Exception {
        return super.authenticationManagerBean();
    }

    @Override
    protected void configure(HttpSecurity http) throws Exception {
        http.csrf().disable().formLogin();
    }
}
为了方便起见,这里的用户直接创建在内存中,一共两个用户 javaboy/123 和 sang/123,角色分别是 ADMIN 和 USER。这里配置的用户就是我们项目的用户,例如用 GitHub 登录第三方网站,在这个过程中,需要先从 GitHub 获取授权,登录 GitHub 需要用户名/密码信息,这里配置的用户相当于 GitHub 的用户。
另外,由于我们希望让这个授权服务器同时支持授权码模式、简化模式、密码模式以及客户端模式,在支持密码模式时,需要用到 AuthenticationManager 实例,所以在这里暴露出一个 AuthenticationManager 实例。
基本的用户信息配置完成后,接下来我们来配置授权服务器:
//1
@Configuration
public class AccessTokenConfig {
    @Bean
    TokenStore tokenStore() {
        return new InMemoryTokenStore();
    }
}
//2
@EnableAuthorizationServer
@Configuration
public class AuthorizationServer extends AuthorizationServerConfigurerAdapter {
    @Autowired
    TokenStore tokenStore;
    @Autowired
    ClientDetailsService clientDetailsService;
    @Autowired
    AuthenticationManager authenticationManager;

    @Autowired
    PasswordEncoder passwordEncoder;
    // 3
    @Bean
    AuthorizationServerTokenServices tokenServices() {
        DefaultTokenServices services = new DefaultTokenServices();
        services.setClientDetailsService(clientDetailsService);
        services.setSupportRefreshToken(true);
        services.setTokenStore(tokenStore);
        services.setAccessTokenValiditySeconds(60 * 60 * 2);
        services.setRefreshTokenValiditySeconds(60 * 60 * 24 * 3);
        return services;
    }
    // 4
    @Override
    public void configure(AuthorizationServerSecurityConfigurer security) throws Exception {
        security.checkTokenAccess("permitAll()")
                .allowFormAuthenticationForClients();
    }
    // 5
    @Override
    public void configure(ClientDetailsServiceConfigurer clients) throws Exception {
        clients.inMemory()
                .withClient("my_client")
                .secret(passwordEncoder.encode("123"))
                .authorizedGrantTypes("authorization_code","refresh_token","implicit","password","client_credentials")
                .scopes("read:user","read:msg")
                .autoApprove(true)
                .redirectUris("http://client.javaboy.org:8883/login/oauth2/code/javaboy");
    }
    // 6
    @Override
    public void configure(AuthorizationServerEndpointsConfigurer endpoints) throws Exception {
        endpoints
                .authenticationManager(authenticationManager)
                .authorizationCodeServices(authorizationCodeServices())
                .tokenServices(tokenServices());
    }
    @Bean
    AuthorizationCodeServices authorizationCodeServices() {
        return new InMemoryAuthorizationCodeServices();
    }
}
这段配置比较长,我们来逐个解释一下:
-
注释 1 中配置了一个 TokenStore 的实例,这是配置生成的 Access Token 要保存到哪里,可以存在内存中,也可以存在 Redis 中,如果用到了 JWT,就不需要保存了。这里我们配置的实例是 InMemoryTokenStore,即生成的令牌存在内存中。
-
注释 2 创建了一个 AuthorizationServer 类继承自 AuthorizationServerConfigurerAdapter,用来对授权服务器做进一步的详细配置,配置类上通过 @EnableAuthorizationServer 注解开启授权服务器的自动化配置。在该配置类中,主要重写三个 configure 方法。
-
注释 3 配置向 Spring 容器中注册了一个 AuthorizationServerTokenServices 实例,该实例主要配置了生成的 Access Token 的一些基本信息:例如 Access Token 是否支持刷新、Access Token 的存储位置、Access Token 的有效期以及 Refresh Token 的有效期等。
-
注释 4 配置了令牌端点的安全约束,这里设置了 checkTokenAccess 端点可以自由访问。该端点的作用是当资源服务器收到 Access Token 之后,需要去授权服务器校验 Access Token 的合法性,就会访问这个端点。
-
注释 5 配置客户端的详细信息,需要提前在这里配置好客户端信息,这就类似于 GitHub 第三方登录时,我们需要提前在 GitHub 上注册我们的应用信息。客户端的信息可以存在数据库中,也可以存在内存中,这里保存在内存中,分别配置了客户端的 id、secret、授权类型、授权范围以及重定向 uri。OAuth2 四种授权类型不包含 refresh_token 这种类型,但是在 Spring Security 实现中,refresh_token 也被算作一种。
-
注释 6 配置授权码服务和令牌服务。authorizationCodeServices 用来配置授权码(code)的存储,tokenServices 用来配置令牌的存储。
最后将该项目的端口修改为 8881。至此,我们的授权服务器就算搭建成功了。
资源服务器搭建
在资源服务器塔建之前,我需要了解 Access Token 令牌,它可以分为两种
-
透明令牌,如 JWT。
-
不透明令牌。
透明令牌是指令牌本身就携带了用户信息,不透明则是指令牌本身是一入无意义的字符串。如果是透明令牌,如 JWT,那么资源服务器在收到令牌之后,可以自行解析并校验;如果是不透明令牌,那么资源服务器在收到令牌之后,就只能调用授权服务器的端口去校验令牌是否合法。由于前面搭建的授权服务器使用的是不透明令牌,所以这里资源服务器中对令牌的处理也按不透明令牌来处理。
接下来开始搭建资源服务器,我们采用目前最新的方案来搭建。
首先创建一个名为 res_server 的项目,添加 Web、Spring Security 以及 oAuth2 Resource 依赖,最终的 pom.xml 文件内容如下:
<dependency>
    <groupId>org.springframework.boot</groupId>
    <artifactId>spring-boot-starter-oauth2-resource-server</artifactId>
</dependency>
<dependency>
    <groupId>org.springframework.boot</groupId>
    <artifactId>spring-boot-starter-security</artifactId>
</dependency>
<dependency>
    <groupId>org.springframework.boot</groupId>
    <artifactId>spring-boot-starter-web</artifactId>
</dependency>

<dependency>
    <groupId>com.nimbusds</groupId>
    <artifactId>oauth2-oidc-sdk</artifactId>
    <version>6.23</version>
</dependency>
项目创建成功后,在 application.yml 文件中配置令牌解析路径以及客户端 id 和 secret:
spring:
  security:
    oauth2:
      resourceserver:
        opaque:
          introspection-uri: http://auth.javaboy.org:8881/oauth/check_token
          introspection-client-id: my_client
          introspection-client-secret: 123
server:
  port: 8882
introspection-uri 属性配置的就是令牌校验地址,客户端从授权服务器上申请到令牌之后,拿着令牌来资源服务器读取数据,资源服务器收到令牌后,调用该地址去校验令牌是否合法。
接下来配置资源服务器:
@Configuration
public class OAuth2ResourceServerSecurityConfiguration extends WebSecurityConfigurerAdapter {

    @Value("${spring.security.oauth2.resourceserver.opaque.introspection-uri}")
    String introspectionUri;
    @Value("${spring.security.oauth2.resourceserver.opaque.introspection-client-id}")
    String clientId;
    @Value("${spring.security.oauth2.resourceserver.opaque.introspection-client-secret}")
    String clientSecret;

    @Override
    protected void configure(HttpSecurity http) throws Exception {
        http.authorizeRequests()
                .anyRequest().authenticated()
                .and()
                .oauth2ResourceServer()
                .opaqueToken().introspectionUri(introspectionUri)
                .introspectionClientCredentials(clientId, clientSecret);
    }
}
将 application.yml 中配置的三个属性注入进来,然后在 configure(HttpSecurity) 方法中开启不透明令牌的配置,传入三个相关的参数即可。
最后再定义一个测试接口,代码如下:
@RestController
public class HelloController {
    @GetMapping("/hello")
    public String hello() {
        return "hello res server";
    }
}
至此,我们的资源服务器就算配置成功了。
客户端应用搭建
客户端应用搭建和我们前面 GitHub 授权登录比较像。
创建一个名为 client01 的 Spring Boot 项目,引入 Web、Spring Security、Thymeleaf 以及 OAuth2 Client 依赖,在之前旧的 OAuth2 Client 中,负责发送网络请求的是 OAuth2RestTemplate,但是在目前的最新方案中,OAuth2RestTemplate 被 WebClient 所替代,所以我们还需要在项目中引入 WebFlux,最终的 pom.xml 文件内容如下:
<dependency>
    <groupId>org.springframework.boot</groupId>
    <artifactId>spring-boot-starter-oauth2-client</artifactId>
</dependency>
<dependency>
    <groupId>org.springframework.boot</groupId>
    <artifactId>spring-boot-starter-security</artifactId>
</dependency>
<dependency>
    <groupId>org.springframework.boot</groupId>
    <artifactId>spring-boot-starter-web</artifactId>
</dependency>
<dependency>
    <groupId>org.springframework</groupId>
    <artifactId>spring-webflux</artifactId>
</dependency>
<dependency>
    <groupId>io.projectreactor.netty</groupId>
    <artifactId>reactor-netty</artifactId>
</dependency>
<dependency>
    <groupId>org.springframework.boot</groupId>
    <artifactId>spring-boot-starter-thymeleaf</artifactId>
</dependency>
<dependency>
    <groupId>org.thymeleaf.extras</groupId>
    <artifactId>thymeleaf-extras-springsecurity5</artifactId>
</dependency>
由于我们要在这项目中同时演示授权码模式、客户端模式以及密码模式,所以接下来在 application.yml 中对三种授权模式所需要的参数分别进行配置:
server:
  port: 8883
spring:
  security:
    oauth2:
      client:
        registration:
          auth-code:
            provider: javaboy
            client-id: my_client
            client-secret: 123
            authorization-grant-type: authorization_code
            redirect-uri: http://client.javaboy.org:8883/login/oauth2/code/javaboy
            scope: read:msg
          client-creds:
            provider: javaboy
            client-id: my_client
            client-secret: 123
            authorization-grant-type: client_credentials
            scope: read:msg
          password:
            provider: javaboy
            client-id: my_client
            client-secret: 123
            authorization-grant-type: password
            scope: read:msg
        provider:
          javaboy:
            authorization-uri: http://auth.javaboy.org:8881/oauth/authorize
            token-uri: http://auth.javaboy.org:8881/oauth/token
这里提供了三个客户端,名字分别是 auth-code(授权码模式)、client-creds(客户端模式)以及 password(密码模式),三个客户端中指定了各自的参数,大家可以对照 15.2 节去理解这些参数,这里不再赞述。
另外还提供了一个名为 javaboy 的 provider,并配置了授权服务器的认证地址以及令牌获取地址。
接来我需要提供一个 webClient 实例,利用 webClient 可以方便地发起认证请求,这也是最新的 OAuth2 Client 推荐的方式。如果不用 WebClient,那在发起请求时需要开发者自己去拼接各种参数,比较麻烦。
@Configuration
public class WebClientConfig {
    @Bean
    WebClient webClient(OAuth2AuthorizedClientManager authorizedClientManager) {
        ServletOAuth2AuthorizedClientExchangeFilterFunction oauth2Client =
                new ServletOAuth2AuthorizedClientExchangeFilterFunction(authorizedClientManager);
        return WebClient.builder()
                .apply(oauth2Client.oauth2Configuration())
                .build();
    }
    @Bean
    OAuth2AuthorizedClientManager authorizedClientManager(ClientRegistrationRepository clientRegistrationRepository,
                                                          OAuth2AuthorizedClientRepository authorizedClientRepository) {
        OAuth2AuthorizedClientProvider authorizedClientProvider =
                OAuth2AuthorizedClientProviderBuilder.builder()
                        .authorizationCode()
                        .refreshToken()
                        .clientCredentials()
                        .password()
                        .build();
        DefaultOAuth2AuthorizedClientManager authorizedClientManager = new DefaultOAuth2AuthorizedClientManager(
                clientRegistrationRepository, authorizedClientRepository);
        authorizedClientManager.setAuthorizedClientProvider(authorizedClientProvider);
        authorizedClientManager.setContextAttributesMapper(contextAttributesMapper());
        return authorizedClientManager;
    }
    private Function<OAuth2AuthorizeRequest, Map<String, Object>> contextAttributesMapper() {
        return authorizeRequest -> {
            Map<String, Object> contextAttributes = Collections.emptyMap();
            HttpServletRequest servletRequest = authorizeRequest.getAttribute(HttpServletRequest.class.getName());
            String username = servletRequest.getParameter(OAuth2ParameterNames.USERNAME);
            String password = servletRequest.getParameter(OAuth2ParameterNames.PASSWORD);
            if (StringUtils.hasText(username) && StringUtils.hasText(password)) {
                contextAttributes = new HashMap<>();

                // `PasswordOAuth2AuthorizedClientProvider` requires both attributes
                contextAttributes.put(OAuth2AuthorizationContext.USERNAME_ATTRIBUTE_NAME, username);
                contextAttributes.put(OAuth2AuthorizationContext.PASSWORD_ATTRIBUTE_NAME, password);
            }
            return contextAttributes;
        };
    }
}
这里主要提供了两个 Bean:WebClient 和 OAuth2AuthorizedClientManager。前者用来发起网络请求,在 WebClient 配置时,需要用到 OAuth2AuthorizedClientManager 实例。
OAuth2AuthorizedClientManager 主要用来管理授权的客户端,它的职责是通过 OAuth2AuthorizedClientProvider 对不同的客户端进行授权。不同的授权模式会对应不同的 OAuth2AuthorizedClientProvider 实例,例如:
-
授权码模式对应 AuthorizationCodeOAuth2AuthorizedClientProvider。
-
密码模式对应 PasswordOAuth2AuthorizedClientProvider。
-
客户端模式对应 ClientCredentialsOAuth2AuthorizedClientProvider。
-
刷新今牌对象 RefreshTokenOAuth2AuthorizedClientProvider。
通过 OAuth2AuthorizedClientProviderBuilder 来构建所需要的 OAuth2AuthorizedClientProvider 实例,并添加到 OAuth2AuthorizedClientManager 对象中。
另外,由于密码模式还需要用到用户输入的用户名/密码,所以这里通过 contextAttributesMapper 将请求中的用户名/密码提取出来存入 contextAttributes 中。
接下来提供 SecurityConfig,代码如下:
@Configuration
public class SecurityConfig extends WebSecurityConfigurerAdapter {
@Override
protected void configure(HttpSecurity http) throws Exception {
http
.authorizeRequests()
.anyRequest().authenticated()
.and()
.formLogin()
.loginPage("/login.html")
.defaultSuccessUrl("/index")
.permitAll()
.and()
.csrf().disable()
.oauth2Client();
}
@Bean
public UserDetailsService users() {
return new InMemoryUserDetailsManager(User
.withUsername("javaboy").password("{noop}123").roles("USER").build());
}
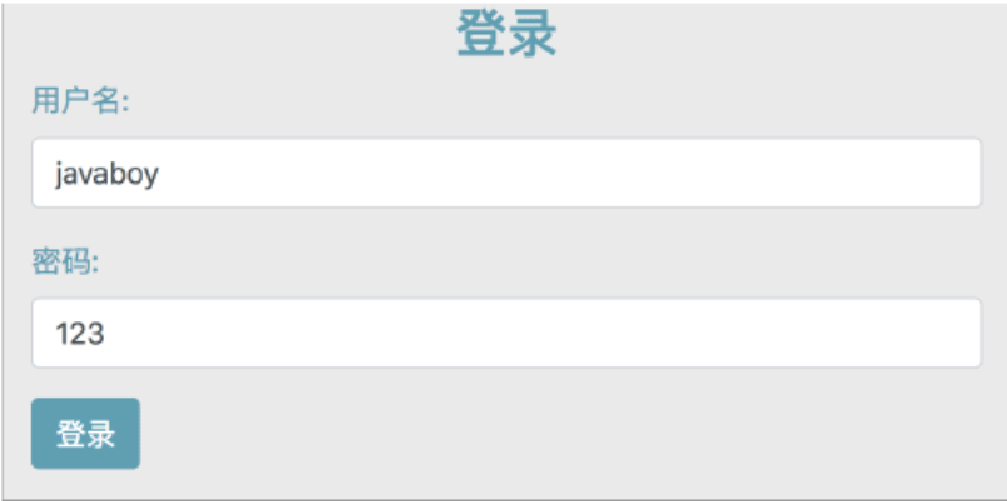
}这段配置大家应该都很熟悉了,这里不再资述。登录页面比较简单,这里给出登录表单, 代码如下:
<form id="login-form" class="form" action="/login.html" method="post">
    <h3 class="text-center text-info">登录</h3>
    <div class="form-group">
        <label for="username" class="text-info">用户名:</label><br>
        <input type="text" name="username" id="username" value="javaboy" class="form-control">
    </div>
    <div class="form-group">
        <label for="password" class="text-info">密码:</label><br>
        <input type="text" name="password" id="password" value="123" class="form-control">
    </div>
    <div class="form-group">
        <input type="submit" name="submit" class="btn btn-info btn-md" value="登录">
    </div>
</form>
登录成功后跳转到 index 页面,该页面是由 Thymeleaf 染的,代码如下:
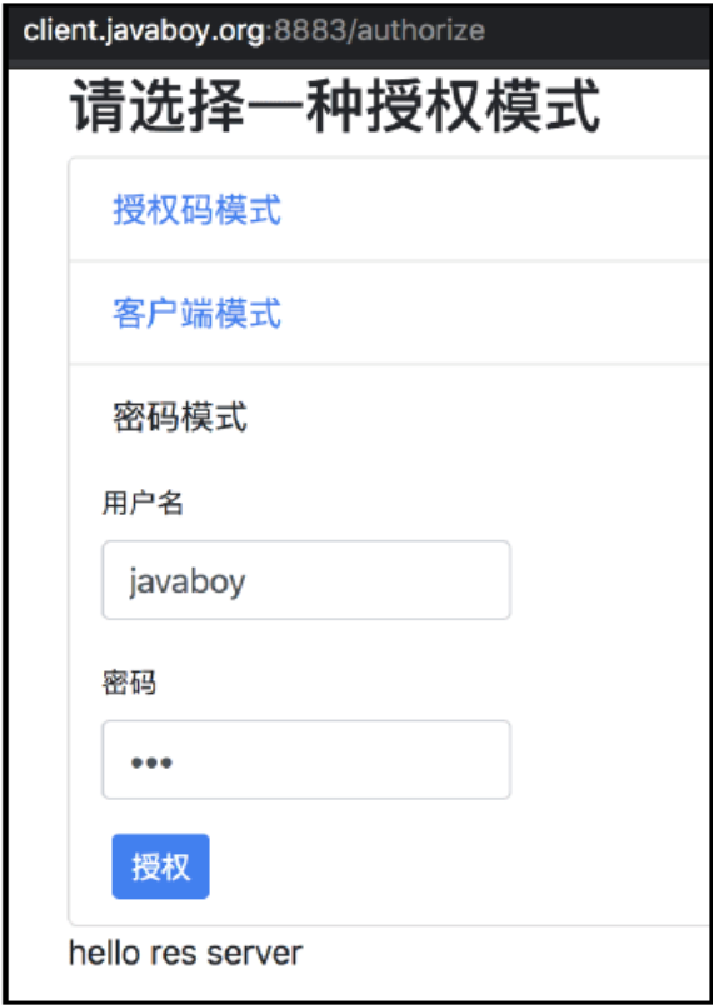
<div class="panel panel-default">
    <div class="panel-heading">
        <h3 class="panel-title">请选择一种授权模式</h3>
    </div>
    <ul class="list-group">
        <li class="list-group-item">
            <a th:href="@{/authorize?grant_type=authorization_code}"><span style="font-size:medium">授权码模式</span></a>
        </li>
        <li class="list-group-item">
            <a th:href="@{/authorize?grant_type=client_credentials}"><span style="font-size:medium">客户端模式</span></a>
        </li>
        <li class="list-group-item">
            <div>
                <p style="font-size:medium">密码模式</p>
                <form th:action="@{/authorize}" method="post">
                    <div class="form-row">
                        <div class="form-group">
                            <label for="username" style="font-size:small">用户名</label>
                            <input type="text" id="username" name="username" value="javaboy" class="form-control input-sm">
                        </div>
                    </div>
                    <div class="form-row">
                        <div class="form-group">
                            <label for="password" style="font-size:small">密码</label>
                            <input type="password" id="password" name="password" value="123" class="form-control input-sm">
                        </div>
                    </div>
                    <input type="hidden" id="grant_type" name="grant_type" value="password">
                    <button type="submit" class="btn btn-primary btn-sm">授权</button>
                </form>
            </div>
        </li>
    </ul>
    <div th:if="${msg}" class="panel-footer">
        <div th:text="${msg}"></div>
    </div>
</div>-
注释 1,这是一个授权码模式的超链接,单击该超链接会触发授权码模式进行校验。
-
注释 2,这是一个客户端模式的超链接,单击该超链接会触发客户端模式进行校验。
-
注释 3,这是密码模式,这种模式需要用到用户名/密码,在下方的输入框中输入用户名/密码,然后单击 “授权” 按钮,触发密码模式进行校验。
-
注释 4,在授权成功后,会返回一个 msg,在当前页面渲染出来。
无论是哪种授权模式,都调用了 /authorize 接口,只是参数不同而已,因此我们还需要提供 /authorize 接口,代码如下:
@Controller
public class HelloController {
    @Autowired
    WebClient webClient;
    private String helloUri="http://res.javaboy.org:8882/hello";
    //1
    @GetMapping(value = "/authorize", params = "grant_type=authorization_code")
    public String authorization_code_grant(Model model) {
        String msg = retrieveMessages("auth-code");
        model.addAttribute("msg", msg);
        return "index";
    }
    //2
    @GetMapping(value = "/authorize", params = "grant_type=client_credentials")
    public String client_credentials_grant(Model model) {
        String msg = retrieveMessages("client-creds");
        model.addAttribute("msg", msg);
        return "index";
    }
    //3
    @PostMapping(value = "/authorize", params = "grant_type=password")
    public String password_grant(Model model) {
        String msg = retrieveMessages("password");
        model.addAttribute("msg", msg);
        return "index";
    }
    //4
    private String retrieveMessages(String clientRegistrationId) {
        return webClient
                .get()
                .uri(helloUri)
                .attributes(clientRegistrationId(clientRegistrationId))
                .retrieve()
                .bodyToMono(String.class)
                .block();
    }
    //5
    @GetMapping("/")
    public String root() {
        return "redirect:/index";
    }

    @GetMapping("/index")
    public String index() {
        return "index";
    }

}-
注释 1,处理授权码模式的接口,调用 retrieveMessages 方法去请求 helloUri 地址,将获取结果存入 Model 中。
-
注释 2 与注释 3,功能类似,不再赘述。
-
注释 4,通过 WebClient 发起请求。
-
注释 5,两个页面映射。
最后将项目端口改为 8883。
至此我们的整个工程就塔建完成了。
测试
首先在浏览器中访问 http://client.javaboy.org:8883/index 地址,由于用户未登录,所以会重定向到 http://client.javaboy.org:8883/login.html 页面进行登录,如图 15-12 所示。
用户在该页面上完成登录,注意这个时候是登录客户端而不是授权服务器,客户端登录成功后,就可以看到项目首页了,如图 15-13 所示。
在客户端首页,用户可以选择任何一种授权模式。例如单击授权码模式,此时就会访问到客户端的 /authorize 接口,然后 WebClient 向 http://res.javaboy.org:8882/hello 接口发起请求,但是由于当前客户端还没有在授权服务器上进行认证,所以又会跳转到授权服务器的登录页面,如图 15-14 所示。
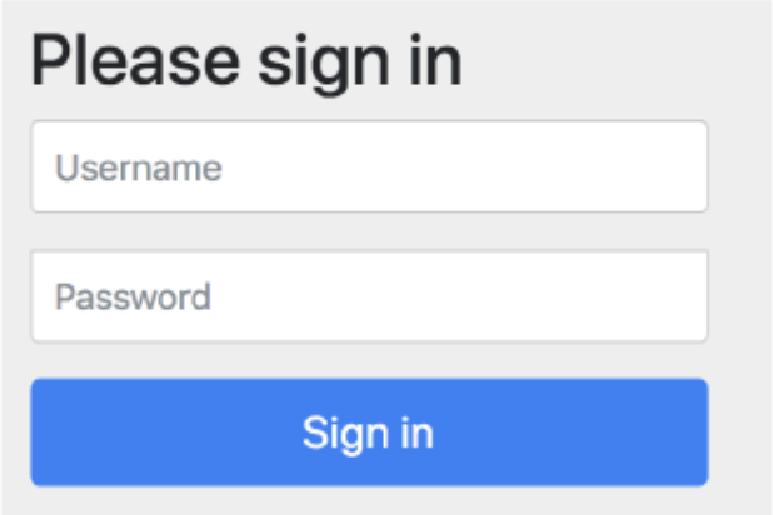
在该页面输入用户名/密码进行登录(注意此时是登录授权服务器),登录成功后,就会看到一个授权页面,如图 15-15 所示。
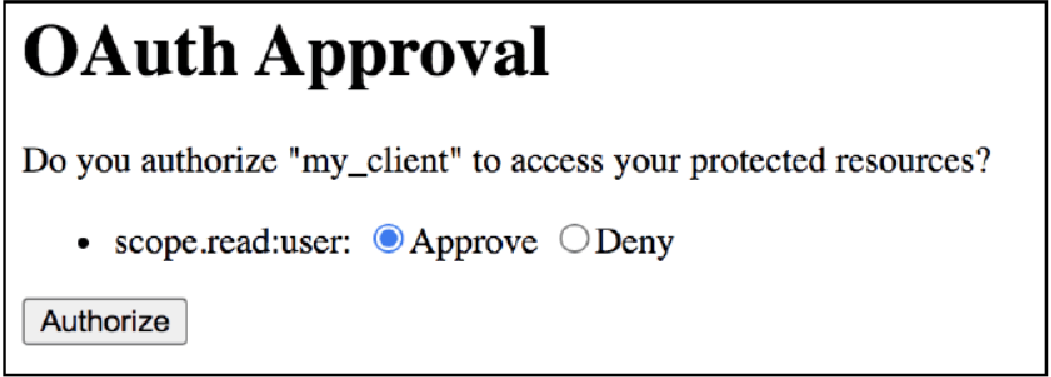
选择 Approve 然后单击下方的 “授权” 按钮,表示批准本次授权。这里也可以自动批准,在授权服务器中配置客户端信息时,通过调用 .autoApprove(true) 方法可以设置自动批准,这样在登录完成后就不会看到该页面了。
至此,整个授权过程完成,再次来到 http://client.javaboy.org:8883/authorize 地址,此时页面底部就可以看到接口数据了,如图15-16所示。
客户端模式和密码模式测试方式类似,这里不再赘述。
原理分析
先来看资源服务器。
当我们在资源服务器中配置了 .oauth2ResourceServer().opaqueToken() 之后,实际上向 Spring Security 过滤器链中添加了一个 BearerTokenAuthenticationFilter 过滤器,在该过滤器中将完成令牌的解析与校验,我们来看一下它的 doFilterInternal 方法:
protected void doFilterInternal(HttpServletRequest request, HttpServletResponse response, FilterChain filterChain)
        throws ServletException, IOException {

    final boolean debug = this.logger.isDebugEnabled();

    String token;

    try {
        //1
        token = this.bearerTokenResolver.resolve(request);
    } catch ( OAuth2AuthenticationException invalid ) {
        this.authenticationEntryPoint.commence(request, response, invalid);
        return;
    }
    //2
    if (token == null) {
        filterChain.doFilter(request, response);
        return;
    }
    //3
    BearerTokenAuthenticationToken authenticationRequest = new BearerTokenAuthenticationToken(token);

    authenticationRequest.setDetails(this.authenticationDetailsSource.buildDetails(request));

    try {
        AuthenticationManager authenticationManager = this.authenticationManagerResolver.resolve(request);
        Authentication authenticationResult = authenticationManager.authenticate(authenticationRequest);
        //4
        SecurityContext context = SecurityContextHolder.createEmptyContext();
        context.setAuthentication(authenticationResult);
        SecurityContextHolder.setContext(context);

        filterChain.doFilter(request, response);
    } catch (AuthenticationException failed) {
        SecurityContextHolder.clearContext();

        this.authenticationFailureHandler.onAuthenticationFailure(request, response, failed);
    }
}-
注释 1,从当前请求中解析出 Access Token,Access Token 默认放在请求头中,从请求头中取出 Authorization 字段即可。
-
注释 2,如果第一步获取到的令牌为空,就说明用户没有传递 Access Token,此时继续执行后面的过滤器,当前请求将在最后的 FilterSecurityInterceptor 中被检查出权限不足而抛出异常。
-
注释 3,构造一个 BearerTokenAuthenticationToken 对象并传入Access Token 令牌,然后调用 authenticate 方法完成令牌校验。最终承担校验任务的是 OpaqueTokenAuthenticationProvider#authenticate 方法,在该方法中会调用授权服务器的 /oauth/check_token 接口,令牌校验成功后,该接口会返回该令牌对应的用户信息。
-
注释 4,将获取到的 authenticationResult 对象存入 SecurityContext 中,完成登录。
这就是资源服务器的大致工作流程,还是比较简单的。
从这个流程中大家也可以看到,客户端每次从资源服务器中请求数据时,资源服务器都会调用授权服务器的接口去校验令牌的合法性,这无形中增大了授权服务器的压力,后面我们将通过 JWT 来解决这一问题。
客端的工作原理就要简单很多了。
客户端的请求是由 WebClient 发起的,底层真正发起 HTTP 请求的依然是 RestTemplate。这里涉及的核心类就是 DefaultOAuth2AuthorizedClientManager 和 OAuth2AuthorizedClientProvider,这两者的关系类似于我们之前讲的 ProviderManager 和 AuthenticationProvider 的关系。
DefaultOAuth2AuthorizedClientManager 类的核心方法是 authorize,由 WebClient 发起的请求会在这里被拦截下来,我们来看一下该方法:
public OAuth2AuthorizedClient authorize(OAuth2AuthorizeRequest authorizeRequest) {
    //1
    String clientRegistrationId = authorizeRequest.getClientRegistrationId();
    OAuth2AuthorizedClient authorizedClient = authorizeRequest.getAuthorizedClient();
    Authentication principal = authorizeRequest.getPrincipal();

    HttpServletRequest servletRequest = getHttpServletRequestOrDefault(authorizeRequest.getAttributes());
    HttpServletResponse servletResponse = getHttpServletResponseOrDefault(authorizeRequest.getAttributes());
    //2
    OAuth2AuthorizationContext.Builder contextBuilder;
    if (authorizedClient != null) {
        contextBuilder = OAuth2AuthorizationContext.withAuthorizedClient(authorizedClient);
    } else {
        authorizedClient = this.authorizedClientRepository.loadAuthorizedClient(
                clientRegistrationId, principal, servletRequest);
        if (authorizedClient != null) {
            contextBuilder = OAuth2AuthorizationContext.withAuthorizedClient(authorizedClient);
        } else {
            ClientRegistration clientRegistration = this.clientRegistrationRepository.findByRegistrationId(clientRegistrationId);
            Assert.notNull(clientRegistration, "Could not find ClientRegistration with id '" + clientRegistrationId + "'");
            contextBuilder = OAuth2AuthorizationContext.withClientRegistration(clientRegistration);
        }
    }
    OAuth2AuthorizationContext authorizationContext = contextBuilder
            .principal(principal)
            .attributes(attributes -> {
                Map<String, Object> contextAttributes = this.contextAttributesMapper.apply(authorizeRequest);
                if (!CollectionUtils.isEmpty(contextAttributes)) {
                    attributes.putAll(contextAttributes);
                }
            })
            .build();
    //3
    try {
        authorizedClient = this.authorizedClientProvider.authorize(authorizationContext);
    } catch (OAuth2AuthorizationException ex) {
        this.authorizationFailureHandler.onAuthorizationFailure(
                ex, principal, createAttributes(servletRequest, servletResponse));
        throw ex;
    }
    //4
    if (authorizedClient != null) {
        this.authorizationSuccessHandler.onAuthorizationSuccess(
                authorizedClient, principal, createAttributes(servletRequest, servletResponse));
    } else {
        // In the case of re-authorization, the returned `authorizedClient` may be null if re-authorization is not supported.
        // For these cases, return the provided `authorizationContext.authorizedClient`.
        if (authorizationContext.getAuthorizedClient() != null) {
            return authorizationContext.getAuthorizedClient();
        }
    }

    return authorizedClient;
}-
注释 1,authorizeRequest 是一个包含 clientRegistrationId 标志的客户端请求,从中可以提取出 clientRegistrationId、客户端对象、已经登录用户信息以及原始的 HttpServletRequest 与 HttpServletResponse。
-
注释 2,构造 OAuth2AuthorizationContext 对象,用来保存授权请求时所需要的一些必要信息,构造该对象需要用到客户端对象。对于已经认证过的 authorizedClient 可以从 authorizedClientRepository 中直接获取,而没有认证过的 authorizedClient 则只能从 clientRegistrationRepository 中获取客户端信息,然后构造 OAuth2AuthorizationContext 并配置已登录用户对象以及额外附加的用户信息,额列附加的用户信息主要是指密码模式中跟随原始请求一起传来的用户名/密码。
-
注释 3,通过 authorizedClientProvider.authorize 方法进行授权,最终会调用到不同的 OAuth2AuthorizedClientProvider 实例。如果客户端同时支持多种不同的授权模式,则多个 OAuth2AuthorizedClientProvider 实例会被 DelegatingOAuth2AuthorizedClientProvider 对象代理,在代理对象中再去遍历不同的 OAuth2AuthorizedClientProvider 实例,选择合适的 OAuth2AuthorizedClientProvider 实例进行处理,最终调用的请求发送工具依然是 RestTemplate。
-
注释 4,在 OAuth2AuthorizedClientProvider 中认证成功后,会返回认证成功后的 authorizedClient 对象,该对象中就包含了Access Token 和 Refresh Token。如果该客户端已经认证过了,并且 Access Token 还没有过期,则返回的 authorizedClient 为 null,此时,直接从 authorizationContext 取出旧的 authorizedClient 返回即可。
这就是客户端的一个大致工作流程,OAuth2AuthorizedClientProvider 中的实现细节都比较容易,我们就不一一讲解了。
自定义请求
前面的案例中,我们通过 WebClient 来发送认证请求,整个授权过程包括参数的拼接都是由框架帮我们完成的。
有时候,我们可能需要拿到令牌 Access Token,然后自己调用资源服务器的接口来获取数据,这在前后端分离中非常有用。在客户端中获取令牌 Access Token 的方式很简单,我的在 client01 项目的 HelloController 中添加如接口:
@GetMapping("/token")
@ResponseBody
public String token(@RegisteredOAuth2AuthorizedClient OAuth2AuthorizedClient authorizedClient) {
    OAuth2AccessToken accessToken = authorizedClient.getAccessToken();
    return accessToken.getTokenValue();
}
注入 OAuth2AuthorizedClient 对象,然后就可以从该对象中提取出 Access Token 以及,Refresh Token。如果当前客户端只支持一种授权模式,则直接按照上面的写法来;如果当前客户端支持多种授权模式,则需要在 @RegisteredOAuth2AuthorizedClient 注解中指明 registrationId,代码如下:
@GetMapping("/token")
@ResponseBody
public String token(@RegisteredOAuth2AuthorizedClient("auth-code") OAuth2AuthorizedClient authorizedClient) {
    OAuth2AccessToken accessToken = authorizedClient.getAccessToken();
    return accessToken.getTokenValue();
}
有了 Access Token,开发者就可以利用 Access Token 来请求资源服务器的其他接口了。HTTP 请求工具可以利用 Spring 提供的 RestTemplate,也可以使用自已擅长的其他 HTTP 请求工具,如 HttpClient、OkHttp 等,这个过程就比较简单了,这里不再赘述。