测试反应式控制器
在反应式控制器的测试方面,Spring 并没有忽略我们的需求。实际上,Spring 引入了WebTestClient。这是一个新的测试工具类,让Spring WebFlux编写的反应式控制器的测试代码变得非常容易。为了了解如何使用WebTestClient编写测试,我们首先使用它测试12.1.2小节中编写的TacoController中的recentTacos()方法。
测试GET请求
对于recentTacos()方法,我们想断言,如果针对“/api/tacos?recent”路径发送HTTP GET请求,那么会得到JSON载荷的响应并且taco的数量不会超过12个。程序清单12.1中的测试类是一个很好的起点。
package tacos.web.api;
import static org.mockito.ArgumentMatchers.any;
import static org.mockito.Mockito.when;
import java.util.ArrayList;
import java.util.List;
import org.junit.jupiter.api.Test;
import org.mockito.Mockito;
import org.springframework.http.MediaType;
import org.springframework.test.web.reactive.server.WebTestClient;
import reactor.core.publisher.Flux;
import reactor.core.publisher.Mono;
import tacos.Ingredient;
import tacos.Ingredient.Type;
import tacos.Taco;
import tacos.data.TacoRepository;

public class TacoControllerTest {

  @Test
  public void shouldReturnRecentTacos() {
    Taco[] tacos = {
        testTaco(1L), testTaco(2L),
        testTaco(3L), testTaco(4L),    ⇽---  创建测试数据
        testTaco(5L), testTaco(6L),
        testTaco(7L), testTaco(8L),
        testTaco(9L), testTaco(10L),
        testTaco(11L), testTaco(12L),
        testTaco(13L), testTaco(14L),
        testTaco(15L), testTaco(16L)};
    Flux<Taco> tacoFlux = Flux.just(tacos);

    TacoRepository tacoRepo = Mockito.mock(TacoRepository.class);
    when(tacoRepo.findAll()).thenReturn(tacoFlux);    ⇽---  模拟TacoRepository

    WebTestClient testClient = WebTestClient.bindToController(
        new TacoController(tacoRepo))
        .build();    ⇽---  创建WebTestClient

    testClient.get().uri("/api/tacos?recent")
      .exchange()    ⇽---  请求最近的tacos
      .expectStatus().isOk()    ⇽---  验证响应是否符合预期
      .expectBody()
        .jsonPath("$").isArray()
        .jsonPath("$").isNotEmpty()
        .jsonPath("$[0].id").isEqualTo(tacos[0].getId().toString())
        .jsonPath("$[0].name").isEqualTo("Taco 1")
        .jsonPath("$[1].id").isEqualTo(tacos[1].getId().toString())
        .jsonPath("$[1].name").isEqualTo("Taco 2")
        .jsonPath("$[11].id").isEqualTo(tacos[11].getId().toString())
        .jsonPath("$[11].name").isEqualTo("Taco 12")
        .jsonPath("$[12]").doesNotExist();
  }

  ...

}
shouldReturnRecentTacos()方法做的第一件事情就是以Flux<Taco>的形式创建了一些测试数据。这个Flux随后作为mock TacoRepository的findAll()方法的返回值。
Flux发布的Taco对象是由一个名为testTaco()的方法创建的。这个方法会根据一个数字生成一个Taco,其ID和名称都是基于该数字生成的。testTaco()方法的实现如下所示:
private Taco testTaco(Long number) {
  Taco taco = new Taco();
  taco.setId(number != null ? number.toString(): "TESTID");
  taco.setName("Taco " + number);
  List<Ingredient> ingredients = new ArrayList<>();
  ingredients.add(
      new Ingredient("INGA", "Ingredient A", Type.WRAP));
  ingredients.add(
      new Ingredient("INGB", "Ingredient B", Type.PROTEIN));
  taco.setIngredients(ingredients);
  return taco;
}
为简单起见,所有的测试taco都有两种相同的配料,但是它们的ID和名称是根据传入的数字确定的。
回到shouldReturnRecentTacos()方法,我们实例化了一个TacoController并将mock的TacoRepository注入构造器。这个控制器传递给了WebTestClient.bindToController()方法,以便生成WebTestClient实例。
所有的环境搭建工作完成后,就可以使用WebTestClient提交GET请求至“/api/tacos?recent”,并校验响应是否符合我们的预期。对get().uri("/api/tacos?recent")的调用描述了我们想要发送的请求。随后,对exchange()的调用会真正提交请求,这个请求将会由WebTestClient绑定的控制器(TacoController)来进行处理。
最后,我们可以验证响应是否符合预期。通过调用expectStatus(),我们可以断言响应具有HTTP 200 (OK)状态码。然后,我们多次调用jsonPath()断言响应体中的JSON包含它应该具有的值。最后一个断言检查第12个元素(在从0开始计数的数组中)是否真的不存在,以此判断结果不超过12个元素。
如果返回的JSON比较复杂,比如有大量的数据或多层嵌套的数据,那么使用jsonPath()会变得非常烦琐。实际上,为了节省空间,在程序清单12.1中,我省略了很多对jsonPath()的调用。在这种情况下,使用jsonPath()会变得非常枯燥烦琐,WebTestClient提供了json()方法。这个方法可以传入一个String参数(包含响应要对比的JSON)。
举例来说,假设我们在名为recent-tacos.json的文件中创建了完整的响应JSON并将它放到了类路径的“/tacos”路径下,那么可以按照如下的方式重写WebTestClient断言:
ClassPathResource recentsResource =
    new ClassPathResource("/tacos/recent-tacos.json");
String recentsJson = StreamUtils.copyToString(
    recentsResource.getInputStream(), Charset.defaultCharset());

testClient.get().uri("/api/tacos?recent")
  .accept(MediaType.APPLICATION_JSON)
  .exchange()
  .expectStatus().isOk()
  .expectBody()
    .json(recentsJson);
因为json()接受的是一个String,所以我们必须先将类路径资源加载为String。借助Spring中StreamUtils的copyToString()方法,这一点很容易实现。copyToString()方法返回的String就是我们的请求所预期响应的JSON内容。我们将其传递给json()方法,就能验证控制器的输出。
WebTestClient提供的另一种可选方案就是它允许将响应体与值的列表进行对比。expectBodyList()方法会接受一个代表列表中元素类型的Class或ParameterizedType Reference,并且会返回ListBodySpec对象,来基于该对象进行断言。借助expectBody List(),我们可以重写测试类,使用创建mock TacoRepository时的测试数据的子集来进行验证:
testClient.get().uri("/api/tacos?recent")
  .accept(MediaType.APPLICATION_JSON)
  .exchange()
  .expectStatus().isOk()
  .expectBodyList(Taco.class)
    .contains(Arrays.copyOf(tacos, 12));
在这里,我们断言响应体包含测试方法开头创建的原始Taco数组的前12个元素。
测试POST请求
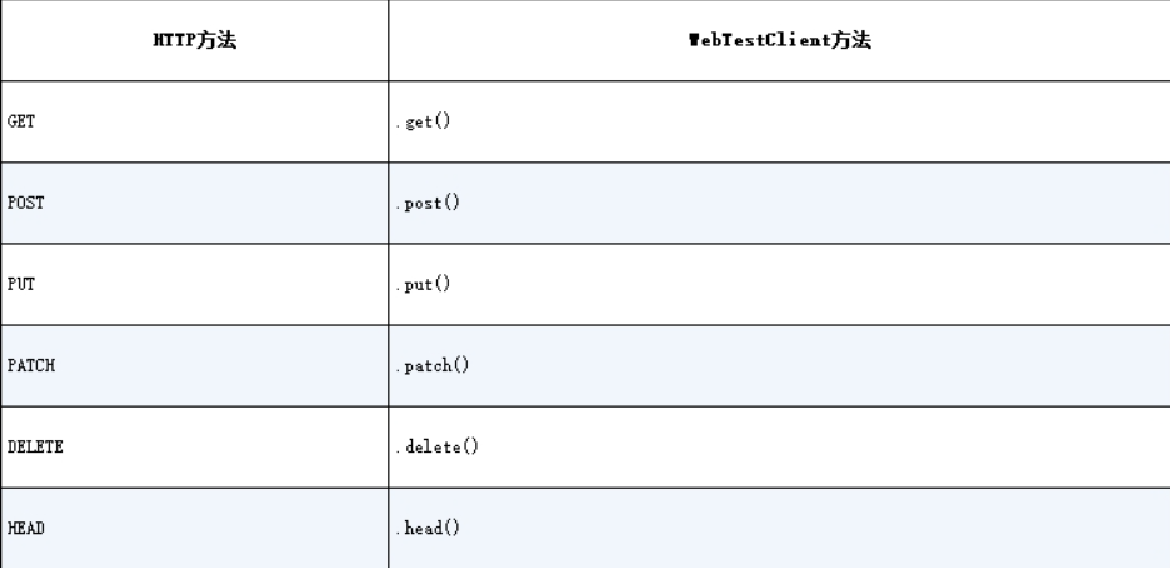
WebTestClient不仅能对控制器发送GET请求,还能用来测试各种HTTP方法,包括GET、POST、PUT、PATCH、DELETE和HEAD方法。表12.1表明了HTTP方法与WebTestClient方法的映射关系。
作为测试Spring WebFlux控制器其他HTTP请求方法的样例,我们看一下针对TacoController的另一个测试。这一次,我们会编写一个对taco创建API的测试,提交POST请求到“/api/tacos”:
@SuppressWarnings("unchecked")
@Test
public void shouldSaveATaco() {
  TacoRepository tacoRepo = Mockito.mock(
              TacoRepository.class);    ⇽---  模拟TacoRepository

  WebTestClient testClient = WebTestClient.bindToController(    ⇽---  创建WebTestClient
      new TacoController(tacoRepo)).build();
  Mono<Taco> unsavedTacoMono = Mono.just(testTaco(1L));
  Taco savedTaco = testTaco(1L);
  Flux<Taco> savedTacoMono = Flux.just(savedTaco);

  when(tacoRepo.saveAll(any(Mono.class))).thenReturn(savedTacoMono);    ⇽---  创建测试数据

  testClient.post()    ⇽---  POST taco请求
      .uri("/api/tacos")
      .contentType(MediaType.APPLICATION_JSON)
      .body(unsavedTacoMono, Taco.class)
      .exchange()
      .expectStatus().isCreated()    ⇽---  校验响应是否符合预期
      .expectBody(Taco.class)
      .isEqualTo(savedTaco);
}
与上面的测试方法类似,shouldSaveATaco()首先创建一些测试数据和mock TacoRepository,创建WebTestClient,并将其绑定到控制器。随后,它使用WebTestClient提交POST请求到“/design”,并且将请求体声明为application/json类型,请求载荷为Taco的JSON序列化形式,放到未保存的Mono中。在执行exchange()之后,该测试断言响应状态为HTTP 201 (CREATED)并且响应体中的载荷与已保存的Taco对象相同。
使用实时服务器进行测试
到目前为止,我们所编写的测试都依赖于Spring WebFlux的mock实现,所以并不需要真正的服务器。但是,我们可能需要在服务器(如Netty或Tomcat)环境中测试WebFlux控制器,也许还会需要存储库或其他的依赖。换句话说,我们有可能要编写集成测试。
编写WebTestClient的集成测试与编写其他Spring Boot集成测试类似,首先需要我们为测试类添加@RunWith和@SpringBootTest注解:
package tacos;

import java.io.IOException;
import org.junit.jupiter.api.Test;
import org.junit.jupiter.api.extension.ExtendWith;
import org.springframework.beans.factory.annotation.Autowired;
import org.springframework.boot.test.context.SpringBootTest;
import org.springframework.boot.test.context.SpringBootTest.WebEnvironment;
import org.springframework.http.MediaType;
import org.springframework.test.context.junit.jupiter.SpringExtension;
import org.springframework.test.web.reactive.server.WebTestClient;

@ExtendWith(SpringExtension.class)
@SpringBootTest(webEnvironment = WebEnvironment.RANDOM_PORT)
public class TacoControllerWebTest {
  @Autowired
  private WebTestClient testClient;
}
通过将webEnvironment属性设置为WebEnvironment.RANDOM_PORT,我们要求Spring启动一个运行时服务器并监听任意选择的端口。
你可能也注意到,我们将WebTestClient自动装配到了测试类中。这意味着我们不仅不用在测试方法中创建它,而且在发送请求的时候也不需要指定完整的URL。这是因为WebTestClient能够知道测试服务器在哪个端口上运行。现在,我们可以使用自动装配的WebTestClient将shouldReturnRecentTacos()重写为集成测试:
@Test
public void shouldReturnRecentTacos() throws IOException {
  testClient.get().uri("/api/tacos?recent")
    .accept(MediaType.APPLICATION_JSON).exchange()
    .expectStatus().isOk()
    .expectBody()
        .jsonPath("$").isArray()
        .jsonPath("$.length()").isEqualTo(3)
        .jsonPath("$[?(@.name == 'Carnivore')]").exists()
        .jsonPath("$[?(@.name == 'Bovine Bounty')]").exists()
        .jsonPath("$[?(@.name == 'Veg-Out')]").exists();
}
我们发现,这个版本的shouldReturnRecentTacos()代码要少得多。我们不再需要创建WebTestClient,因为可以使用自动装配的实例。另外,也不需要mockTacoRepository,因为Spring会创建TacoController实例并注入真正的TacoRepository实例。在这个版本的测试方法中,我们使用JSONPath表达式来校验数据库提供的值。
WebTestClient在测试的时候非常有用,我们可以使用它消费WebFlux控制器所暴露的API。但是,如果应用本身要消费某个API,又该怎样处理呢?接下来,我们将注意力转向Spring反应式Web的客户端,看一下WebClient如何通过REST客户端来处理反应式类型,如Mono和Flux。