集成测试示例
在本节中,我们将尝试进行一些计算,然后尝试将结果存储在数据库中。我们将创建一个名为咖啡(coffee)的数据库,并尝试创建一个程序来简单计算我们一天喝了多少杯咖啡的总和,然后将其持久化。持久化之后,我们需要能够验证持久化的总和是否正确。
使用 Symfony 6 安装 Doctrine
由于我们使用的是 Symfony 框架,它与 Doctrine 配合得很好,所以我们只使用 Doctrine 来保存和检索数据库中的数据。有很多方法可以从数据库中持久化和检索数据,但对于这个项目,我们将只专注于使用 Doctrine 来简化我们的示例,以便我们可以专注于测试而不是重新发明轮子 Doctrine 是一个 ORM。您可以在 https://www.doctrine-project.org 上阅读有关 Doctrine 的更多信息。
让我们通过运行以下命令来安装 Doctrine:
/var/www/html/symfony# composer require symfony/orm-pack
/var/www/html/symfony# composer require symfony/maker-bundle --dev
运行上述命令(可能需要几分钟)后,创建一个本地环境文件,并使用以下内容保存它:
DATABASE_URL="mysql://root:mypassword@server-mysql/mydb?serverVersion=8&charset=utf8mb4"在上一行中,我们告诉 Symfony,在我们的本地环境中,我们希望使用我们在 第 3 章 “使用 Docker 容器设置我们的开发环境” 中创建的 MySQL 容器。
您可以打开 docker-compose.yml 文件来查看 MySQL 容器详细信息。您可以在那里进行任何进一步的配置更改以满足您的需求。
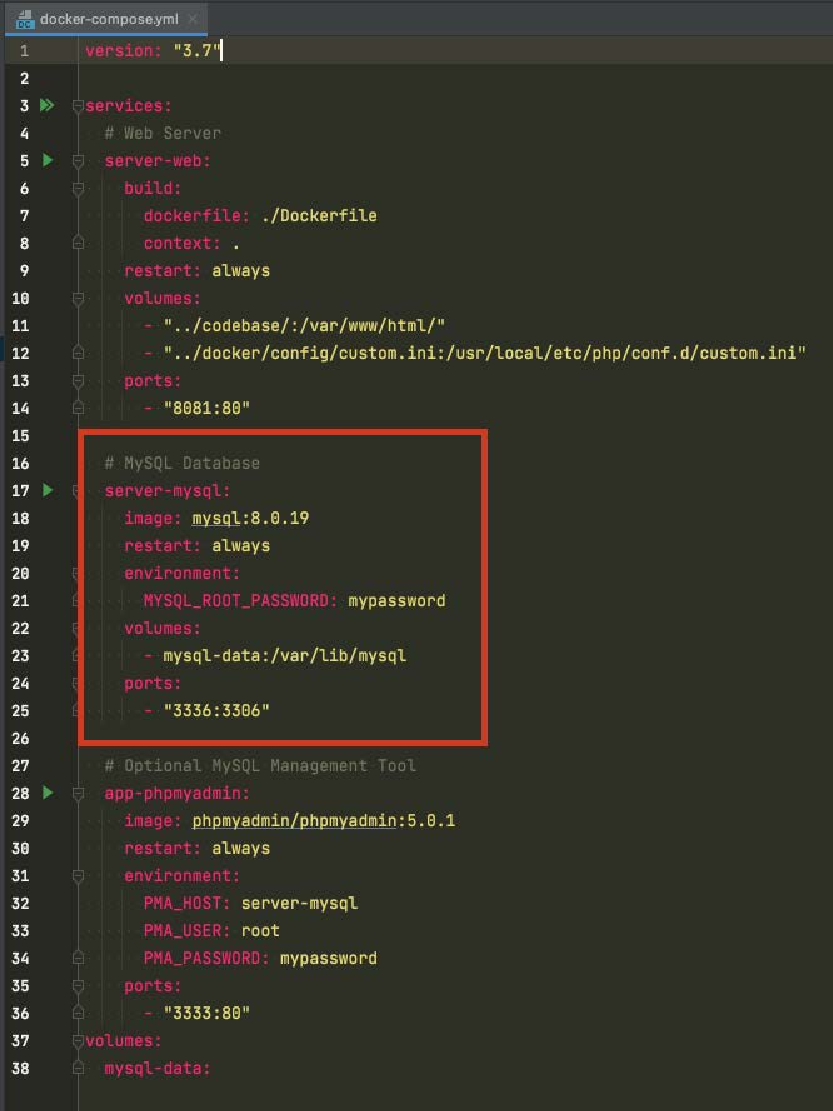
您可以在此处更改数据库密码,甚至可以将 MySQL 版本更改为您需要的版本。在 .env.local 文件中,我们指定要使用 MySQL8,并且还指定要使用 server-mysql 容器,而不是使用数据库服务器的 IP 地址。我们还使用 coffee 作为数据库名称。
接下来,我们将使用 Doctrine ORM 为我们创建一个 MySQL 数据库。然后,我们将使用这个新数据库进行示例集成测试。
Doctrine 和数据库
我们已经配置了我们的环境,以便它可以连接到我们创建的 MySQL 服务器容器,并且我们已经指定了要用于示例的数据库名称。现在,在这个阶段,我们准备为我们的集成测试示例创建一个数据库。运行以下命令:
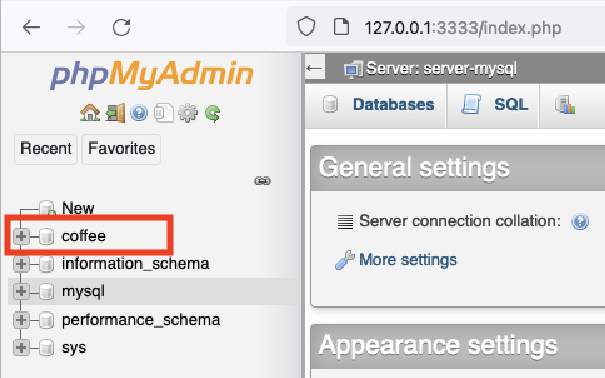
/var/www/html/symfony# php bin/console doctrine:database:create通过运行前面的命令,Doctrine 将使用我们在 .env.local 文件中提供的参数为我们创建一个名为 Coffee 的数据库。

现在,我们可以使用自己的数据库了。如果你有桌面 MySQL 客户端,可以连接到 server-mysql 容器查看我们刚刚创建的数据库。如果没有,为了让自动测试看起来比无尽的终端窗口更漂亮,我们在 第 3 章 使用 Docker 容器设置开发环境 中添加了 PHPMyAdmin 容器,以便快速、轻松地访问数据库。
打开浏览器,访问以下网址: http://127.0.0.1:3333/index.php 。您将看到以下内容:
在编写任何使用我们刚刚创建的数据库的代码之前,首先,我们需要了解我们想要用它做什么并为其创建集成测试。接下来,我们将创建第一个失败的集成测试。
我们的第一次集成测试失败
我们有一个持久化信息的解决方案,即 Doctrine 和 MySQL。我们还有一种计算随机整数之和的方法。现在,让我们开始使用它们。我们希望能通过一个字符串名称和三个整数来表示我们喝了多少杯咖啡,然后得到总和并将其持久化。
创建以下集成测试文件:
<?php

namespace App\Tests\Integration\Service;
use PHPUnit\Framework\TestCase;

class ConsumptionServiceTest extends TestCase
{
    public function testCanComputeAndSave()
    {
        $this->fail("--- RED --");
    }
}
我们在 App\Tests\Integration 命名空间内创建了第一个集成测试,该命名空间将成为我们集成测试套件的一部分。运行以下命令以确保一切正常,并且我们的测试按预期失败:
/var/www/html/symfony# .runDebug.sh --testsuite Integration --filter ConsumptionServiceTest您应该看到由我们创建的行 $this->fail("--- RED --"); 引起的失败测试:
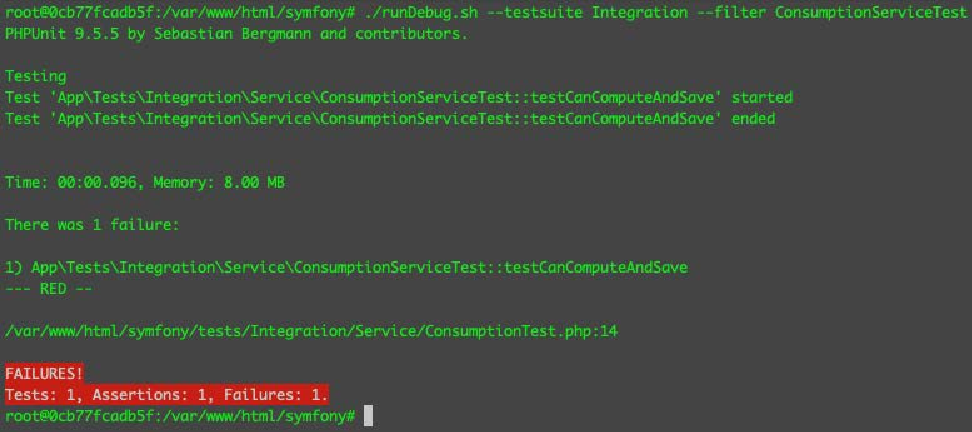
我们现在有一个失败的集成测试套件测试。现在,我们要做的就是让它通过。
让我们尝试准确地分解我们想要做的事情以及我们想要测试的内容:
-
我们希望能够跟踪一个人一天喝了多少杯咖啡
-
我们希望了解早上、下午和晚上各自消耗的咖啡杯数量
-
我们希望获得总和,然后保留总数以及人员姓名
-
我们希望能够检索保留的记录并检查其是否正确。
根据前面的列表,我们可以使用以下内容更新我们的测试:
<?php

namespace App\Tests\Integration\Service;
use PHPUnit\Framework\TestCase;

class ConsumptionServiceTest extends TestCase
{
    public function testCanComputeAndSave()
    {
        // Given
        $name = "Damo";
        $morningCoffee = 2;
        $afternoonCoffee = 3;
        $eveningCoffee = 1;

        // Expected Total:
        $expectedTotal = 6;

        // Persist the data
        $service = new ConsumptionService();
        $persistedId = $service->computeAndSave($name,
        $morningCoffee, $afternoonCoffee, $eveningCoffee);

        // Verify if the data persisted is correct:
        // TODO:
    }
}
正如您所看到的,我们的测试不完整 - 但对我来说,这很好。我编写一个失败的测试并确保它失败,但我也尝试开始准确地编写我想要测试的内容。
运行以下命令看看会发生什么:
/var/www/html/symfony# ./runDebug.sh --testsuite Integration --filter ConsumptionServiceTest该测试尝试实例化不存在的 ConsumationService.php 类。因此,您将得到以下结果:
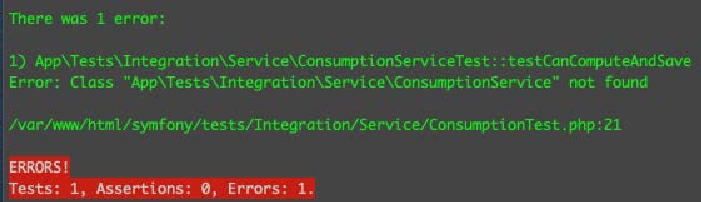
我们故意尝试从不存在的类实例化对象,因此导致测试失败。这告诉我们什么? 还记得测试驱动开发(TDD)吗?解决方案代码的开发是由失败的测试驱动的? 好吧,我们可能要开始编写解决方案代码,即 ConclusionService.php 类和它需要使用的其他程序。我们应该总是先通过测试。
但是,在编写 ConsumationService.php 类之前,让我们为我们的示例创建 ConsumerService.php 类所需的 Doctrine 实体。
创建 Doctrine 实体
让我们创建一个实体类来表示我们的数据。Doctrine 实体只是一个简单的普通旧 PHP 对象 (POPO),带有一些特定于 Doctrine 的注释,可以在最基本的用法中映射到数据库表。
运行以下命令来创建 Consumation.php 类:
/var/www/html/symfony# php bin/console make:entity运行上述命令后,输入要创建的字段。对于我们的示例,请使用以下内容:
New property name: name
Field type: string
Field length: 50
Can this field be null in the database? no
New property name: total
Field type: integer
Can this field be null in the database? no
命令提示后,您现在应该在 codebase/symfony/src/Entity/Conclusion.php 中看到一个新的实体类文件:
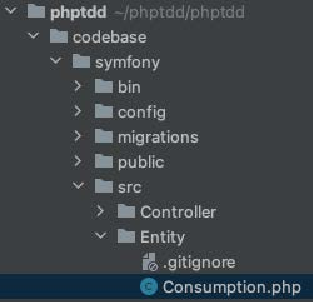
如果打开该文件,您将看到自动生成的 Doctrine 实体代码:
<?php

namespace App\Entity;
use App\Repository\ConsumptionRepository;
use Doctrine\ORM\Mapping as ORM;

#[ORM\Entity(repositoryClass: ConsumptionRepository::class)]
class Consumption
{
    #[ORM\Id]
    #[ORM\GeneratedValue]
    #[ORM\Column(type: 'integer')]
    private $id;

    #[ORM\Column(type: 'string', length: 50)]
    private $name;

    #[ORM\Column(type: 'integer')]
    private $total;

    public function getId(): ?int
    {
        return $this->id;
    }

    public function getName(): ?string
    {
        return $this->name;
    }

    public function setName(string $name): self
    {
        $this->name = $name;
        return $this;
    }

    public function getTotal(): ?int
    {
        return $this->total;
    }

    public function setTotal(int $total): self
    {
        $this->total = $total;
        return $this;
    }
}总之,我们只有两个字段可以使用,name 和 total 字段。这对于我们的集成测试示例来说是完美的。
接下来,我们需要 Doctrine 实体要表示的实际数据库表。我们将使用 Doctrine ORM 来运行迁移工具,以便生成我们需要的数据库表。
为实体创建 Doctrine 表
现在我们已经有了一个实体,我们还可以创建 Consumption 实体代表的数据库表。
运行以下命令:
/var/www/html/symfony# php bin/console make:migration
/var/www/html/symfony# php bin/console doctrine:migrations:migrate
运行上述命令后,应该会为您创建一个新的数据库表。如果您返回到 PHPMyAdmin 页面,您将看到基于 Consumption.php 实体类创建的新消耗表:
现在,我们有了一个数据库表,它将由我们的 Consumption.php 实体类表示。这张表将用来保存我们咖啡饮用者的咖啡消费记录!
然而,在实际项目中,我们不想使用主数据库来运行我们的测试;否则,我们的测试最终会将测试数据插入到生产数据库中。接下来,我们将创建测试数据库。该数据库将专门供我们的集成测试使用,并将反映主数据库的结构。
创建测试数据库
就像前面的指令集一样,我们还将根据某些环境配置创建一个数据库 - 但这一次,这是专门供我们的测试使用的。
打开 .env.test 文件并在文件末尾添加以下行:
DATABASE_URL="mysql://root:mypassword@server-mysql/coffee?serverVersion=8&charset=utf8mb4"您会注意到它与我们用于 .env.local 文件的值相同。请注意,我们重用了 Coffee 作为数据库名称。
现在,运行以下命令来创建测试数据库:
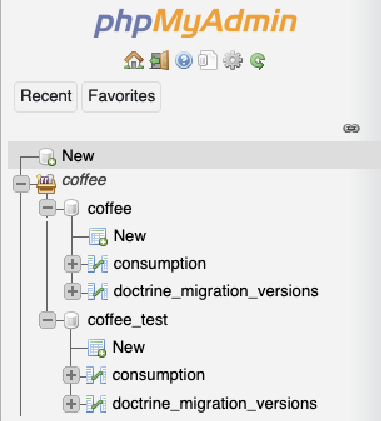
/var/www/html/symfony# php bin/console doctrine:database:create --env=test将创建一个名为 Coffee_test 的新数据库。 _test 是我们指定的咖啡数据库名称的后缀。我们运行的每个使用数据库的集成测试都将使用 Coffee_test 数据库来保存和读取数据。
接下来,运行以下命令,以便我们也可以将 Consumption 表迁移到新的 Coffee_test 数据库中:
/var/www/html/symfony# php bin/console doctrine:migrations:migrate -n --env=test在此阶段,我们将拥有两个几乎相同的数据库。用于解决方案的 coffee 数据库和用于我们测试的 Coffee_test 数据库。
现在我们已经创建了数据库,并且还拥有了 Doctrine ORM,它将作为从 PHP 代码库与数据库进行通信的主要工具,现在我们将开始构建解决方案代码以通过失败的集成测试。
把事情放在一起
在此阶段,我们现在准备开始构建 ComputationServiceTest.php 集成测试不断抱怨的缺失解决方案代码。还记得我们失败的测试中的这条消息吗?
Error: Class "App\Tests\Integration\Service\ConsumptionService" not found让我们按照以下步骤开始修复该错误:
-
首先,打开
services.yaml文件并使用以下内容更新它:codebase/symfony/config/services.yaml# This file is the entry point to configure your own services. # Files in the packages/ subdirectory configure your dependencies. # Put parameters here that don't need to change on each machine where the app is deployed # https://symfony.com/doc/current/best_practices.html#use-parameters-for-application-configuration parameters: services: # default configuration for services in *this* file _defaults: autowire: true # Automatically injects dependencies in your services. autoconfigure: true # Automatically registers your services as commands, event subscribers, etc. # makes classes in src/ available to be used as services # this creates a service per class whose id is the fully-qualified class name App\: resource: '../src/' exclude: - '../src/DependencyInjection/' - '../src/Entity/' - '../src/Kernel.php' App\Service\ConsumptionService: public: true # add more service definitions when explicit configuration is needed # please note that last definitions always *replace* previous ones由于我们在本示例中使用 Symfony,因此我们将使用其符合 PSR-11 的服务容器来创建所需对象的实例。我们将使用服务容器,而不是使用
newPHP 关键字来创建我们将要编写的ConsumerService.php类的实例。 -
创建包含以下内容的以下类:
codebase/symfony/src/Service/ConsumptionService.php<?php namespace App\Service; use App\Entity\Consumption; use App\Example\Calculator; use Doctrine\Persistence\ManagerRegistry; class ConsumptionService { /** * @var Calculator */ private Calculator $calculator; /** * @var ManagerRegistry */ private $managerRegistry; /** * @param ManagerRegistry $doctrine * @param Calculator $calculator */ public function __construct(ManagerRegistry $doctrine, Calculator $calculator) { $this->setManagerRegistry($doctrine); $this->setCalculator($calculator); } /** * @param string $name * @param int $morning * @param int $afternoon * @param int $evening * @return int */ public function calculateAndSave(string $name, int $morning, int $afternoon, int $evening): int { $entityManager = $this->getManagerRegistry()->getManager(); // Calculate total: $sum = $this->getCalculator()->calculateTotal($morning, $afternoon, $evening); // Consumption model or entity: $consumption = new Consumption(); $consumption->setName($name); $consumption->setTotal($sum); // Persist using the Entity Manager: $entityManager->persist($consumption); $entityManager->flush(); return $consumption->getId(); } /** * @return Calculator */ public function getCalculator(): Calculator { return $this->calculator; } /** * @param Calculator $calculator */ public function setCalculator(Calculator $calculator): void { $this->calculator = $calculator; } /** * @return ManagerRegistry */ public function getManagerRegistry(): ManagerRegistry { return $this->managerRegistry; } /** * @param ManagerRegistry $managerRegistry */ public function setManagerRegistry(ManagerRegistry $managerRegistry): void { $this->managerRegistry = $managerRegistry; } }在我们回到集成测试课程之前,让我们快速回顾一下我们在本课程中所做的事情。
ConsumptionService类依赖于两个对象:ManagerRegistry和CalculationService。然后,calculateAndSave方法将使用这两个对象来实现其目标。 -
现在,让我们回到
ConsumptionServiceTest.php类,并将其内容替换为以下内容:<?php namespace App\Tests\Integration\Service; use App\Entity\Consumption; use App\Service\ConsumptionService; use Symfony\Bundle\FrameworkBundle\Test\KernelTestCase; class ConsumptionServiceTest extends KernelTestCase { public function testCanComputeAndSave() { self::bootKernel(); // Given $name = "Damo"; $morningCoffee = 2; $afternoonCoffee = 3; $eveningCoffee = 1; // Expected Total: $expectedTotal = 6; // Test Step 1: Get the Symfony's service container: $container = static::getContainer(); // Test Step 2: Use PSR-11 standards to get an instance of our service, pre-injected with the EntityManager: /** @var ConsumptionService $service */ $service = $container->get(ConsumptionService::class); // Test Step 3: Run the method we want to test for: $persistedId = $service->calculateAndSave($name, $morningCoffee, $afternoonCoffee, $eveningCoffee); // Test Step 4: Verify if the data persisted data is correct: $em = $service->getManagerRegistry()->getManager(); $recordFromDb = $em->find(Consumption::class, $persistedId); $this->assertEquals($expectedTotal,$recordFromDb->getTotal()); $this->assertEquals($name, $recordFromDb->getName()); } }我在代码中留下了注释,以清楚地解释我们在测试中做了什么。让我们更详细地了解它:
-
测试步骤 1:由于我们使用的是 Symfony 并扩展了
KernelTestCase类,因此可以使用static::getContainer()方法获取 Symfony 服务容器的实例。我们将用它来创建ConsumptionService的实例,而不是手动使用newPHP 关键字来实例化它。 -
测试步骤 2:由于我们使用的是 Symfony,因此可以使用其符合 PSR-11 标准的服务容器。我们可以使用该服务容器获取类的实例,而无需手动实例化它们的依赖关系。例如,我们的
ConsumptionService类在其构造函数中需要两个对象。当服务容器配置为自动布线时,容器将自动实例化ConsumptionService构造函数中声明的依赖关系。自动连接配置声明在本章前面修改过的codebase/symfony/config/services.yaml中。 -
测试步骤 3:这是关键所在!这是我们要测试的方法。我们执行
calculateAndSave方法。我们希望在这一步中,对我们提供的三个整数求和,然后持久化到数据库中。 -
测试步骤 4:如果
calculateAndSave方法成功完成了任务,那么我们就可以进行实际测试了。我们将使用ConsumptionService中的实体管理器对象来检索一个Consumption实体。我们将读取数据库中存储的数据,并使用assertEquals方法将其与我们在测试中声明的$expectedTotal和$name值进行比较。如果一切顺利,我们就可以通过测试。
-
-
现在,通过运行以下命令再次执行集成测试:
/var/www/html/symfony# ./runDebug.sh --testsuite Integration --filter ConsumptionServiceTest这一次,我们应该可以通过测试了!
root@0cb77fcadb5f:/var/www/html/symfony# ./runDebug.sh --testsuite Integration --filter ConsumptionServiceTest PHPUnit 9.5.5 by Sebastian Bergmann and contributors. Testing . 1 / 1 (100%) Time: 00:00.580, Memory: 18.00 MB OK (1 test, 2 assertions) root@0cb77fcadb5f:/var/www/html/symfony# -
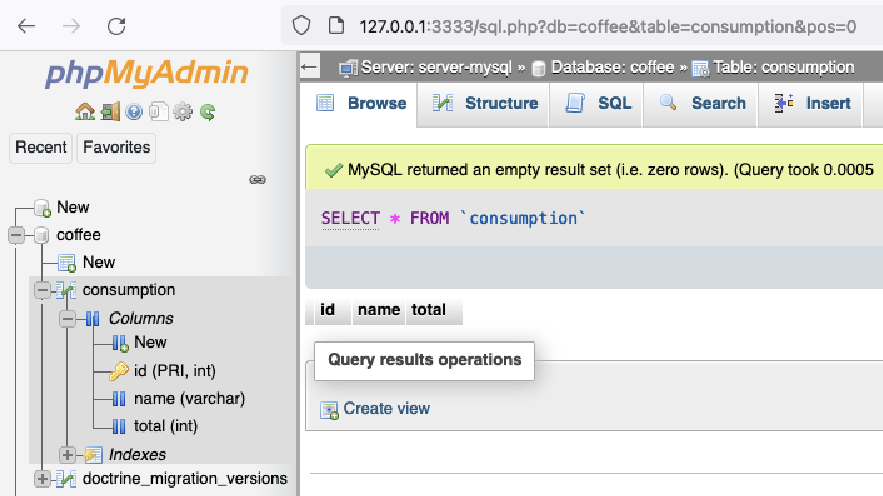
我们终于通过了第一次集成测试!要查看我们刚刚在数据库中创建的记录,请运行以下命令:
/var/www/html/symfony# php bin/console dbal:run-sql 'SELECT * FROM consumption' --env=test您应该得到以下结果:
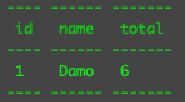
成功!我们能够创建集成测试,创建解决方案类,并最终通过集成测试!
我们为什么首先使用集成测试?
打开 ConsumptionService.php 类,查看构造方法。
在构造函数中,我们指定了两个必要参数。我们需要一个 ManagerRegistry 实例和一个我们在本章前面开发的 Calculator 实例。这是我们的 ComputationService.php 类所依赖的两个对象。现在,这正是我们需要集成测试而不是单元测试的原因。
当我们执行 calculateAndSave 方法时,我们将使用我们的 ConsumptionService 所不具备的业务逻辑。相反,它依赖于其他对象来实现其目标。与我们构建单元测试的方法相反,单元测试方法并不依赖其他对象来完成它们的工作。这就是单元测试和集成测试的主要区别。
总结
在本章中,我们通过编写自己的示例来定义什么是单元测试。我们通过构建和通过单元测试,以及编写自己的 shell 脚本来帮助我们执行不同的自动化测试配置,从而使我们更容易调试或运行测试覆盖率。我们已经了解了什么是测试覆盖率报告,以及如何使用它。
我们已经编写了第一个集成测试,并配置了我们的开发环境,以便我们也能使用 MySQL 数据库。我们创建了一个解决方案类,该类将执行通过测试所需的业务逻辑,而且我们还能验证数据库中的持久化内容是否与我们的预期一致。
在本章中,我们试图清楚地定义什么是单元测试和集成测试,它们之间有什么区别,以及为什么我们必须将它们分成各自的篮子或测试套件。
在下一章中,我们将讨论行为驱动开发(BDD)。我们将了解它的用途、为什么需要它,以及它与 TDD 的关系。