用户微服务模块改造
在 newbee-mall-cloud-step02 工程中,用户微服务是一个单独的模块。而在最终的微服务架构项目中,用户微服务模块的结构如下:
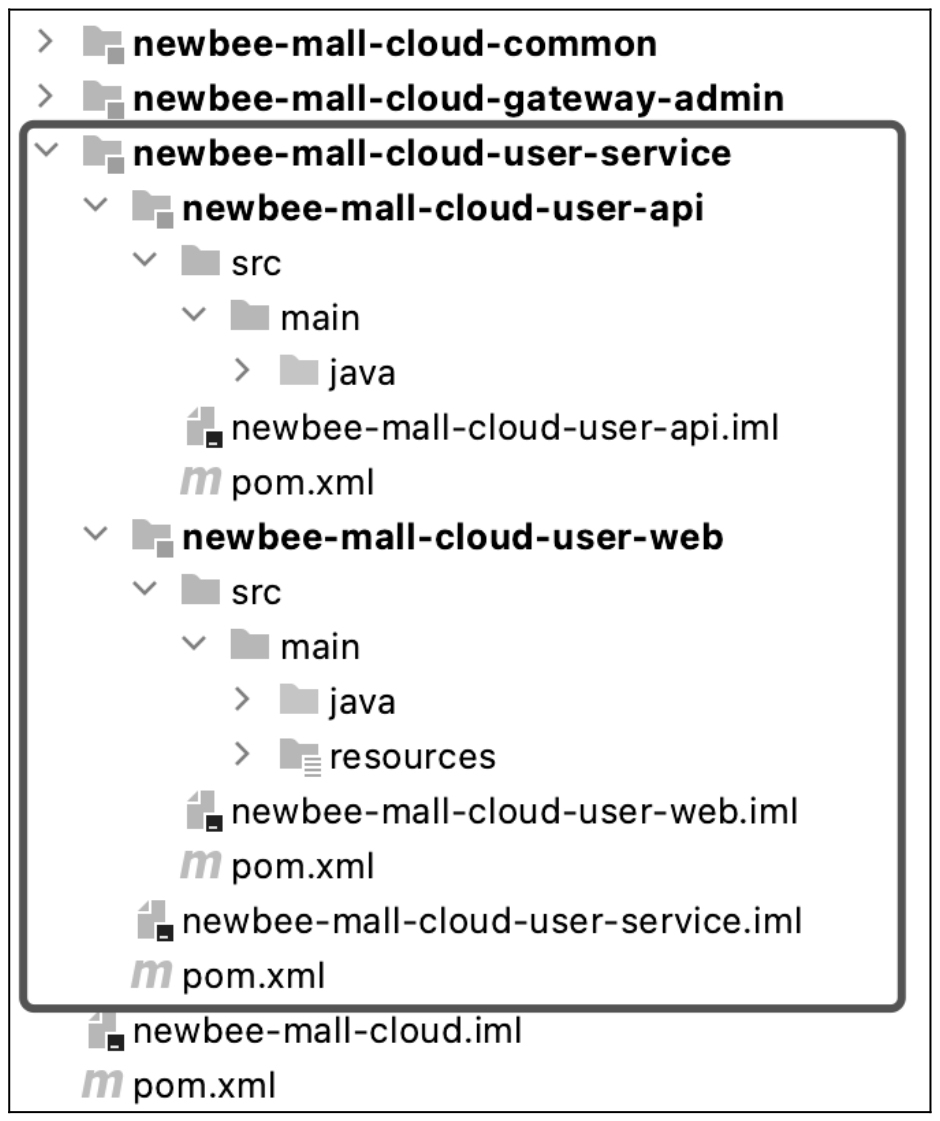
newbee-mall-cloud-user-service       // 用户微服务
├── newbee-mall-cloud-user-api   // 存放商城用户模块中暴露的用于远程调用的
                                 FeignClient 类
└── newbee-mall-cloud-user-web   // 商城用户模块 API 的代码及逻辑
用户微服务所在的模块包含 user-web 和 user-api 两个模块,它们各自的作用都标注出来了。
这个做法其实很好理解,微服务架构项目中存在不同的微服务实例间的远程通信过程,在当前的实战项目中是通过 OpenFeign 来实现的,因此笔者就对用户微服务做了一次结构整理,单独创建了一个 newbee-mall-cloud-user-api 模块,用于存放商城用户模块中暴露的用于远程调用的 FeignClient 类。这样,如果有哪个微服务需要调用用户微服务中的一些接口,直接将 newbee-mall-cloud-user-api 添加到其依赖项中就可以使用 FeignClient 类中的方法来调用了。不止是用户微服务,其他业务微服务的模块结构也如此。
另外,newbee-mall-cloud 项目中存放 FeignClient 类的模块,其命名方式都是 xxx-api。这个命名方式参考了 Dubbo 项目中的命名方式,其实也可以定义为 newbee-mall-cloud-user-feign、newbee-mall-cloud-user-feignclient 等。
接下来,就是实际的改造过程,在 newbee-mall-cloud-user-service 模块下新增 newbee-mall-cloud-user-api 和 newbee-mall-cloud-user-web 两个模块。修改各模块下的 pom.xml 文件,梳理三个模块间的关联关系。
newbee-mall-cloud-user-service 模块的 pom.xml 文件代码修改如下:
<?xml version="1.0" encoding="UTF-8"?>
<project xmlns="http://maven.apache.org/POM/4.0.0" xmlns:xsi="http://www.w3.org/2001/XMLSchema-instance"
         xsi:schemaLocation="http://maven.apache.org/POM/4.0.0 https://maven.apache.org/xsd/maven-4.0.0.xsd">
    <modelVersion>4.0.0</modelVersion>
    <groupId>ltd.newbee.cloud</groupId>
    <artifactId>newbee-mall-cloud-user-service</artifactId>
    <version>0.0.1-SNAPSHOT</version>
    <packaging>pom</packaging>
    <name>newbee-mall-cloud-user-service</name>
    <description>商城用户模块</description>

    <parent>
        <groupId>ltd.newbee.cloud</groupId>
        <artifactId>newbee-mall-cloud</artifactId>
        <version>0.0.1-SNAPSHOT</version>
    </parent>

    <properties>
        <java.version>1.8</java.version>
    </properties>

    <modules>
        <module>newbee-mall-cloud-user-web</module>
        <module>newbee-mall-cloud-user-api</module>
    </modules>

    <dependencies>
        </dependencies>
</project>
因为业务依赖和相关的业务代码都需要移到 newbee-mall-cloud-user-web 模块中,所以这里只定义模块间的关系即可,将该模块打包方式 packaging 配置项的值改为 pom,父模块是 newbee-mall-cloud,两个子模块分别是 newbee-mall-cloud-user-api 和 newbee-mall-cloud-user-web。
newbee-mall-cloud-user-api 模块的 pom.xml 文件代码修改如下:
<?xml version="1.0" encoding="UTF-8"?>
<project xmlns="http://maven.apache.org/POM/4.0.0" xmlns:xsi="http://www.w3.org/2001/XMLSchema-instance"
         xsi:schemaLocation="http://maven.apache.org/POM/4.0.0 https://maven.apache.org/xsd/maven-4.0.0.xsd">
    <modelVersion>4.0.0</modelVersion>
    <groupId>ltd.user.newbee.cloud</groupId>
    <artifactId>newbee-mall-cloud-user-api</artifactId>
    <packaging>jar</packaging>
    <version>0.0.1-SNAPSHOT</version>
    <name>newbee-mall-cloud-user-api</name>
    <description>用户微服务 openfeign</description>
    <parent>
        <groupId>ltd.user.newbee.cloud</groupId>
        <artifactId>newbee-mall-cloud-user-service</artifactId>
        <version>0.0.1-SNAPSHOT</version>
    </parent>
    <properties>
        <java.version>1.8</java.version>
    </properties>
    <dependencies>
        <dependency>
            <groupId>org.springframework.cloud</groupId>
            <artifactId>spring-cloud-starter-openfeign</artifactId>
        </dependency>
    </dependencies>
</project>
这里定义了与父模块 newbee-mall-cloud-user-service 的关系,打包方式 packaging 配置项的值为 jar。同时,由于后面要添加 FeignClient,因此这里引入了 OpenFeign 的依赖项。
newbee-mall-cloud-user-web 模块的 pom.xml 文件代码修改如下:
<?xml version="1.0" encoding="UTF-8"?>
<project xmlns="http://maven.apache.org/POM/4.0.0" xmlns:xsi="http://www.w3.org/2001/XMLSchema-instance"
         xsi:schemaLocation="http://maven.apache.org/POM/4.0.0 https://maven.apache.org/xsd/maven-4.0.0.xsd">
    <modelVersion>4.0.0</modelVersion>
    <groupId>ltd.newbee.cloud</groupId>
    <artifactId>newbee-mall-cloud-user-web</artifactId>
    <version>0.0.1-SNAPSHOT</version>
    <name>newbee-mall-cloud-user-web</name>
    <description>用户微服务</description>
    <parent>
        <groupId>ltd.newbee.cloud</groupId>
        <artifactId>newbee-mall-cloud-user-service</artifactId>
        <version>0.0.1-SNAPSHOT</version>
    </parent>
    <properties>
        <java.version>1.8</java.version>
    </properties>
    <dependencies>
        <dependency>
            <groupId>org.springframework.boot</groupId>
            <artifactId>spring-boot-starter-web</artifactId>
        </dependency>
        <dependency>
            <groupId>org.springframework.boot</groupId>
            <artifactId>spring-boot-starter-test</artifactId>
            <scope>test</scope>
        </dependency>
        <dependency>
            <groupId>com.alibaba.cloud</groupId>
            <artifactId>spring-cloud-starter-alibaba-nacos-discovery</artifactId>
        </dependency>
        <dependency>
            <groupId>org.springframework.boot</groupId>
            <artifactId>spring-boot-starter-validation</artifactId>
        </dependency>
        <dependency>
            <groupId>org.mybatis.spring.boot</groupId>
            <artifactId>mybatis-spring-boot-starter</artifactId>
        </dependency>
        <dependency>
            <groupId>org.projectlombok</groupId>
            <artifactId>lombok</artifactId>
            <scope>provided</scope>
        </dependency>
        <dependency>
            <groupId>io.springfox</groupId>
            <artifactId>springfox-boot-starter</artifactId>
        </dependency>
        <dependency>
            <groupId>mysql</groupId>
            <artifactId>mysql-connector-java</artifactId>
            <scope>runtime</scope>
        </dependency>
        <dependency>
            <groupId>ltd.newbee.cloud</groupId>
            <artifactId>newbee-mall-cloud-common</artifactId>
            <version>0.0.1-SNAPSHOT</version>
        </dependency>
    </dependencies>
</project>
这里定义了与父模块 newbee-mall-cloud-user-service 的关系,同时将相关的业务依赖项也移到配置文件中。
接下来就是把 newbee-mall-cloud-step02 工程中用户微服务的业务代码和配置项移到 newbee-mall-cloud-user-web 模块中,这个过程比较简单,复制并粘贴即可。改造后的商城用户模块的目录结构如图 2-7 所示。
商城用户模块改造完成后,测试步骤是不能漏掉的。一定要验证项目是否能正常启动、接口是否能正常调用,防止在代码移动过程中出现的一些小问题导致项目无法启动或代码报错。