文件刷盘机制
RocketMQ的存储与读写是基于JDK NIO的内存映射机制(MappedByteBuffer)的,消息存储时首先将消息追加到内存中,再根据配置的刷盘策略在不同时间刷盘。如果是同步刷盘,消息追加到内存后,将同步调用MappedByteBuffer的force()方法;如果是异步刷盘,在消息追加到内存后会立刻返回给消息发送端。RocketMQ使用一个单独的线程按照某一个设定的频率执行刷盘操作。通过在broker配置文件中配置flushDiskType来设定刷盘方式,可选值为ASYNC_FLUSH(异步刷盘)、SYNC_FLUSH(同步刷盘),默认为异步刷盘。本节以CommitLog文件刷盘机制为例来剖析RocketMQ的刷盘机制,ConsumeQueue文件、Index文件刷盘的实现原理与CommitLog刷盘机制类似。RocketMQ处理刷盘的实现方法为Commitlog#handleDiskFlush(),刷盘流程作为消息发送、消息存储的子流程,我们先重点了解消息存储流程的相关知识。值得注意的是,Index文件的刷盘并不是采取定时刷盘机制,而是每更新一次Index文件就会将上一次的改动写入磁盘。
Broker同步刷盘
同步刷盘指的是在消息追加到内存映射文件的内存中后,立即将数据从内存写入磁盘文件,由CommitLog的handleDiskFlush方法实现,如代码清单4-74所示。
final GroupCommitService service = (GroupCommitService) this.flushCommitLogService;
GroupCommitRequest request = new GroupCommitRequest(result.getWroteOffset() + result.getWroteBytes());
service.putRequest(request);

boolean flushOK = request.waitForFlush(this.defaultMessageStore.getMessageStoreConfig().getSyncFlushTimeout());
if (!flushOK) {
    putMessageResult.setPutMessageStatus(PutMessageStatus.FLUSH_DISK_TIMEOUT);
}
同步刷盘实现流程如下。
1)构建GroupCommitRequest同步任务并提交到GroupCommitRequest。 2)等待同步刷盘任务完成,如果超时则返回刷盘错误,刷盘成功后正常返回给调用方。GroupCommitRequest的类图如图4-21所示。
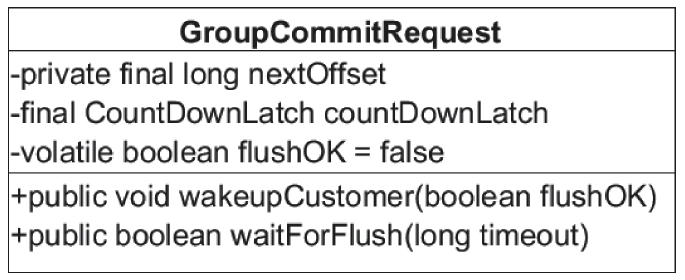
下面介绍GroupCommitRequest的核心属性,如代码清单4-75所示。
1)long nextOffset:刷盘点偏移量。 2)CountDownLatch countDownLatch:倒记数锁存器。 3)flushOk:刷盘结果,初始为false。
public boolean waitForFlush(long timeout) {
    try {
        this.countDownLatch.await(timeout, TimeUnit.MILLISECONDS);
        return this.flushOK;
    } catch (InterruptedException e) {
        log.error("Interrupted", e);
        return false;
    }
}
消费发送线程将消息追加到内存映射文件后,将同步任务GroupCommitRequest提交到GroupCommitService线程,然后调用阻塞等待刷盘结果,超时时间默认为5s,如代码清单4-76所示。
public void wakeupCustomer(final boolean flushOK) {
    this.flushOK = flushOK;
    this.countDownLatch.countDown();
}
GroupCommitService线程处理GroupCommitRequest对象后将调用wakeupCustomer方法将消费发送线程唤醒,并将刷盘请求告知GroupCommitRequest。同步刷盘线程实现GroupCommitService类图如图4-22所示。
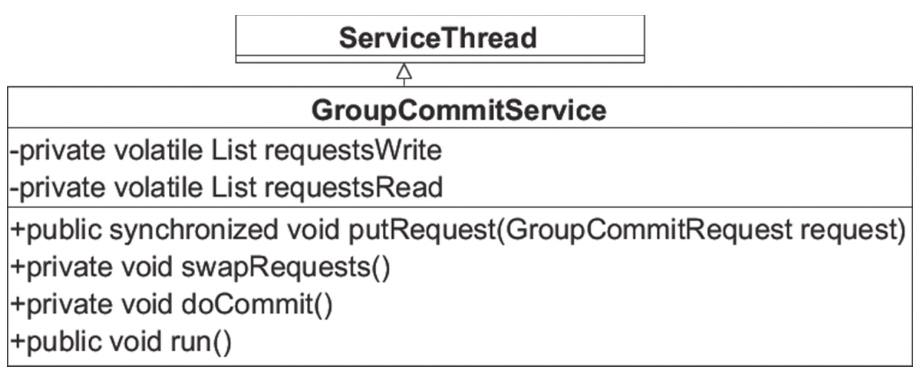
1)private volatile List requestsWrite:同步刷盘任务暂存容器。 2)private volatile List requestsRead:GroupCommitService线程每次处理的request容器,这是一个设计亮点,避免了任务提交与任务执行的锁冲突,如代码清单4-77所示。
public synchronized void putRequest(final GroupCommitRequest request) {
    synchronized (this.requestsWrite) {
        this.requestsWrite.add(request);
    }
    if (hasNotified.compareAndSet(false, true)) {
        waitPoint.countDown();
    }
}
客户端提交同步刷盘任务到 GroupCommitService 线程,如果该线程处于等待状态则将其唤醒,如代码清单 4-78 所示。
private void swapRequests() {
    List<GroupCommitRequest> tmp = this.requestsWrite;
    this.requestsWrite = this.requestsRead;
    this.requestsRead = tmp;
}
为了避免同步刷盘消费任务与其他消息生产者提交任务产生锁竞争,GroupCommitService 提供读容器与写容器,这两个容器每执行完一次任务后交互,继续消费任务,如代码清单4-79所示。
public void run() {
    CommitLog.log.info(this.getServiceName() + " service started");
    while (!this.isStopped()) {
        try {
            this.waitForRunning(10);
            this.doCommit();
        } catch (Exception e) {
            CommitLog.log.warn(this.getServiceName() + " service has exception.", e);
        }
    }
}
GroupCommitService组提交线程,每处理一批刷盘请求后,如果后续有待刷盘的请求需要处理,组提交线程会马不停蹄地处理下一批;如果没有待处理的任务,则休息10ms,即每10ms空转一次,如代码清单4-80所示。
for (GroupCommitRequest req : this.requestsRead) {
    boolean flushOK = false;
    for (int i = 0; i < 2 && !flushOK; i++) {
        flushOK = CommitLog.this.mappedFileQueue.getFlushedWhere() >= req.getNextOffset();
        if (!flushOK) {
            CommitLog.this.mappedFileQueue.flush(0);
        }
    }
    req.wakeupCustomer(flushOK);
}

long storeTimestamp = CommitLog.this.mappedFileQueue.getStoreTimestamp();
if (storeTimestamp > 0) {
    CommitLog.this.defaultMessageStore.getStoreCheckpoint().setPhysicMsgTimestamp(storeTimestamp);
}
1)执行刷盘操作,即调用MappedByteBuffer#force方法。遍历同步刷盘任务列表,根据加入顺序逐一执行刷盘逻辑。 2)调用mappedFileQueue#flush方法执行刷盘操作,最终会调用MappedByteBuffer#force()方法,其具体实现已在4.4节做了详细说明。如果已刷盘指针大于、等于提交的刷盘点,表示刷盘成功,每执行一次刷盘操作后,立即调用GroupCommitRequest#wakeupCustomer唤醒消息发送线程并通知刷盘结果。 3)处理完所有同步刷盘任务后,更新刷盘检测点StoreCheckpoint中的physicMsgTimestamp,但并没有执行检测点的刷盘操作,刷盘检测点的刷盘操作将在刷写消息队列文件时触发。
同步刷盘的简单描述是,消息生产者在消息服务端将消息内容追加到内存映射文件中(内存)后,需要同步将内存的内容立刻写入磁盘。通过调用内存映射文件(MappedByteBuffer的force方法)可将内存中的数据写入磁盘。
Broker异步刷盘
异步刷盘操作如代码清单4-81所示。
// 异步刷盘
else {
    if (!this.defaultMessageStore.getMessageStoreConfig().isTransientStorePoolEnable()) {
        flushCommitLogService.wakeup();
    } else {
        commitLogService.wakeup();
    }
}
开启transientStorePoolEnable机制则启动异步刷盘方式,刷盘实现较同步刷盘有细微差别。如果transientStorePoolEnable为true,RocketMQ会单独申请一个与目标物理文件(CommitLog)同样大小的堆外内存,该堆外内存将使用内存锁定,确保不会被置换到虚拟内存中去,消息首先追加到堆外内存,然后提交到与物理文件的内存映射中,再经flush操作到磁盘。如果transientStorePoolEnable为false,消息将追加到与物理文件直接映射的内存中,然后写入磁盘。transientStorePoolEnable为true的刷盘流程如图4-23所示。
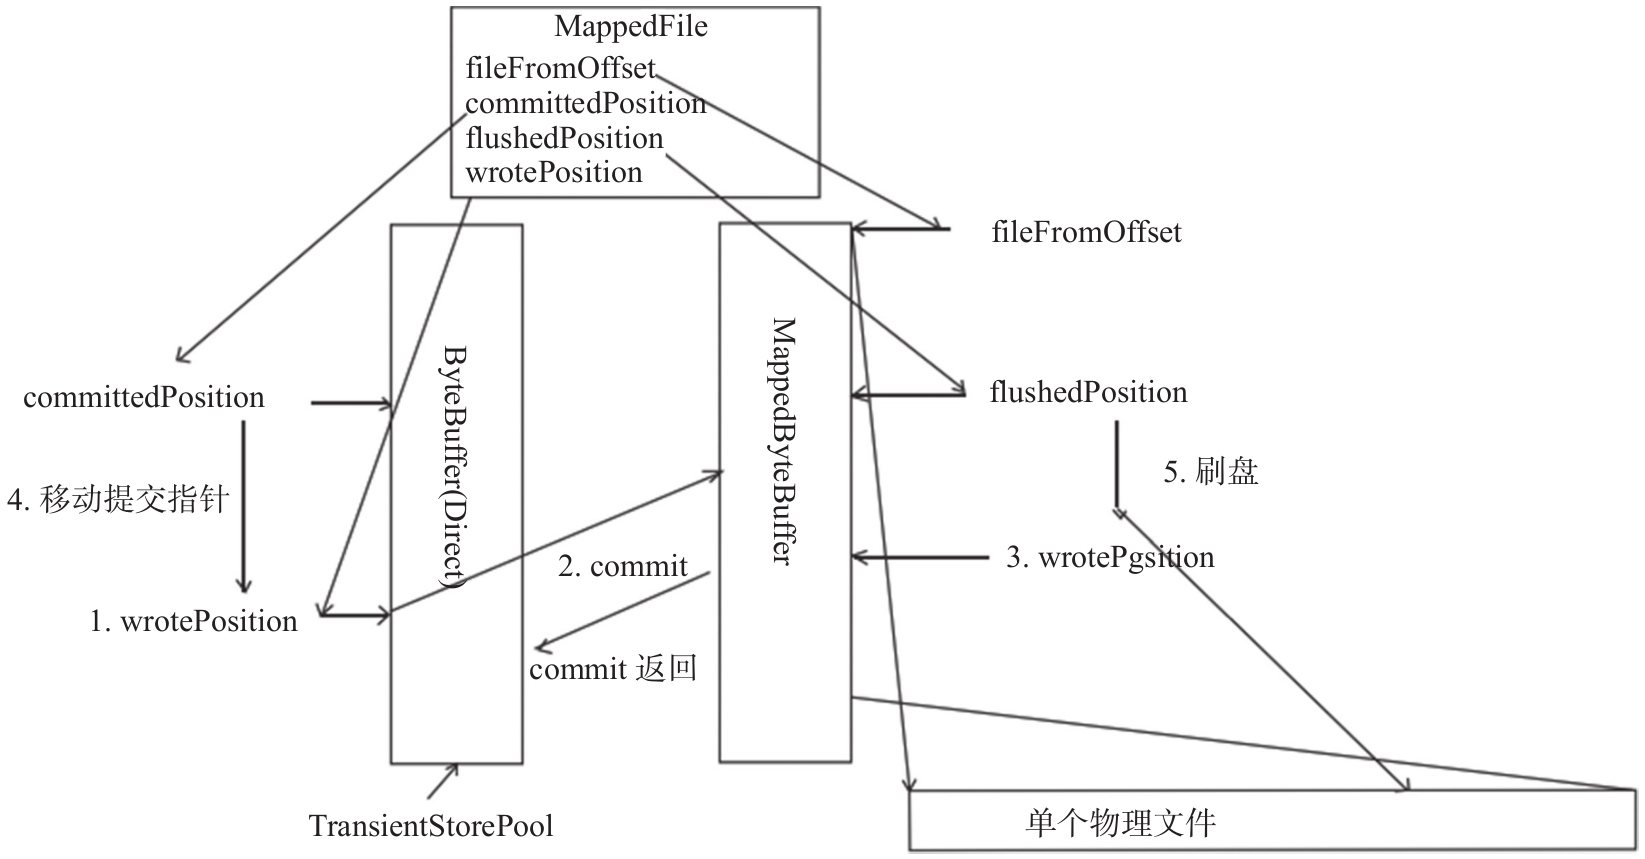
1)将消息直接追加到ByteBuffer(堆外内存DirectByteBuffer),wrotePosition随着消息的不断追加向后移动。 2)CommitRealTimeService线程默认每200ms将ByteBuffer新追加(wrotePosition减去commitedPosition)的数据提交到FileChannel中。 3)FileChannel在通道中追加提交的内容,其wrotePosition指针向前后移动,然后返回。 4)commit操作成功返回,将commitedPosition向前后移动本次提交的内容长度,此时wrotePosition指针依然可以向前推进。 5)FlushRealTimeService线程默认每500ms将FileChannel中新追加的内存(wrotePosition减去上一次写入位置flushedPositiont),通过调用FileChannel#force()方法将数据写入磁盘。
-
CommitRealTimeService提交线程工作机制
CommitRealTimeService提交线程如代码清单4-82所示。
代码清单4-82 CommitLog$CommitRealTimeService#runint interval = CommitLog.this.defaultMessageStore.getMessageStoreConfig().getCommitIntervalCommitLog(); int commitDataLeastPages = CommitLog.this.defaultMessageStore.getMessageStoreConfig().getCommitCommitLogLeastPages(); int commitDataThoroughInterval = CommitLog.this.defaultMessageStore.getMessageStoreConfig().getCommitCommitLogThoroughInterval();第一步:如代码清单4-83所示,先解释3个配置参数的含义。
1)commitIntervalCommitLog:CommitRealTimeService线程间隔时间,默认200ms。
2)commitLogLeastPages:一次提交任务至少包含的页数,如果待提交数据不足,小于该参数配置的值,将忽略本次提交任务,默认4页。
3)commitDataThoroughInterval:两次真实提交的最大间隔时间,默认200ms。
代码清单4-83 CommitLog$CommitRealTimeService#runlong begin = System.currentTimeMillis(); if (begin >= (this.lastCommitTimestamp + commitDataThoroughInterval)) { this.lastCommitTimestamp = begin; commitDataLeastPages = 0; }第二步:如果距上次提交间隔超过commitDataThoroughInterval,则本次提交忽略commitLogLeastPages参数,也就是如果待提交数据小于指定页数,也执行提交操作,如代码清单4-84所示。
代码清单4-84 CommitLog$CommitRealTimeService#runboolean result = CommitLog.this.mappedFileQueue.commit(commitDataLeastPages); long end = System.currentTimeMillis(); if (!result) { this.lastCommitTimestamp = end; flushCommitLogService.wakeup(); } this.waitForRunning(interval);第三步:执行提交操作,将待提交数据提交到物理文件的内存映射内存区,如果返回false,并不代表提交失败,而是表示有数据提交成功了,唤醒刷盘线程执行刷盘操作。该线程每完成一次提交动作,将等待200ms再继续执行下一次提交任务。
-
FlushRealTimeService刷盘线程工作机制
FlushRealTimeService刷盘线程工作流程如代码清单4-85所示。
boolean flushCommitLogTimed = CommitLog.this.defaultMessageStore.getMessageStoreConfig().isFlushCommitLogTimed();
int interval = CommitLog.this.defaultMessageStore.getMessageStoreConfig().getFlushIntervalCommitLog();
int flushPhysicQueueLeastPages = CommitLog.this.defaultMessageStore.getMessageStoreConfig().getFlushCommitLogLeastPages();
int flushPhysicQueueThoroughInterval = CommitLog.this.defaultMessageStore.getMessageStoreConfig().getFlushCommitLogThoroughInterval();
第一步:如代码清单4-86所示,先解释4个配置参数的含义。
-
flushCommitLogTimed:默认为false,表示使用await方法等待;如果为true,表示使用Thread.sleep方法等待。
-
flushIntervalCommitLog:FlushRealTimeService线程任务运行间隔时间。
-
flushPhysicQueueLeastPages:一次刷盘任务至少包含页数,如果待写入数据不足,小于该参数配置的值,将忽略本次刷盘任务,默认4页。
-
flushPhysicQueueThoroughInterval:两次真实刷盘任务的最大间隔时间,默认10s。
long currentTimeMillis = System.currentTimeMillis();
if (currentTimeMillis >= (this.lastFlushTimestamp + flushPhysicQueueThoroughInterval)) {
    this.lastFlushTimestamp = currentTimeMillis;
    flushPhysicQueueLeastPages = 0;
    printFlushProgress = (printTimes++ % 10) == 0;
}
第二步:如果距上次提交数据的间隔时间超过flushPhysicQueueThoroughInterval,则本次刷盘任务将忽略flushPhysicQueueLeastPages,也就是如果待写入数据小于指定页数,也执行刷盘操作,如代码清单4-87所示。
if (flushCommitLogTimed) {
    Thread.sleep(interval);
} else {
    this.waitForRunning(interval);
}
第三步:执行一次刷盘任务前先等待指定时间间隔,然后执行刷盘任务,如代码清单4-88所示。
long begin = System.currentTimeMillis();
CommitLog.this.mappedFileQueue.flush(flushPhysicQueueLeastPages);
long storeTimestamp = CommitLog.this.mappedFileQueue.getStoreTimestamp();
if (storeTimestamp > 0) {
    CommitLog.this.defaultMessageStore.getStoreCheckpoint().setPhysicMsgTimestamp(storeTimestamp);
}
第四步:调用flush方法将内存中的数据写入磁盘,并且更新checkpoint文件的CommitLog文件更新时间戳,checkpoint文件的刷盘动作在刷盘ConsumeQueue线程中执行,其入口为DefaultMessageStore#FlushConsumeQueueService。ConsumeQueue、Index文件的刷盘实现原理与CommitLog文件的刷盘机制类似,本书不再单独分析。