微服务框架搭建
在上一节中,已经系统介绍了各个模块的内容与功能,也说明了整个系统的功能。下面我们搭建这个框架,并在最后让程序运行起来。
搭建模块
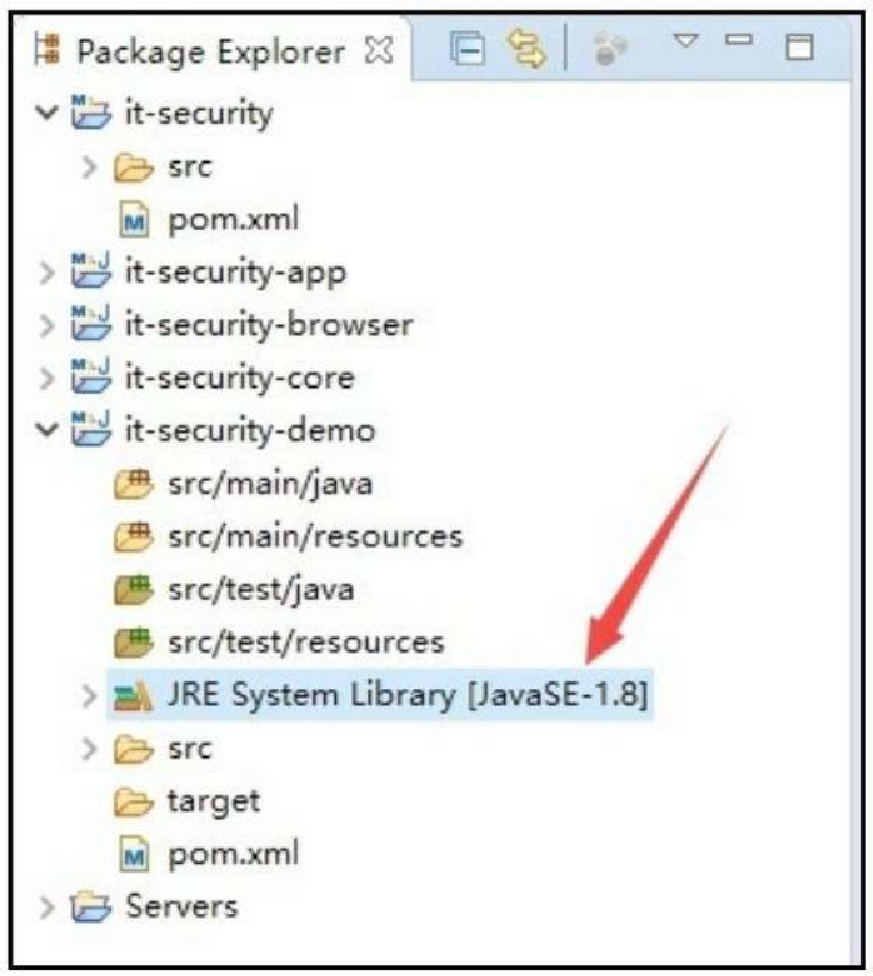
使用 Eclipse 进行搭建,搭建好的情况如图 2.10 所示。
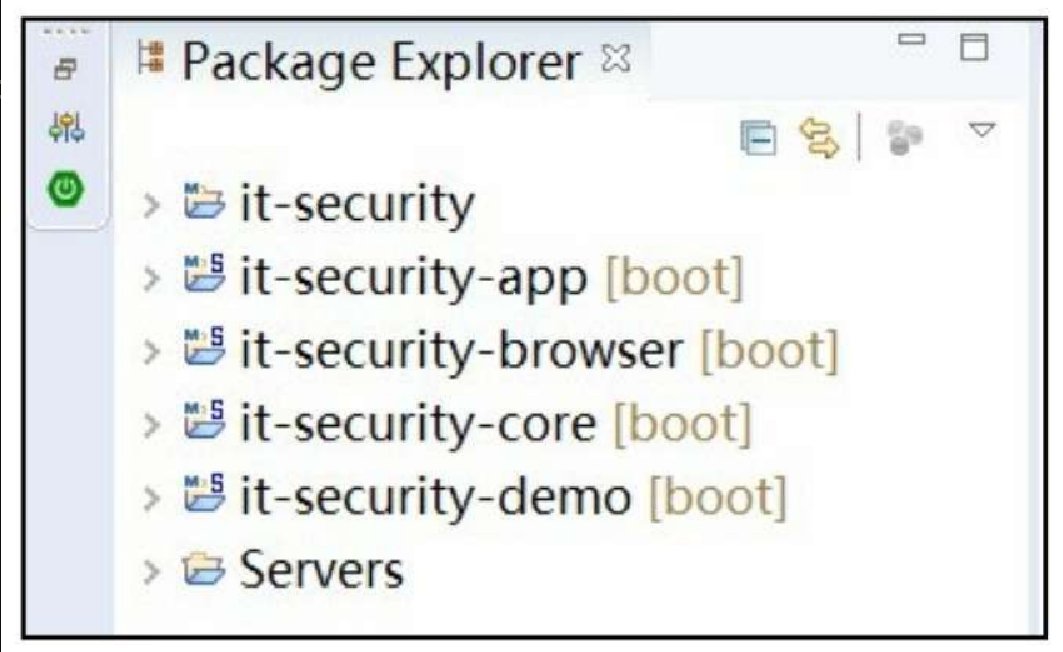
It-security
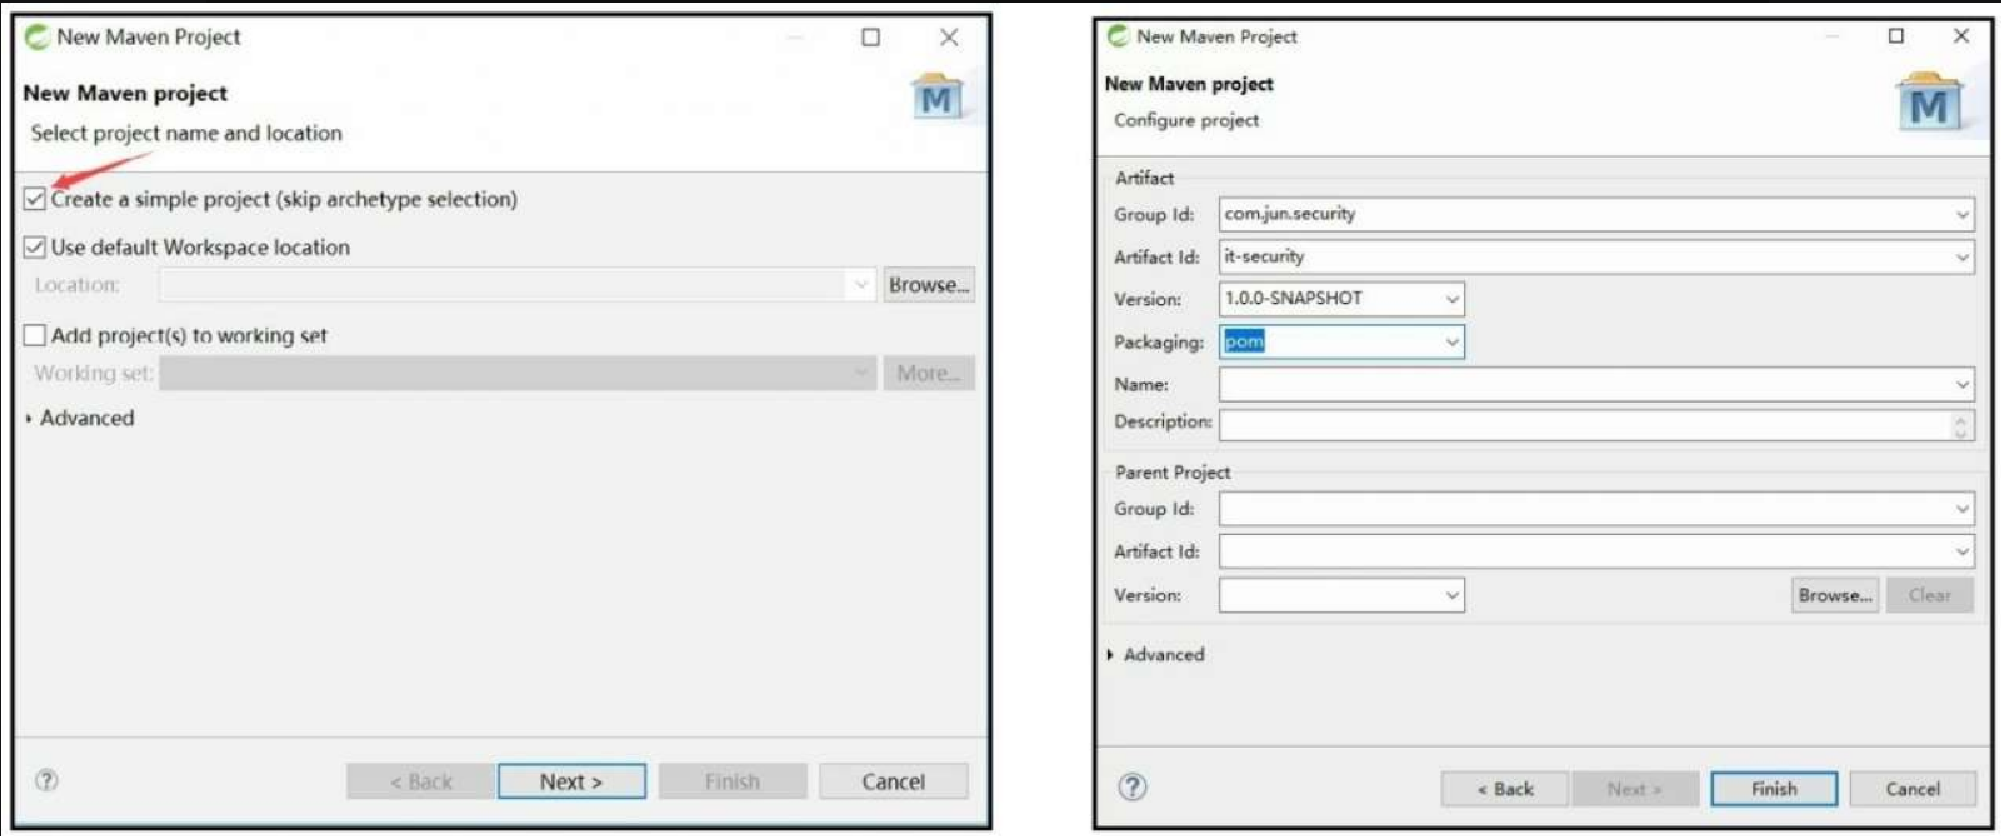
新建一个项目,注意 Packaging 是 pom 文件,是一个父项目,用于打包,将所有的子模块打成一个包,图 2.11 中所有项目的 Group Id 是同一个。
在 Maven 中,会引入依赖,在依赖中,不可忽略的就是版本的冲突问题。如何更好地管理依赖的版本?
这里采用 Spring IO、Spring Cloud 共同来管理、控制版本。同时,这里使用 dependency Management 标签,在 Maven 中 dependencyManagement 的作用其实相当于一个对所依赖的 jar 包进行版本管理的管理器。
如果 dependencies 里的 dependency 没有声明 version 元素,那 Maven 就会到 dependencyManagement 里面去找是否对 artifactId 和 groupId 进行过版本声明。如果有就继承它,如果没有就会报错,这说明必须为 dependency 声明 version。如果 dependencies 中的 dependency 声明了 version,那么无论 dependencyManagement 中有无对该 jar 包的 version 声明,都以 dependency 里的 version 为准。代码如下所示。
<!-- 抽象出来的公共引用变量 -->
<properties>
    <it.security.version>1.0.0-SNAPSHOT</it.security.version>
</properties>
<!-- 版本控制 -->
<dependencyManagement>
    <dependencies>
        <dependency>
            <groupId>io.spring.platform</groupId>
            <artifactId>platform-bom</artifactId>
            <version>Brussels-SR4</version>
            <type>pom</type>
            <scope>import</scope>
        </dependency>
        <dependency>
            <groupId>org.springframework.cloud</groupId>
            <artifactId>spring-cloud-dependencies</artifactId>
            <version>Dalston.SR2</version>
            <type>pom</type>
            <scope>import</scope>
        </dependency>
    </dependencies>
</dependencyManagement>
<!-- 打包编译 -->
<build>
    <plugins>
        <plugin>
            <groupId>org.apache.maven.plugins</groupId>
            <artifactId>maven-compiler-plugin</artifactId>
            <version>2.3.2</version>
            <configuration>
                <source>1.8</source>
                <target>1.8</target>
                <encoding>UTF-8</encoding>
            </configuration>
        </plugin>
    </plugins>
</build>
<!-- 子模块 -->
<modules>
    <module>../it-security-app</module>
    <module>../it-security-browser</module>
    <module>../it-security-core</module>
    <module>../it-security-demo</module>
</modules>打包编译:Maven 是个项目管理工具,如果不告诉它我们的代码要使用什么版本的 JDK 编译的话,它就会用 maven-compiler-plugin 默认版本的 JDK 来进行处理,这样就容易出现版本不匹配,甚至可能导致编译不通过的问题。因此 pom 文件中使用 maven-compiler-plugin 插件指定项目源码的 JDK 版本、编译后的 JDK 版本以及编码。
子模块:说明 pom 文件下引用了哪几个子模块。
it-security-core
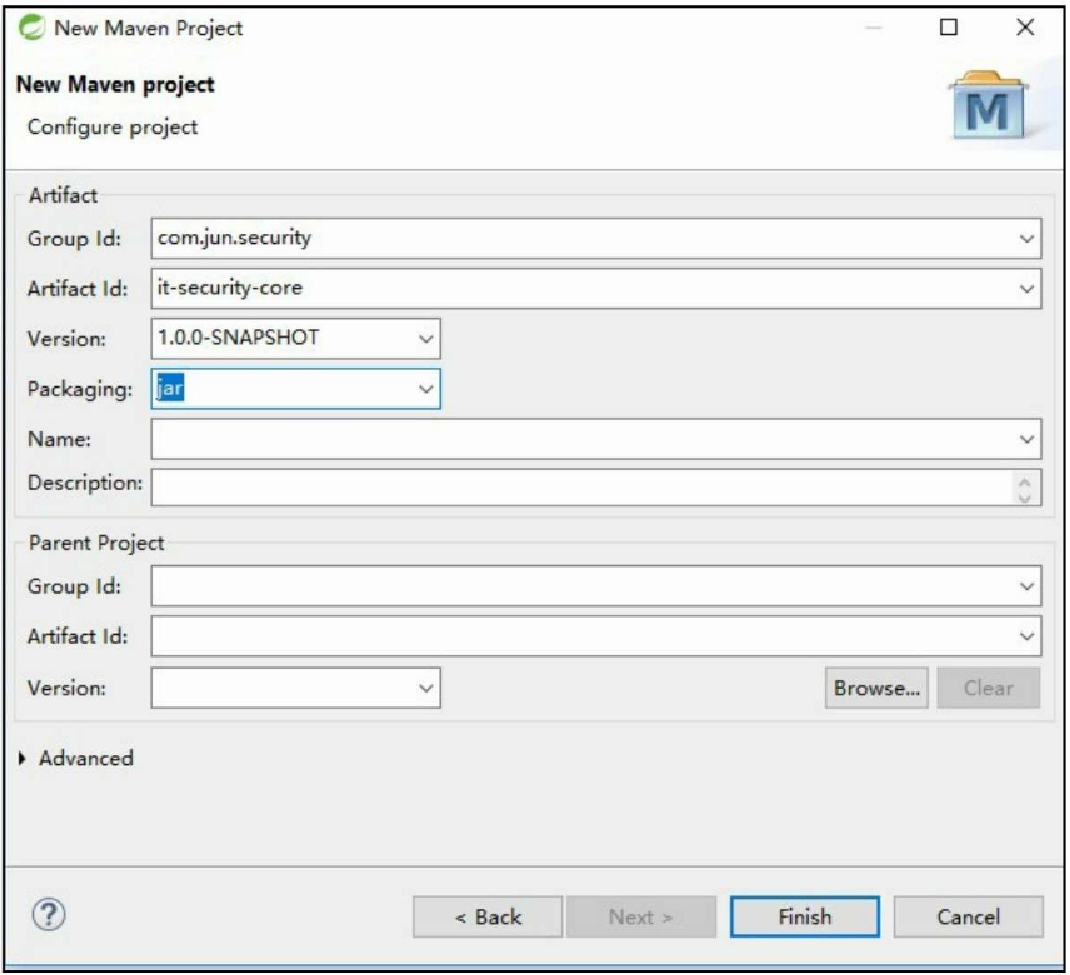
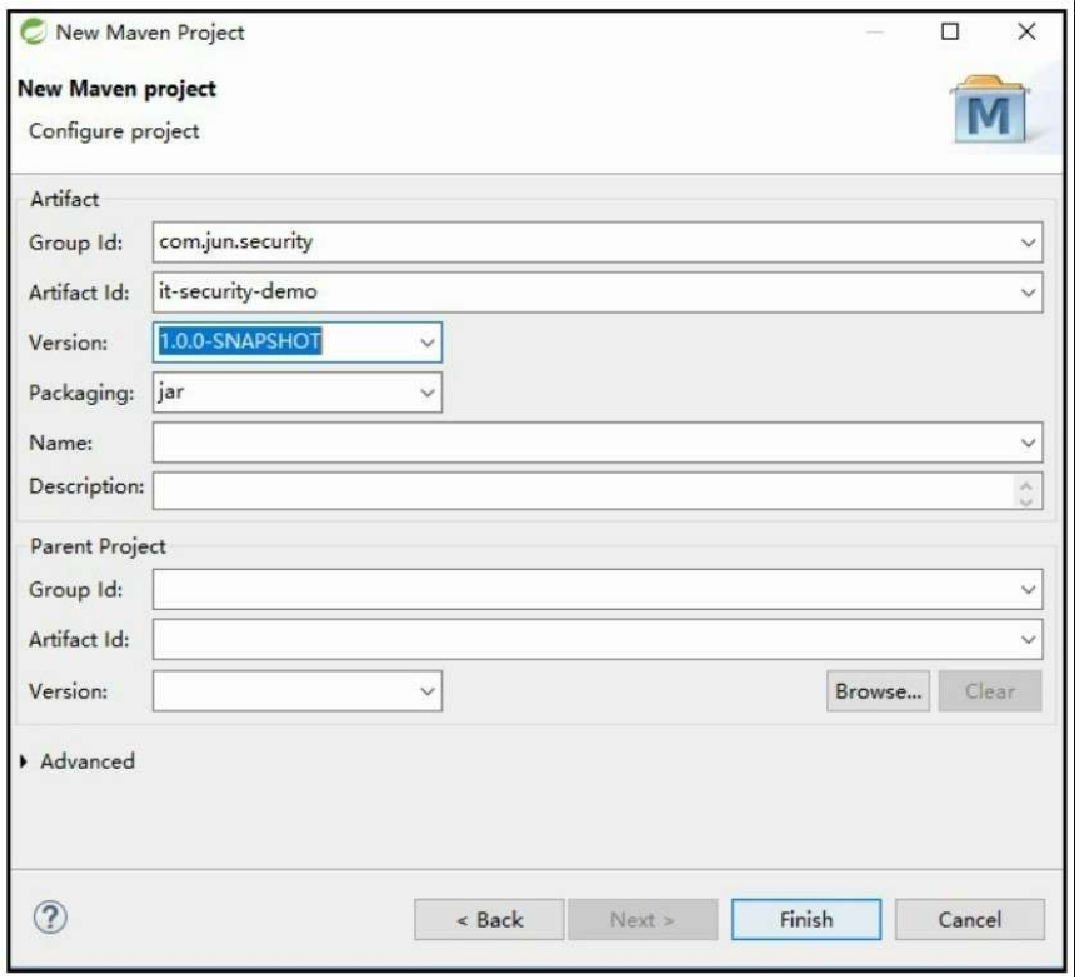
新建时 Packaging 为 jar,注意 Group Id 保持统一,如图 2.12 所示。
这个模块是核心模块,即 core 包,所以引用的依赖也最多。这里需要提供认证服务的包、Redis 的支持包、MySQL 的支持包以及社交网络需要的包,同时还需要添加 Java 开发中常使用的工具包,最后添加 Spring Boot 其他文件的读取支持。代码如下所示。
<dependencies>
    <!-- 提供授权认证服务 -->
    <dependency>
        <groupId>org.springframework.cloud</groupId>
        <artifactId>spring-cloud-starter-oauth2</artifactId>
    </dependency>
    <!-- 整合redis,做缓存作用 -->
    <dependency>
        <groupId>org.springframework.boot</groupId>
        <artifactId>spring-boot-starter-data-redis</artifactId>
    </dependency>
    <!-- 提供对数据源的操作 -->
    <dependency>
        <groupId>org.springframework.boot</groupId>
        <artifactId>spring-boot-starter-jdbc</artifactId>
    </dependency>
    <!-- mysql的连接 -->
    <dependency>
        <groupId>mysql</groupId>
        <artifactId>mysql-connector-java</artifactId>
    </dependency>
    <!-- 社交网络,提供Java配置 -->
    <dependency>
        <groupId>org.springframework.social</groupId>
        <artifactId>spring-social-config</artifactId>
    </dependency>
    <!-- 提供社交连接框架和OAuth 客户端支持 -->
    <dependency>
        <groupId>org.springframework.social</groupId>
        <artifactId>spring-social-core</artifactId>
    </dependency>
    <!-- 社交安全的一些支持 -->
    <dependency>
        <groupId>org.springframework.social</groupId>
        <artifactId>spring-social-security</artifactId>
    </dependency>
    <!-- 管理Web应用程序的连接 -->
    <dependency>
        <groupId>org.springframework.social</groupId>
        <artifactId>spring-social-web</artifactId>
    </dependency>
    <dependency>
        <groupId>commons-lang</groupId>
        <artifactId>commons-lang</artifactId>
    </dependency>
    <dependency>
        <groupId>commons-collections</groupId>
        <artifactId>commons-collections</artifactId>
    </dependency>
    <dependency>
        <groupId>commons-beanutils</groupId>
        <artifactId>commons-beanutils</artifactId>
    </dependency>
    <!--Spring默认使用yml中的配置,但有时候要用传统的xml或properties
配置 -->
    <dependency>
        <groupId>org.springframework.boot</groupId>
        <artifactId>spring-boot-configuration-processor</artifactId>
    </dependency>
</dependencies>
it-security-browser
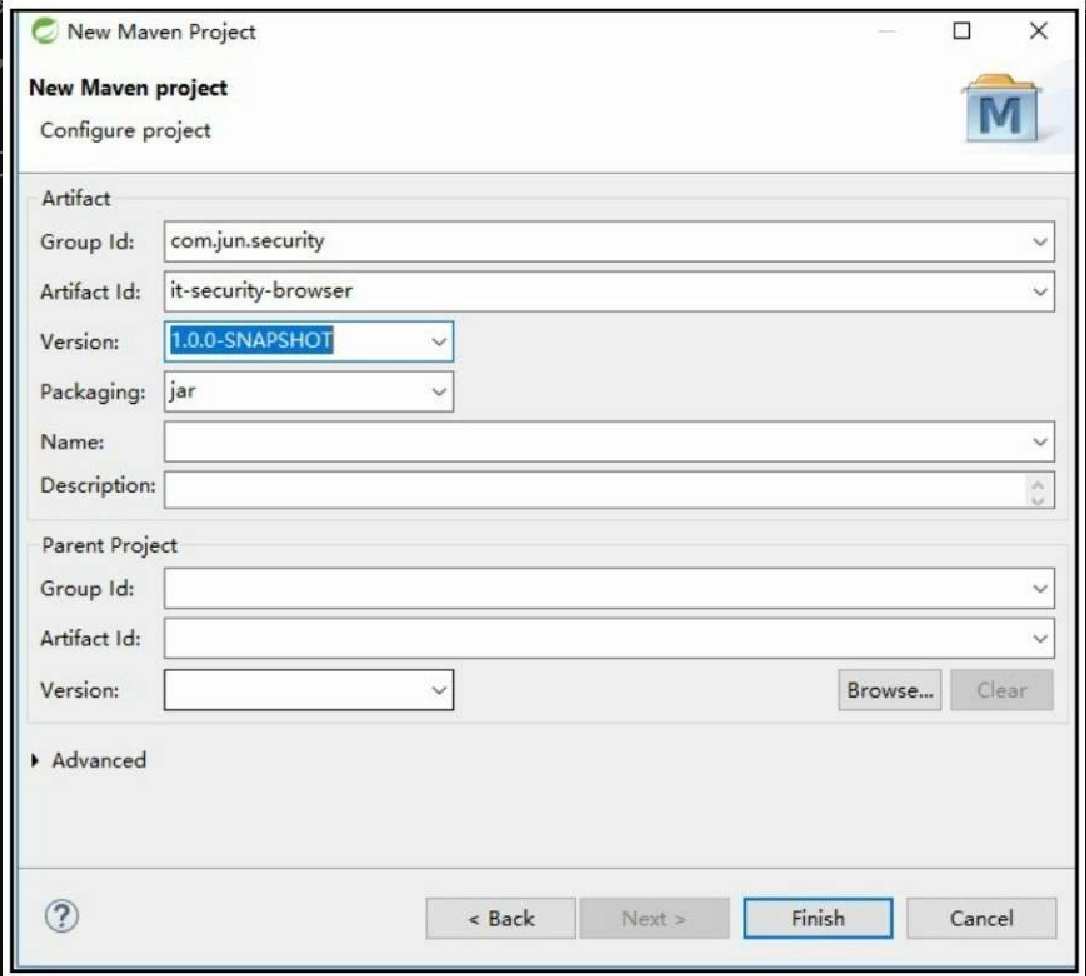
新建时 Packaging 为 jar,如图 2.13 所示。
这个项目主要用于浏览器,所以会有 session 管理的依赖包。代码如下所示。
<dependencies>
    <dependency>
        <groupId>com.jun.security</groupId>
        <artifactId>it-security-core</artifactId>
        <version>${it.security.version}</version>
    </dependency>
    <!-- 用于session管理 -->
    <dependency>
        <groupId>org.springframework.session</groupId>
        <artifactId>spring-session</artifactId>
    </dependency>
    <!-- 执行身份验证、授权、密码学和session管理 -->
    <dependency>
        <groupId>org.apache.shiro</groupId>
        <artifactId>shiro-core</artifactId>
        <version>1.2.2</version>
    </dependency>
</dependencies>
it-security-app
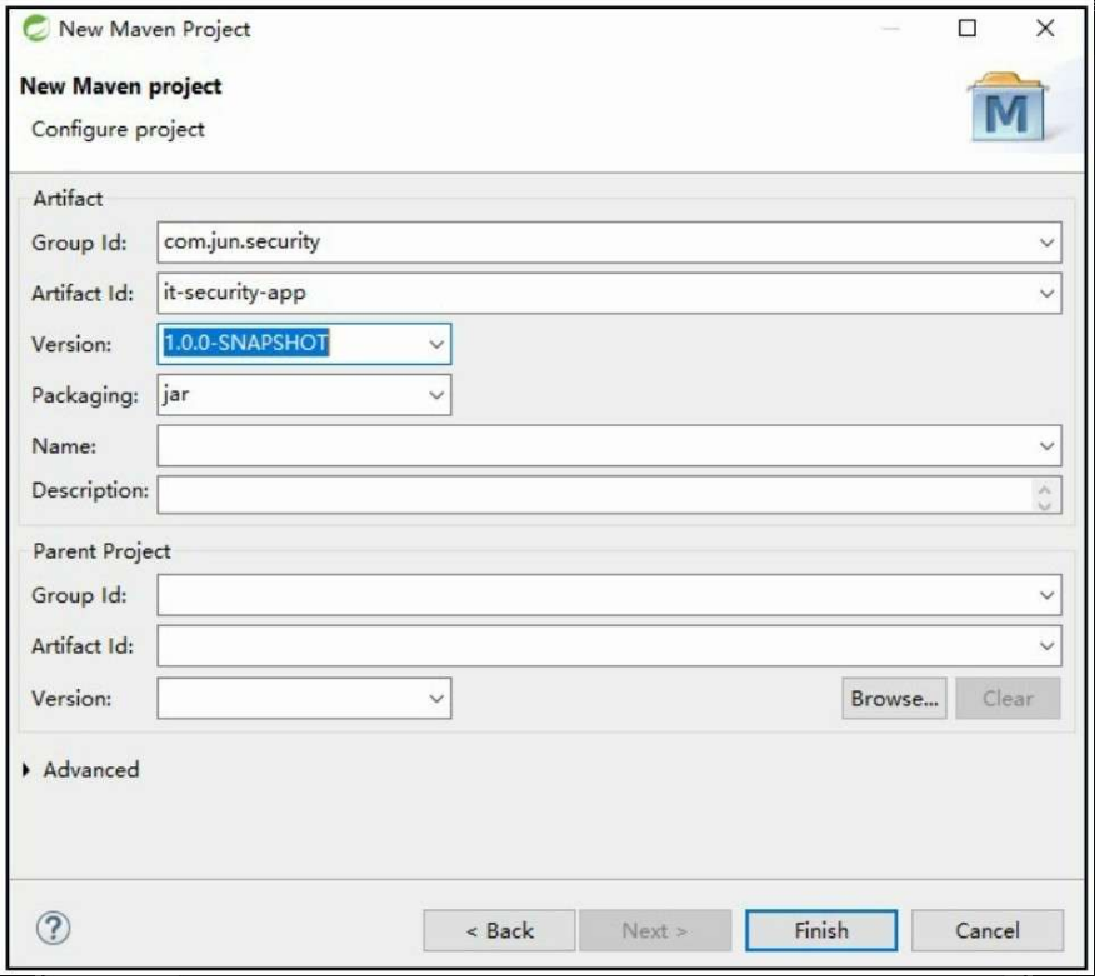
新建时 Packaging 为 jar。这个模块是用于移动端的登录,所以没有特殊的依赖,只需要引用 core 包即可。代码如下所示。
<dependencies>
   <dependency>
      <groupId>com.jun.security</groupId>
      <artifactId>it-security-core</artifactId>
      <version>${it.security.version}</version>
   </dependency>
</dependencies>
新建 Maven 项目,如图 2.14 所示。
启动Demo
此时,项目的所有依赖全部添加完成,框架也已经整理好,下面就准备启动 Demo。
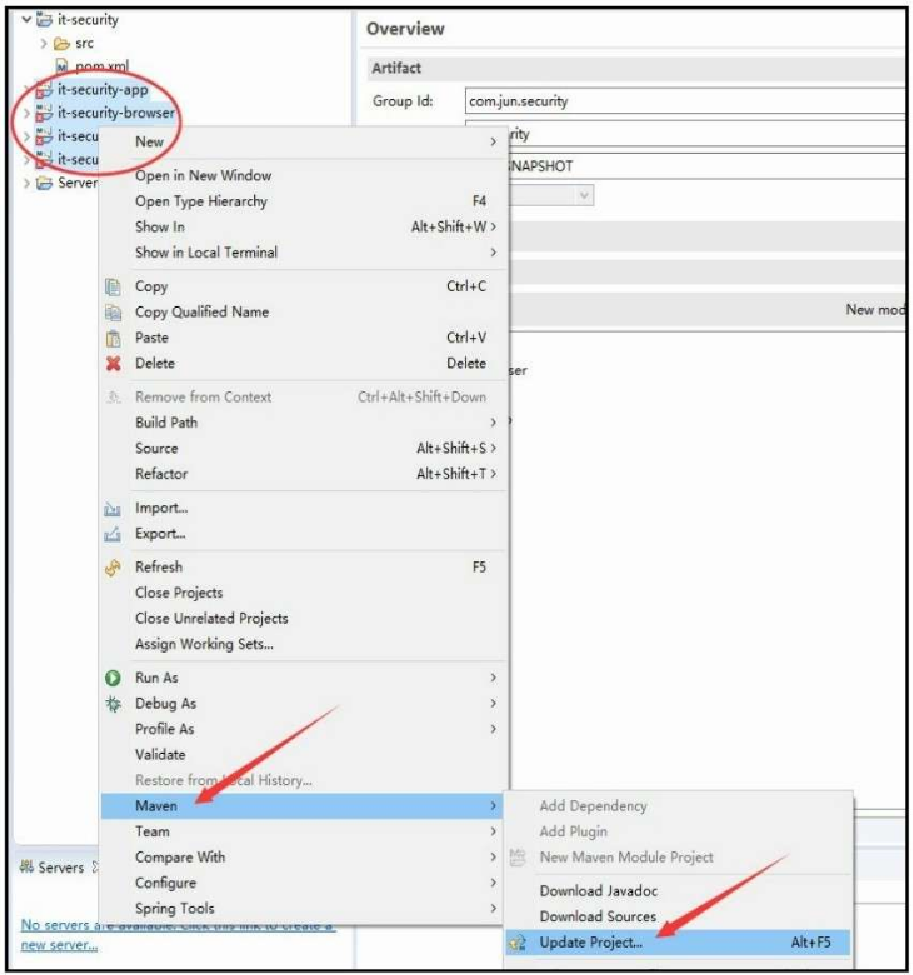
Maven更新
因为关联完子模块,编译的 JDK 还不是 1.8 版本,这里需要 Update Project,如图 2.16 所示。将模块的 “!” 报错去掉,最终可以从图 2.17 中看到 JRE System Library 为 JavaSE-1.8。
新建类
我们的演示在 Demo 模块中进行,如图 2.18 所示。
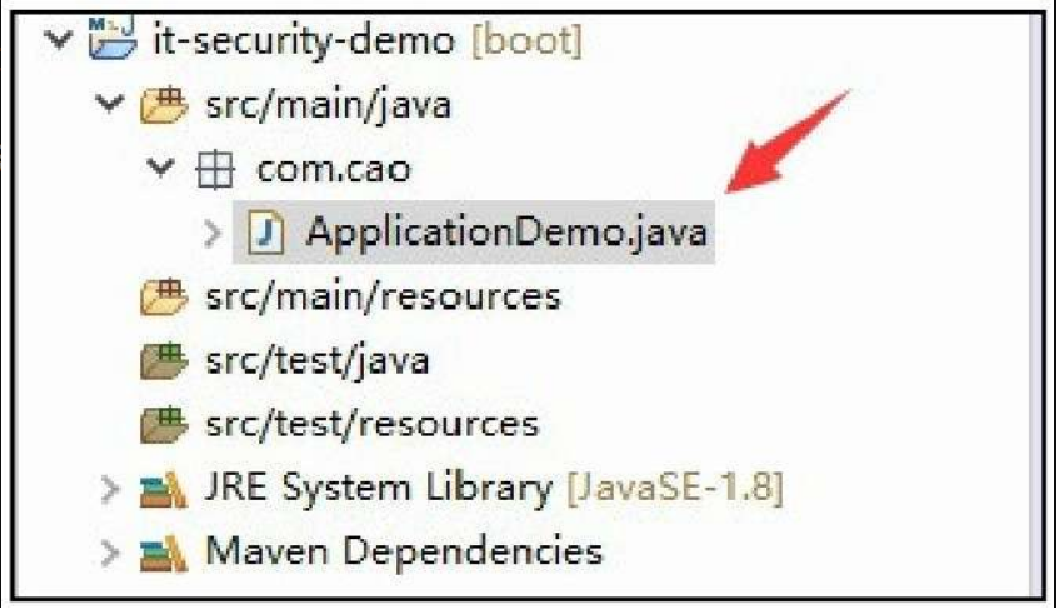
开始写 ApplicationDemo.java,代码如下所示。
package com.cao;
import org.springframework.boot.SpringApplication;
import org.springframework.boot.autoconfigure.EnableAutoConfiguration;
import org.springframework.boot.autoconfigure.SpringBootApplication;
/**
  * @Description 模块启动类
  * @author dell
  */
//说明这是一个springboot项目
@SpringBootApplication
@EnableAutoConfiguration
public class ApplicationDemo {
   public static void main(String[] args) {
      //Spring标准启动方式
      SpringApplication.run(ApplicationDemo.class, args);
   }
}
启动运行
如果启动运行时有图 2.19 所示的报错信息,说明缺少数据库信息。
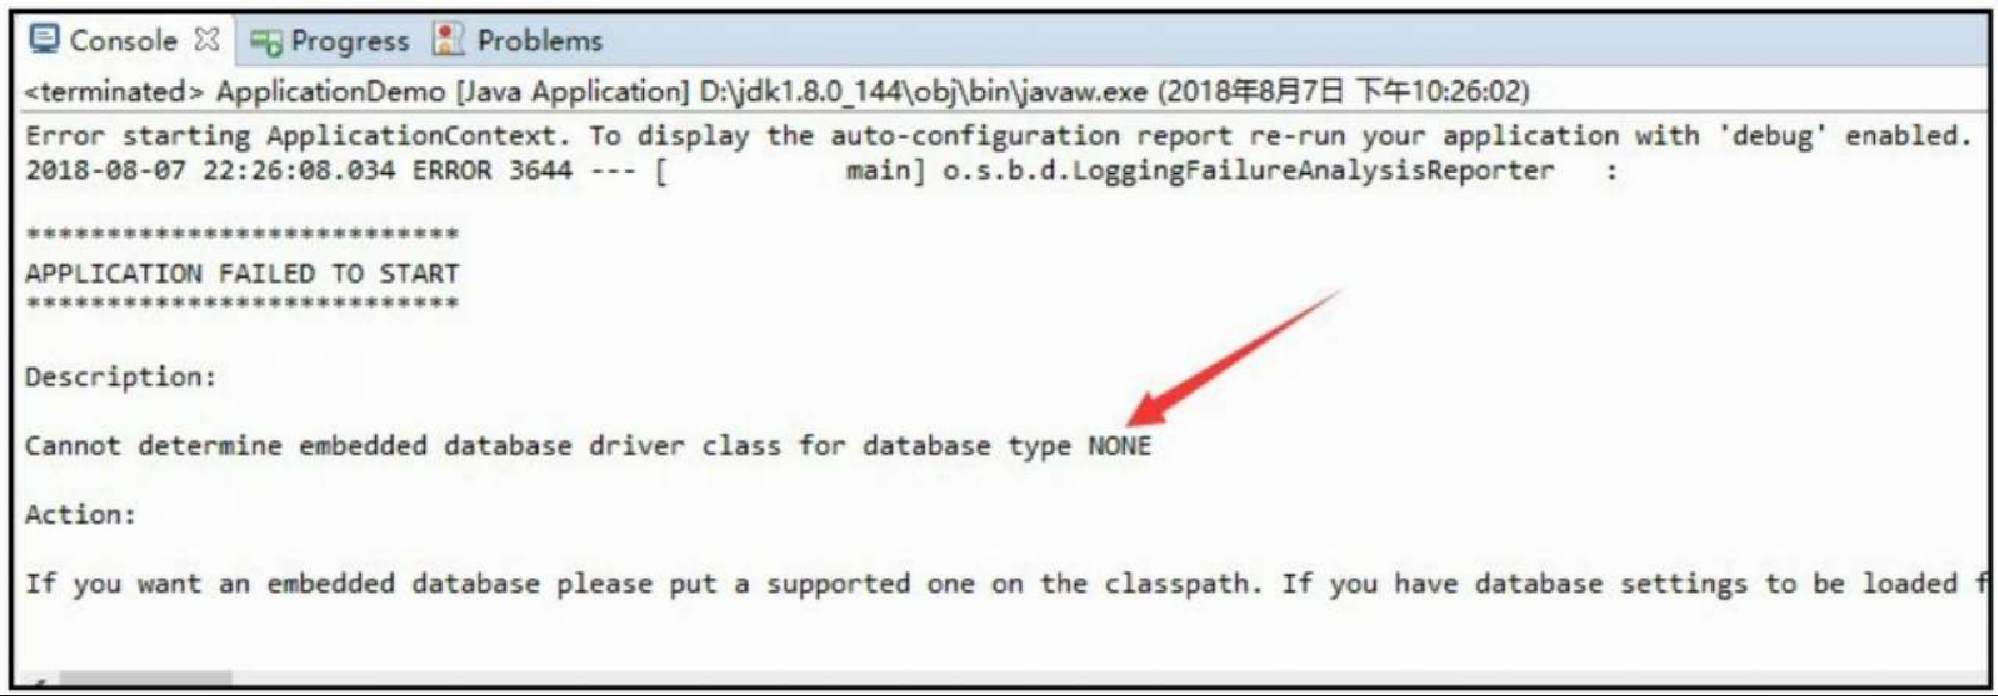
解决方法:在 Spring Boot 中,可以使用 application.properties 进行配置项配置。所以,我们新建一个 application.properties,并且写入如下的数据库配置项,根据需要写自己的数据库链接信息,这里以 MySQL 为例,代码如下所示。
spring.datasource.driver-class-name = com.mysql.jdbc.Driver
spring.datasource.url=jdbc:mysql://127.0.0.1:3308/test?useUnicode=yes&characterEncoding=UTF-8&useSSL=false
spring.datasource.username = root
spring.datasource.password = 123456
再次启动,这里依旧会有报错信息,如图 2.20 所示。
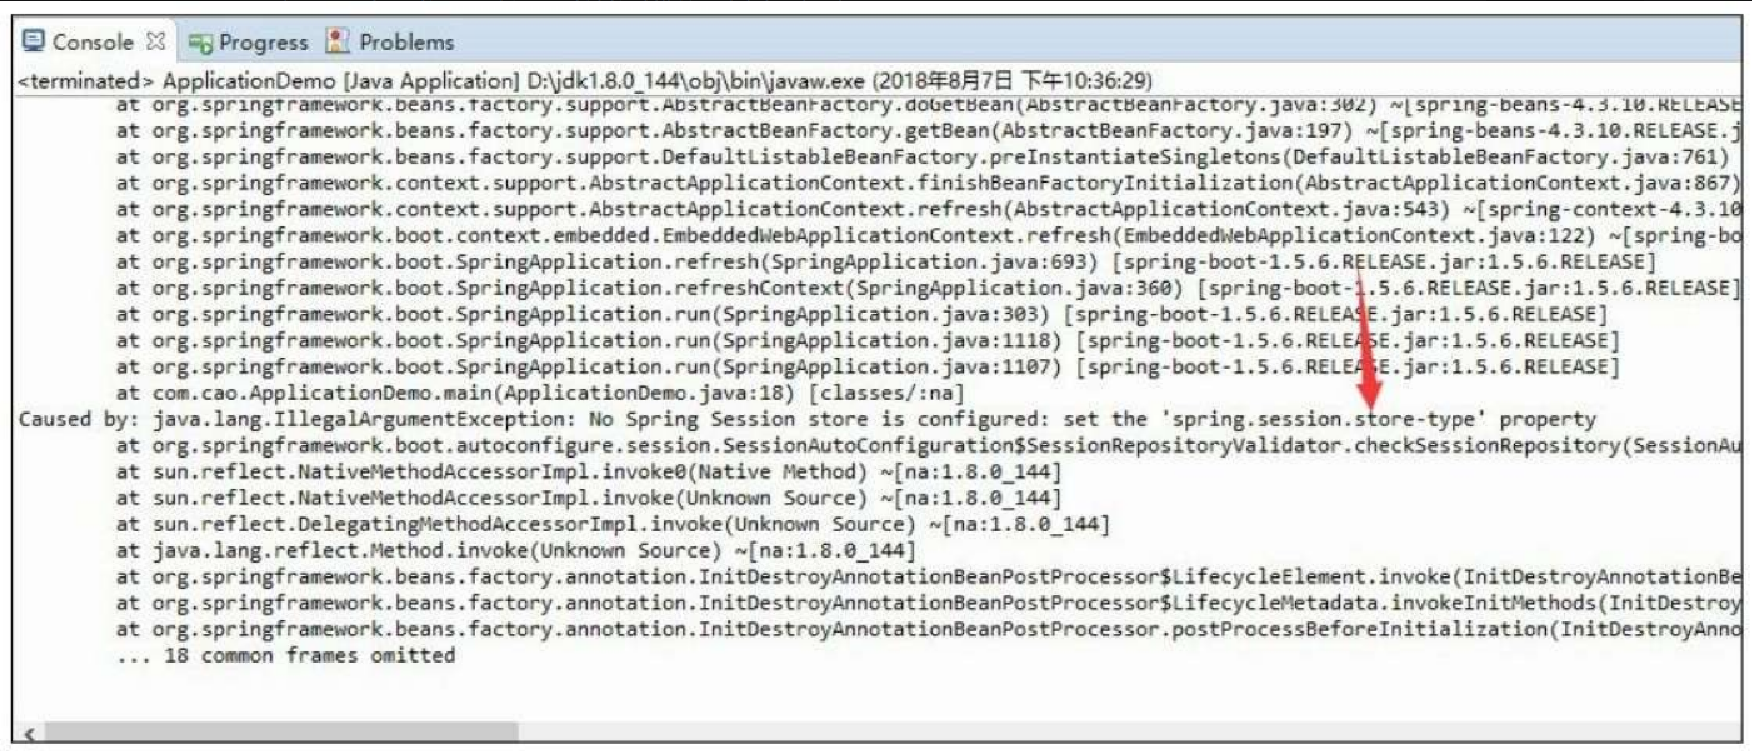
解决方法:因为使用了 session 依赖,但是类型还没有被设置。为了启动项目,暂时将 session 的类型设置为 none,如下所示。
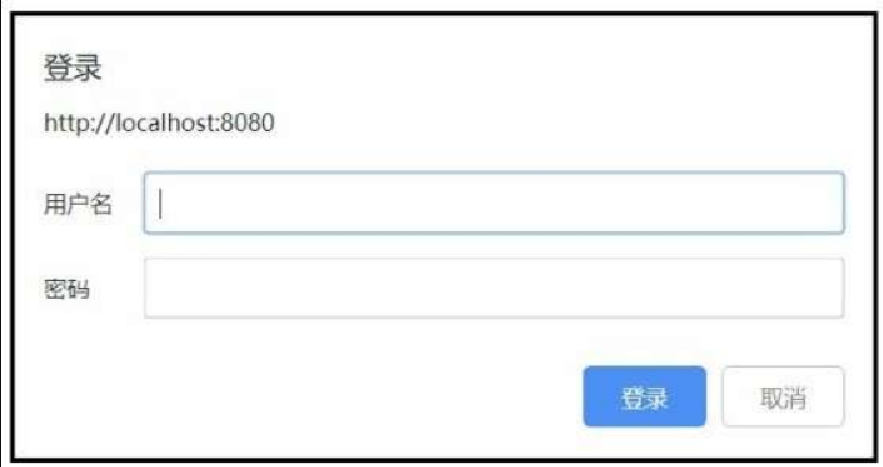
spring.session.store-type=none再次启动,这次将会启动成功,在控制台上没有报错信息。在浏览器中输入 http://localhost:8080 ,将会弹出登录对话框,如图 2.21 所示。
打包发布
这一节的重点是搭建微服务框架,但如何体现微服务框架的优点?在这里先进行打包部署,说明其部署的简单性。需特别注意的是,这里不需要 tomcat 进行部署,只需要有 JDK 的支持就可以进行发布。在 Demo 项目中的 pom.xml 中添加 build,代码如下所示。
<build>
<plugins>
<plugin>
<groupId>org.springframework.boot</groupId>
<artifactId>spring-boot-maven-plugin</artifactId>
<version>1.3.3.RELEASE</version>
<executions>
<execution>
<goals>
<goal>repackage</goal>
</goals>
</execution>
</executions>
</plugin>
</plugins>
<finalName>demo</finalName>
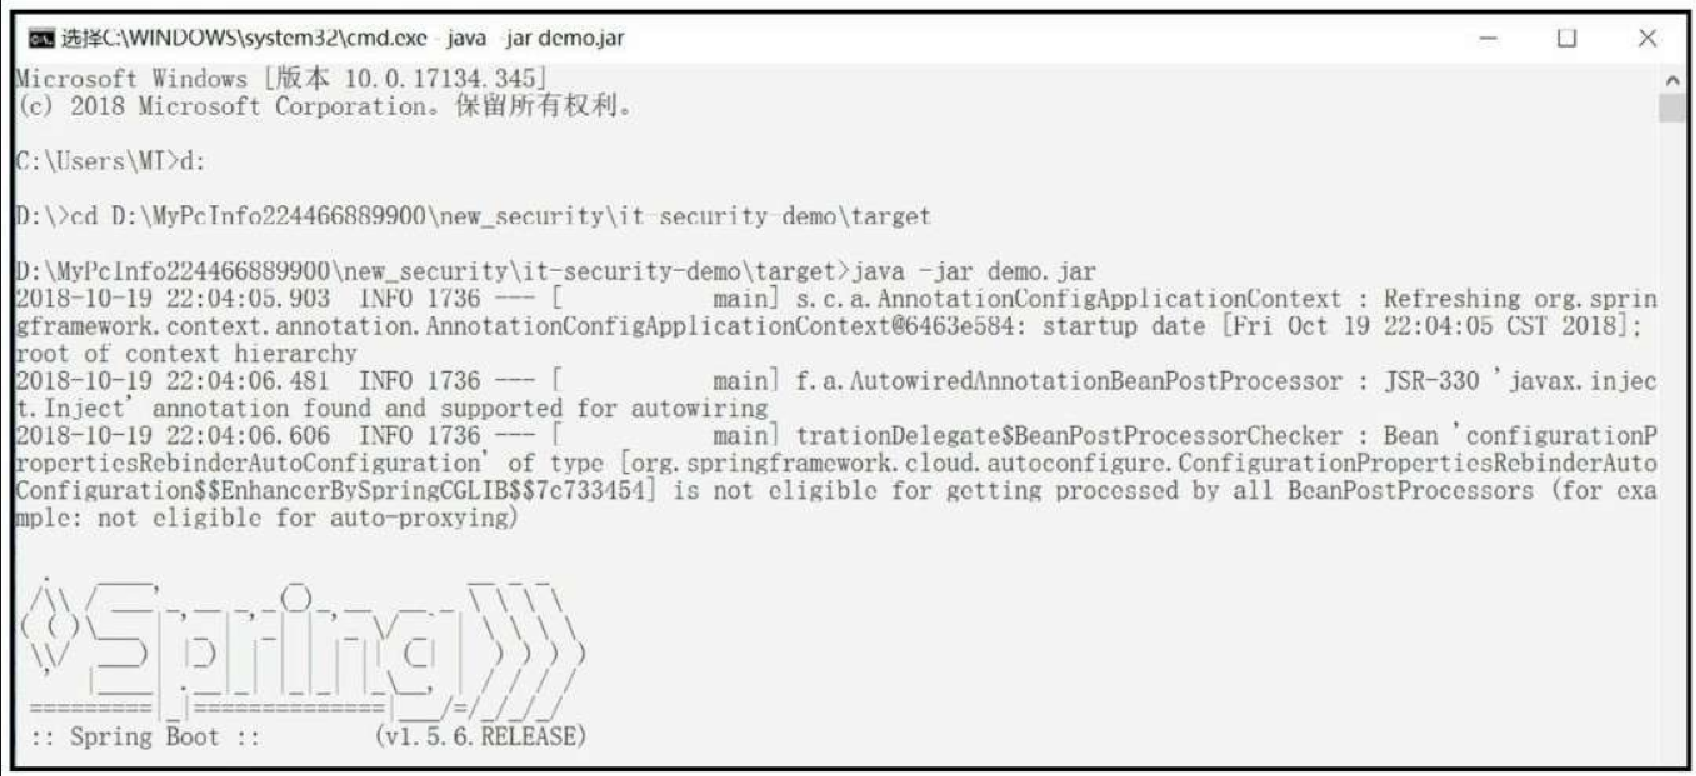
</build>因为没有私服,所以需要先将 it-security、it-securitycore、it-security-browser、it-securtiry-app 打包,将其 jar 包放到 Maven 仓库。具体的做法是在项目上单击右键选择 Run As→Maven clean→Maven install,然后再对 Demo 进行打包,最终效果如图 2.22 所示。
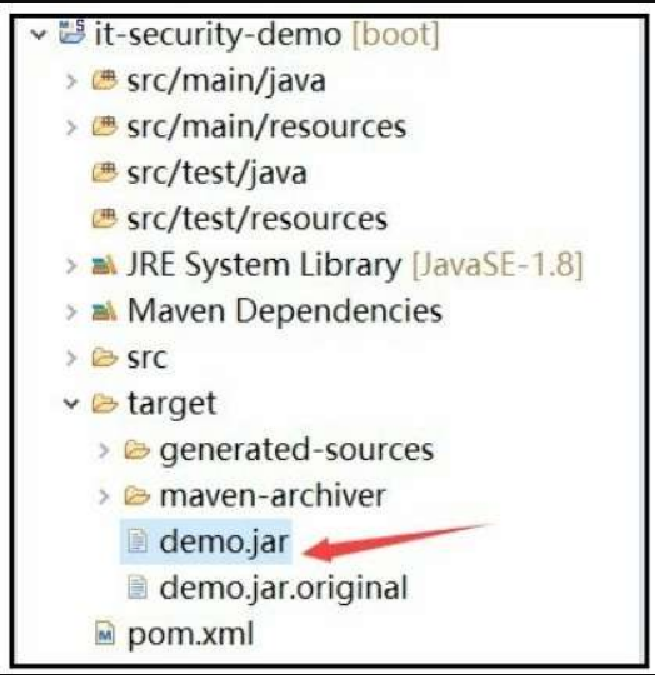
这个 jar 包在 D:\MyPcInfo224466889900\new_security\it-security-demo\target 目录下,我们可以直接通过 JDK 进行发布,发布成功如图 2.23 所示。