Config的服务端使用
在介绍过 Config 的原理之后,我们应该了解到 Config 主要分为服务端与客户端。本小节将使用服务端搭建一个配置中心,并且本配置中心的模块是后面用于存放配置文件的模块。
搭建配置中心
在搭建配置中心时,按照步骤的先后顺序开始,下面是搭建的全部详细步骤。
1) 新建一个框架
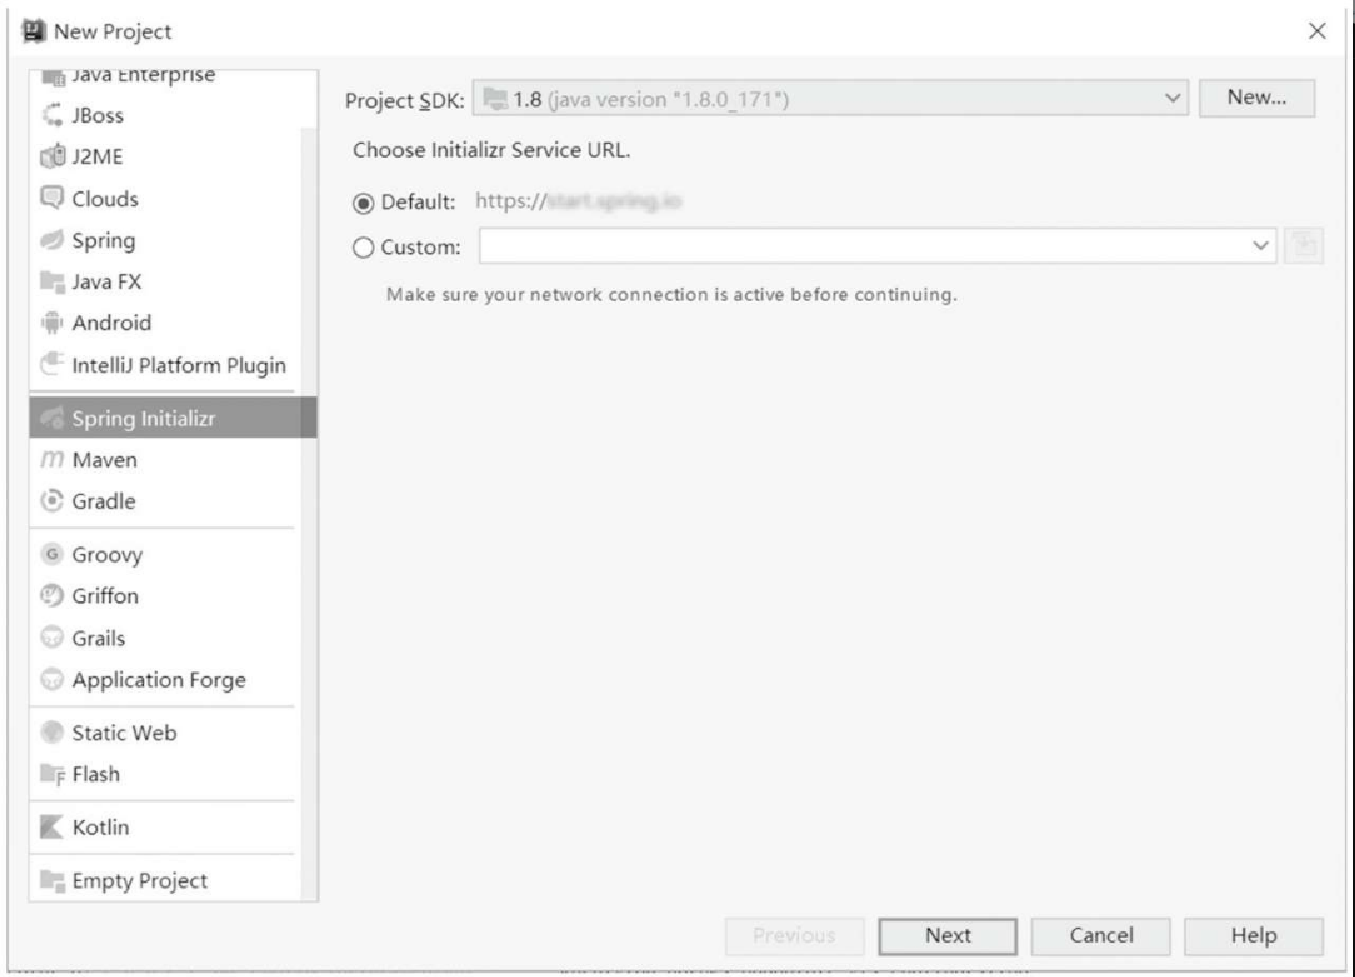
首先,新建一个 Spring Boot 框架,如图14.2所示。
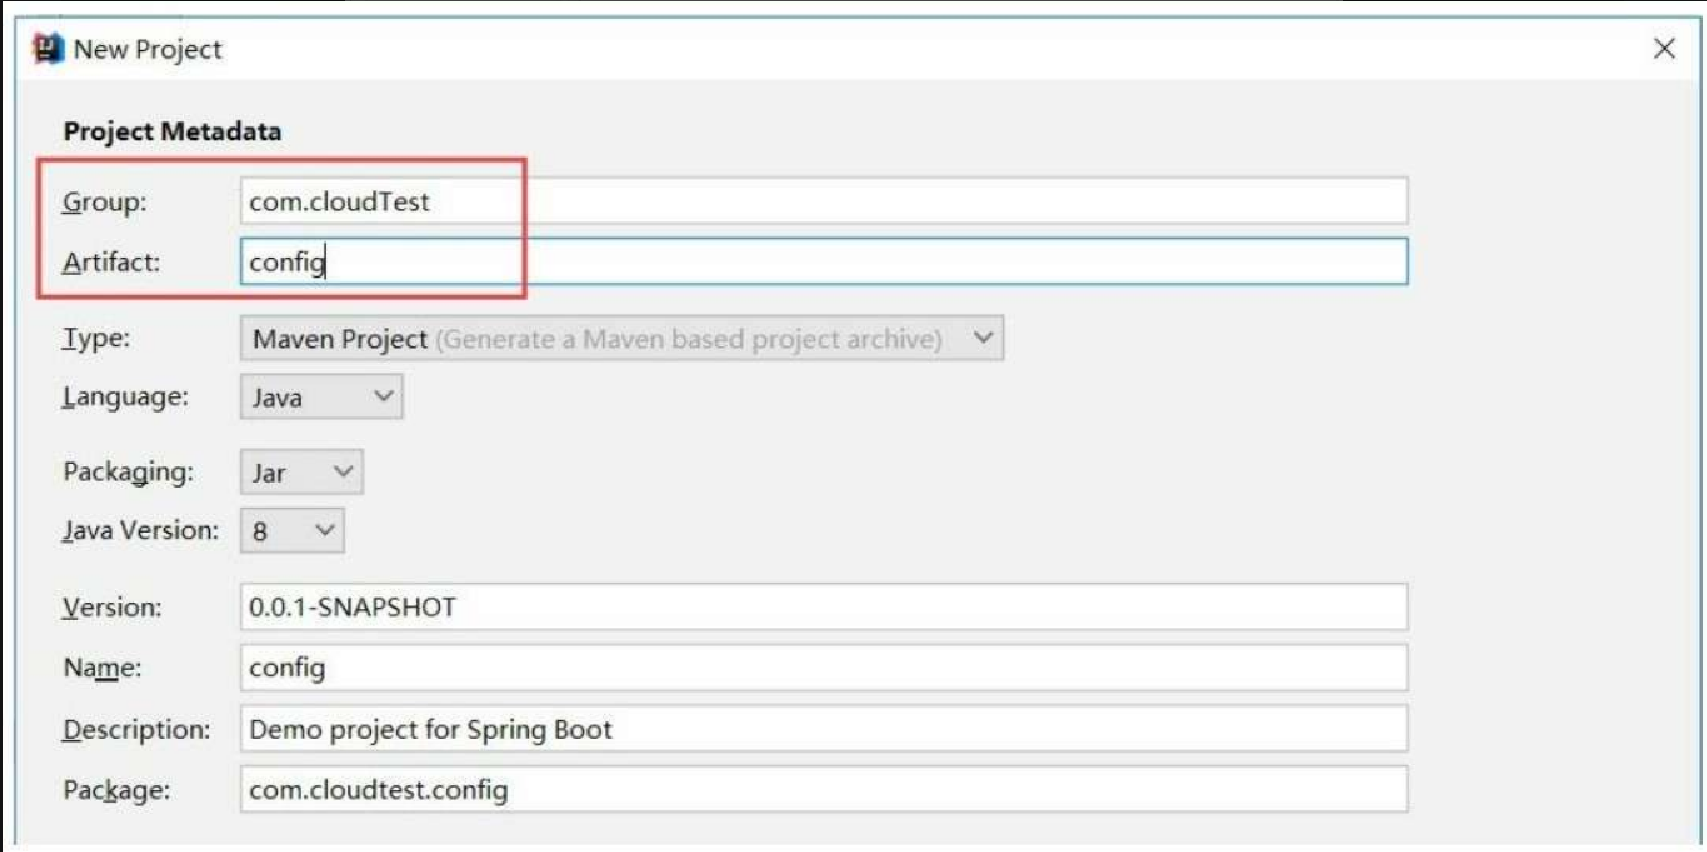
然后,新建一个 config 项目,如图14.3所示。
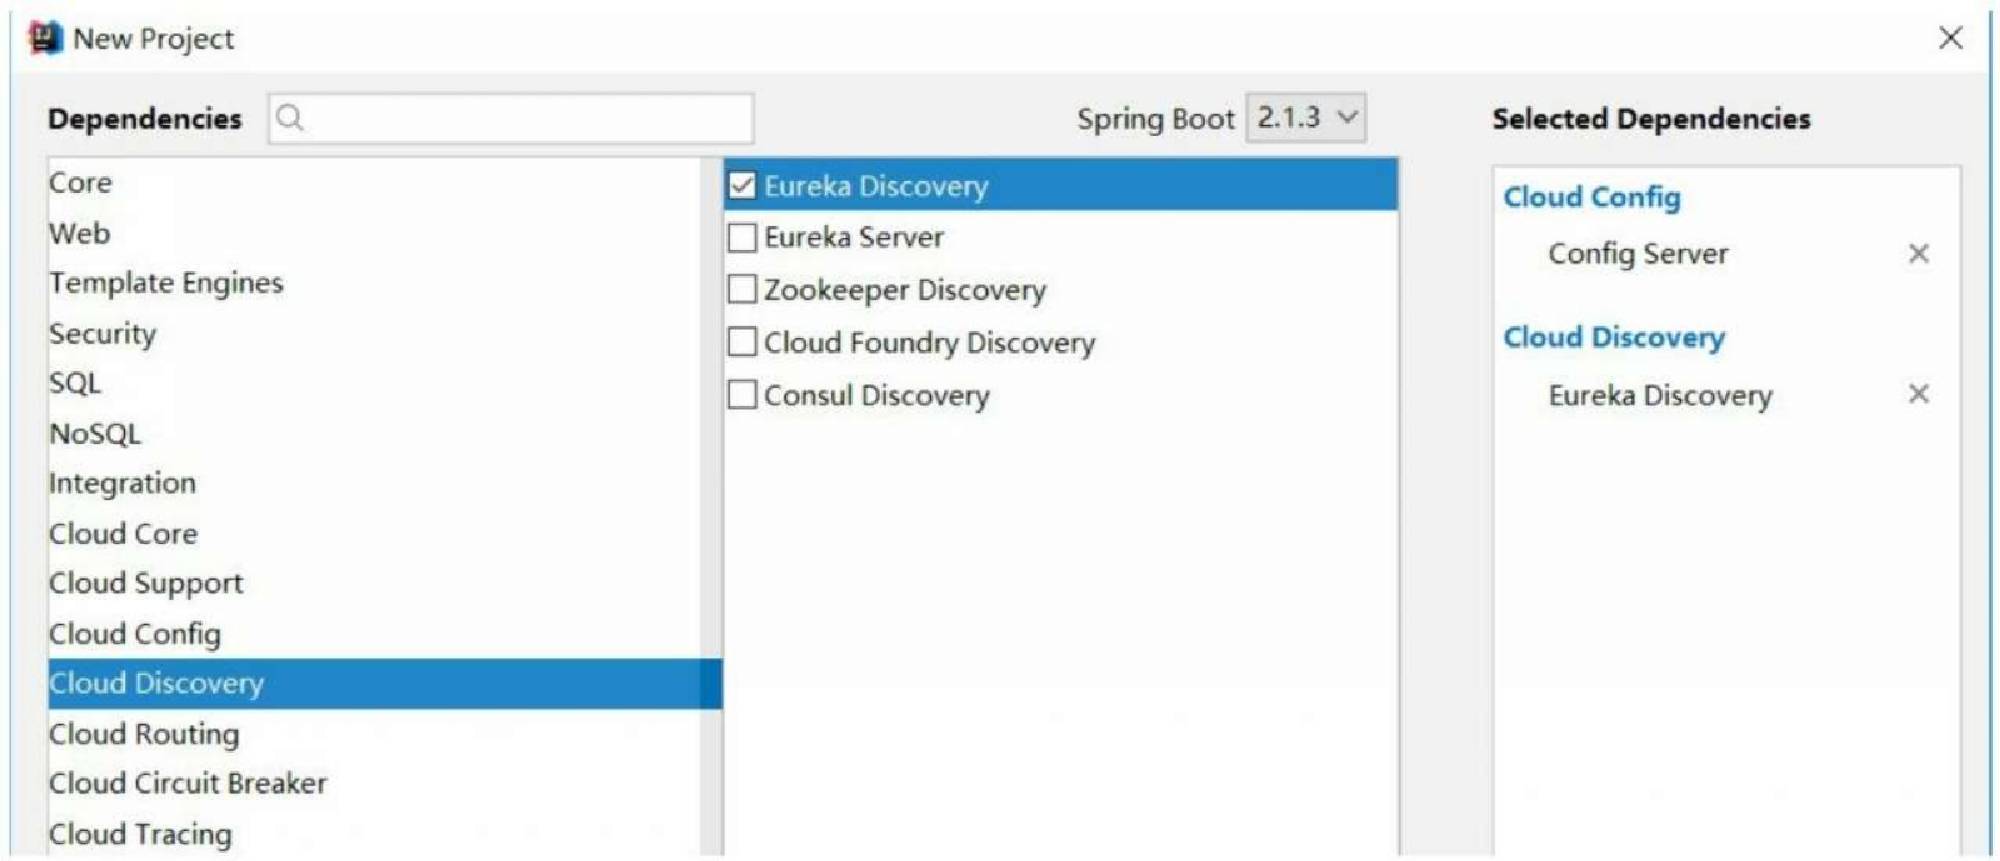
然后,选择需要的依赖。本应用是一个微服务,需要选择 Eureka Discovery,同时,因为这是 Config 的注册中心,所以还需要选择 Config Server,如图14.4所示。
这时,项目已经新建完成。我们进入 pom.xml 文件中,可以看到下面的依赖,这个依赖是 config-server 的依赖。代码如下所示。
<dependency>
   <groupId>org.springframework.cloud</groupId>
   <artifactId>spring-cloud-config-server</artifactId>
</dependency>
2) 准备配置文件
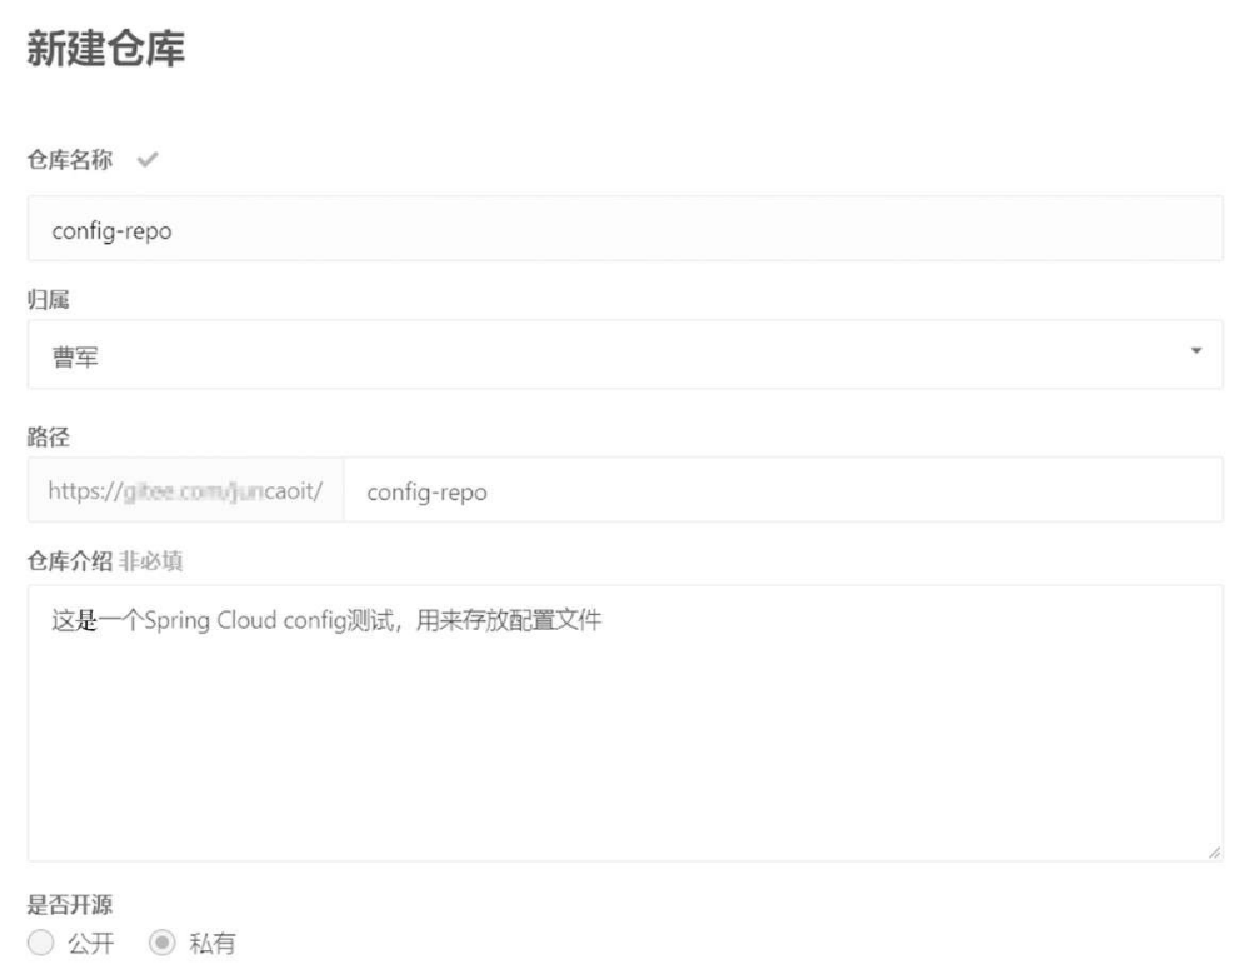
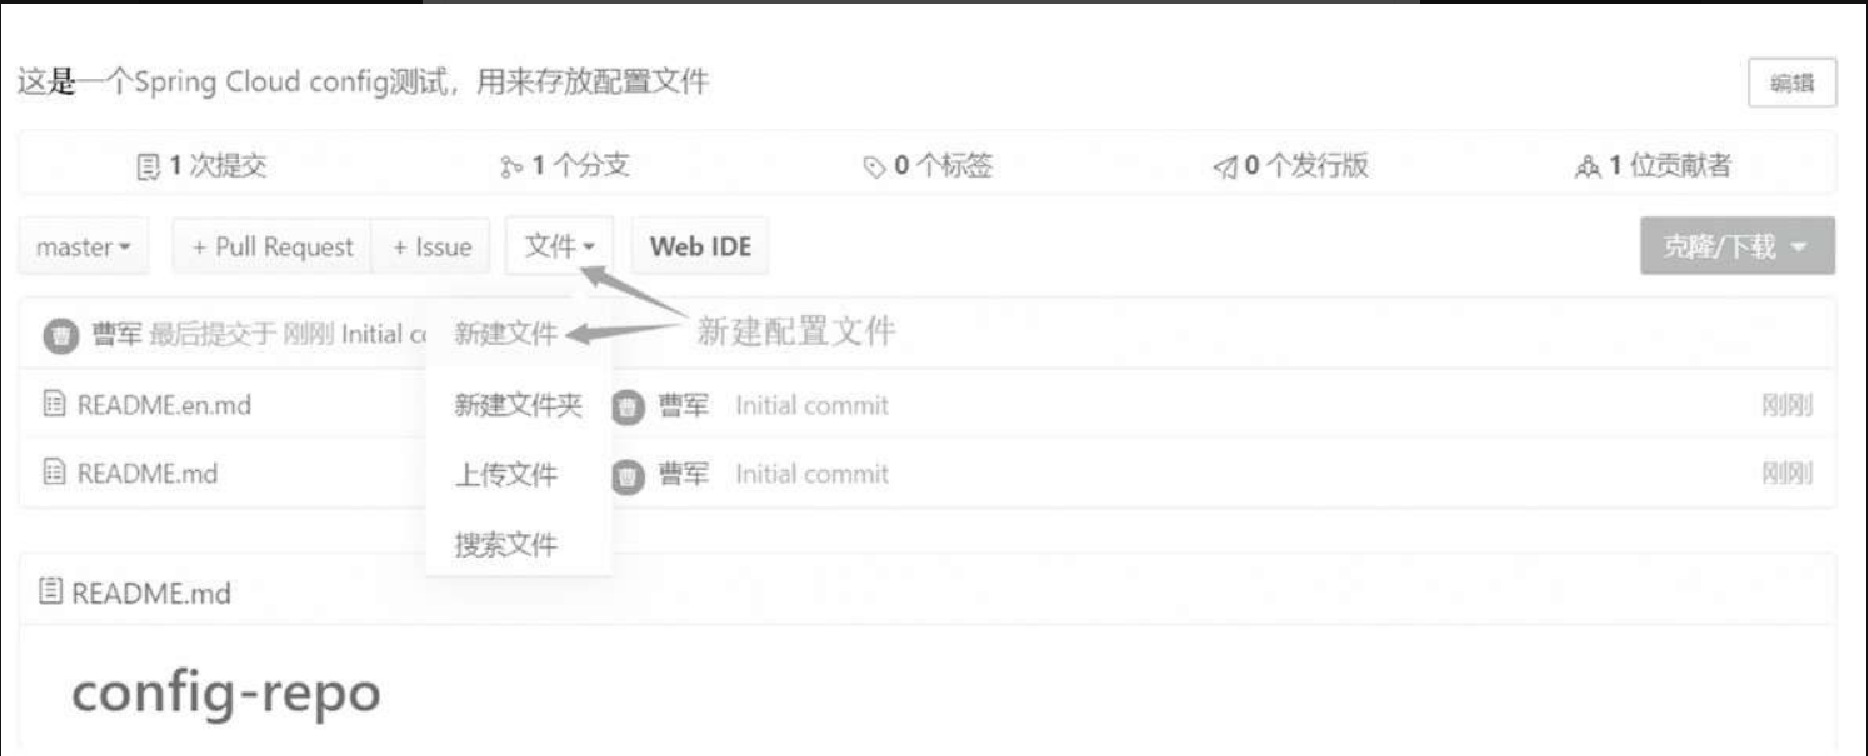
进入码云上新建仓库,仓库名称为 config-repo,如图14.5所示。
然后,新建配置文件。如图14.6所示。
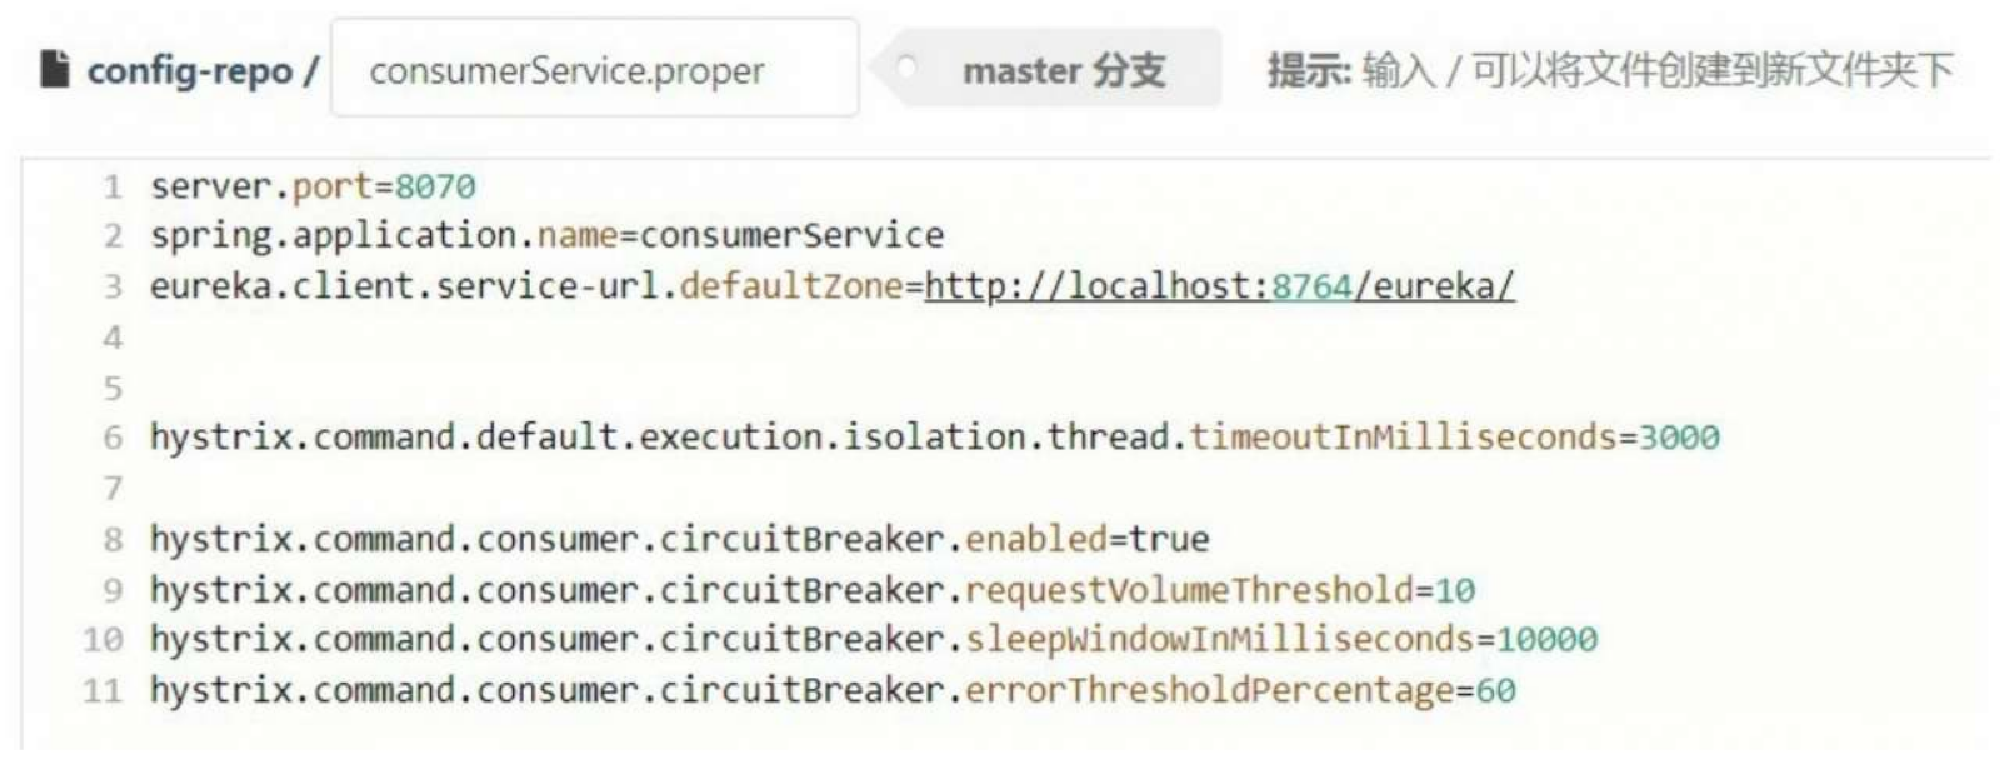
我们使用的是 consumer 中的配置文件,这里直接将配置文件复制到码云仓库中,如图14.7所示。
这样,我们就获取到了仓库的地址。
3) 继续搭建配置中心
首先,添加注解。启动类代码如下所示。
package com.cloudtest.config;
@SpringBootApplication
//Eureka客户端注解
@EnableDiscoveryClient
//配置中心注解
@EnableConfigServer
public class ConfigApplication {
   public static void main(String[] args) {
      SpringApplication.run(ConfigApplication.class, args);
   }
}
在上面的代码中,需要添加注解 @EnabeDiscoveryClient,这个注解保证这个微服务可以注册到 Eureka 服务注册中心;添加注解 @EnableConfigServer,这个注解的功能是使得应用成为配置中心。然后,修改 application.properties 文件,代码如下所示。
server.port=8096
spring.application.name=config
eureka.client.service-url.defaultZone=http://localhost:8764/eureka/
spring.cloud.config.server.git.uri=https://×××.com/×××
spring.cloud.config.server.git.username=13544
spring.cloud.config.server.git.password=xhfx88xxxx
其中,URI 是上文新建仓库的地址,这里用 “×××” 代替,username 是用户名,password 是密码。不过这里的用户名与密码被锁住了,读者使用自己的用户名和密码即可。
配置中心测试
首先,启动项目。
1) 测试1
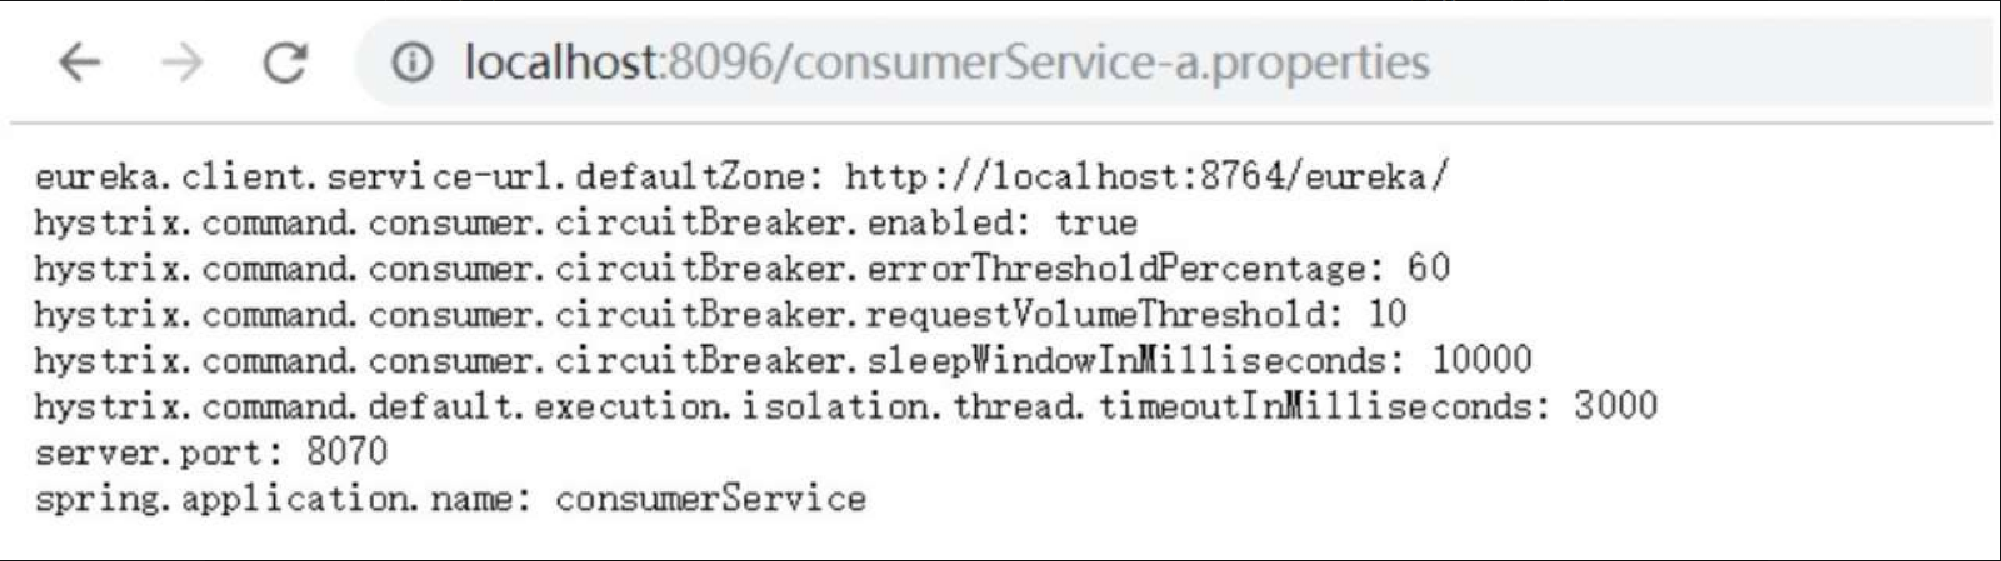
访问链接 http://localhost:8096/consumerService-a.properties ,浏览器的效果如图14.8所示。
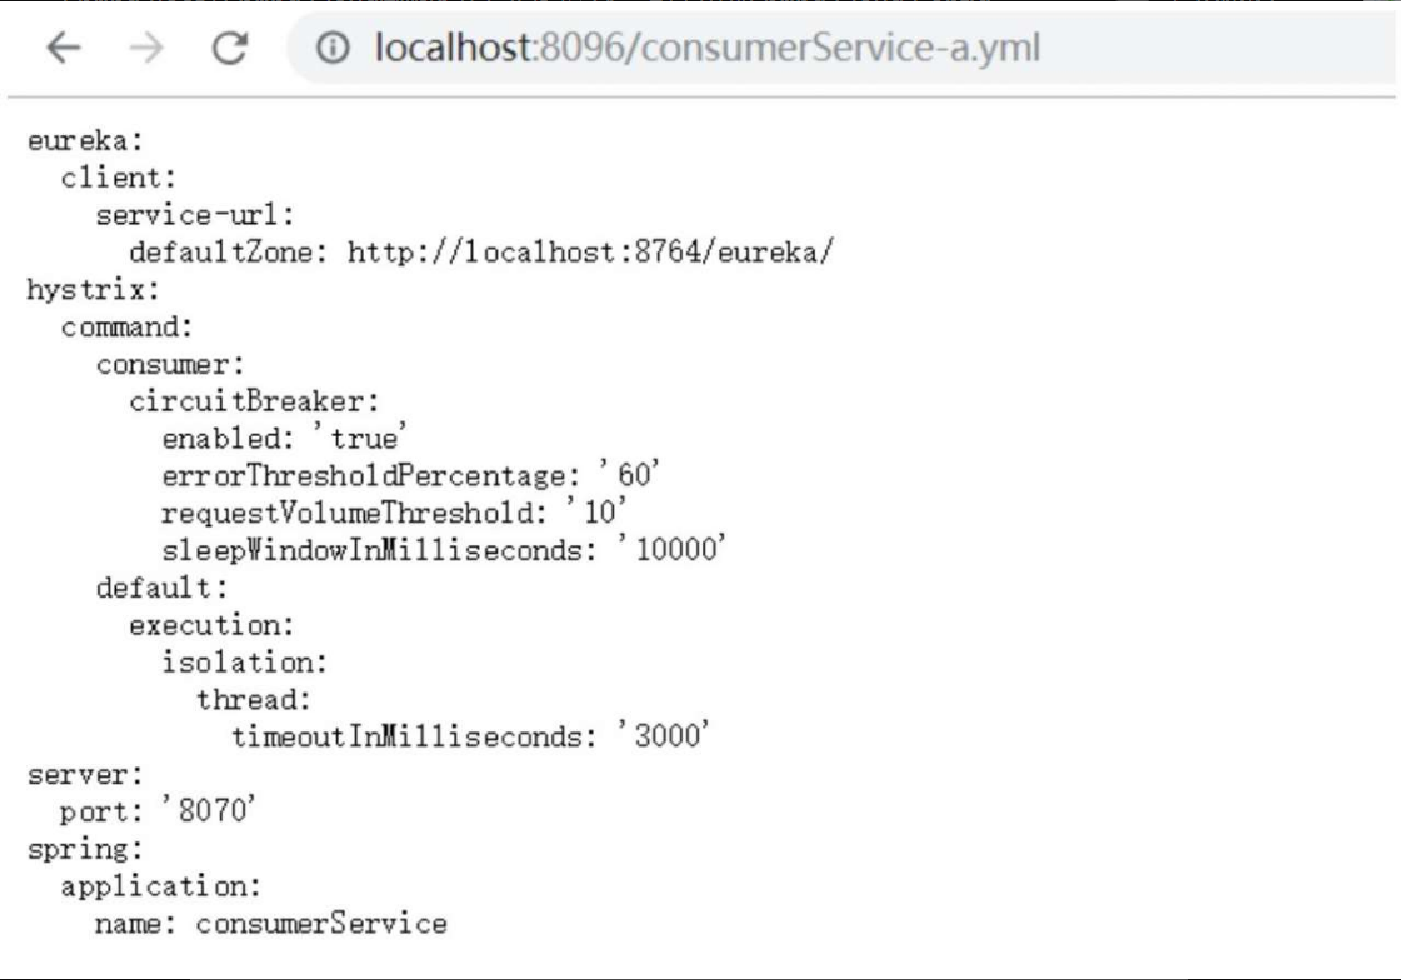
再访问链接 http://localhost:8096/consumerService-a.yml ,会出现新的效果,如图14.9所示。
2) 测试2
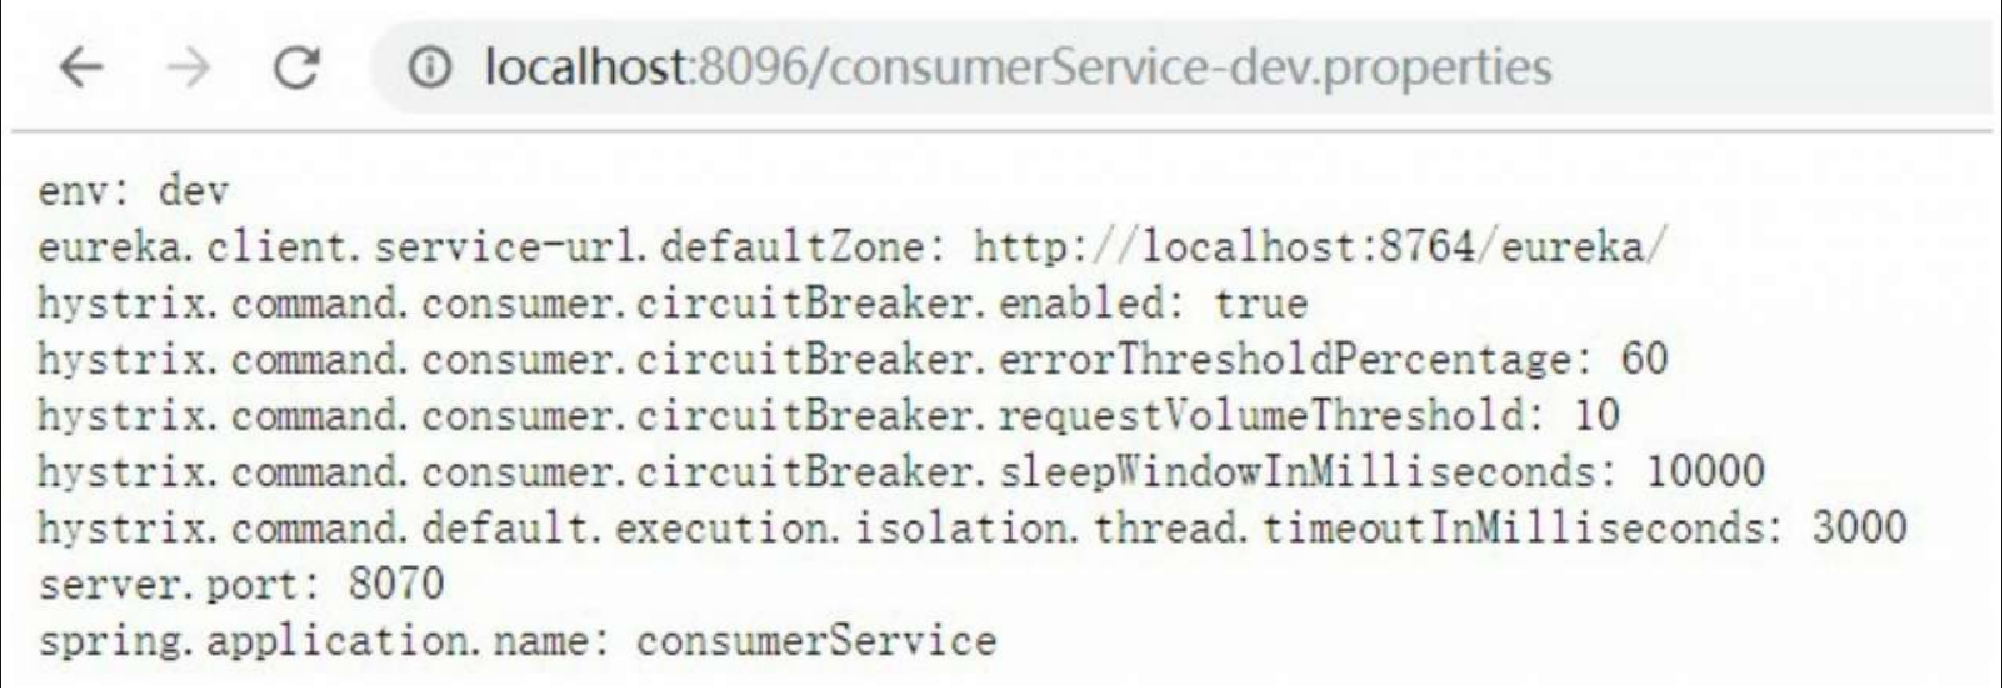
继续新建文件,consumerService-dev.properties 和 consumerService-test.properties。下面列举其中一个的配置文件,在上文的配置文件中加上环境 env 配置。
server.port=8070
spring.application.name=consumerService
eureka.client.service-url.defaultZone=http://localhost:8764/eureka/
hystrix.command.default.execution.isolation.thread.timeoutInMilliseconds=3000
hystrix.command.consumer.circuitBreaker.enabled=true
hystrix.command.consumer.circuitBreaker.requestVolumeThreshold=10
hystrix.command.consumer.circuitBreaker.sleepWindowInMilliseconds=10000
hystrix.command.consumer.circuitBreaker.errorThresholdPercentage=60
env=test
然后,访问链接 http://localhost:8096/consumerService-dev.properties 。效果如图14.10所示。
3) 测试3
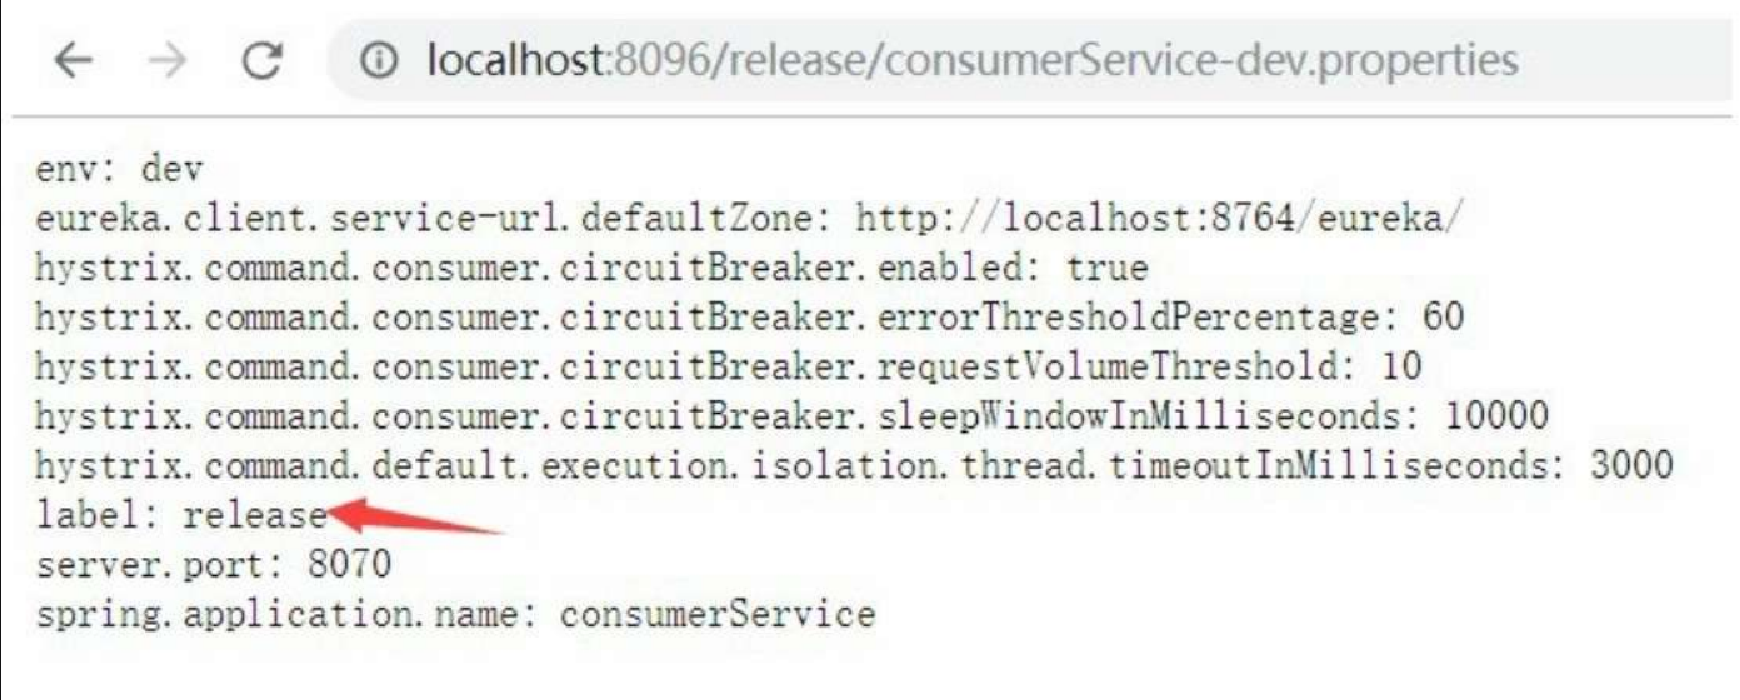
再在 master 的基础上新建一个分支为 release,然后修改 consumerService-dev.properties,如下。
label:release访问链接 http://localhost:8096/release/consumerService-dev.properties 。效果如图14.11所示。
本地Git
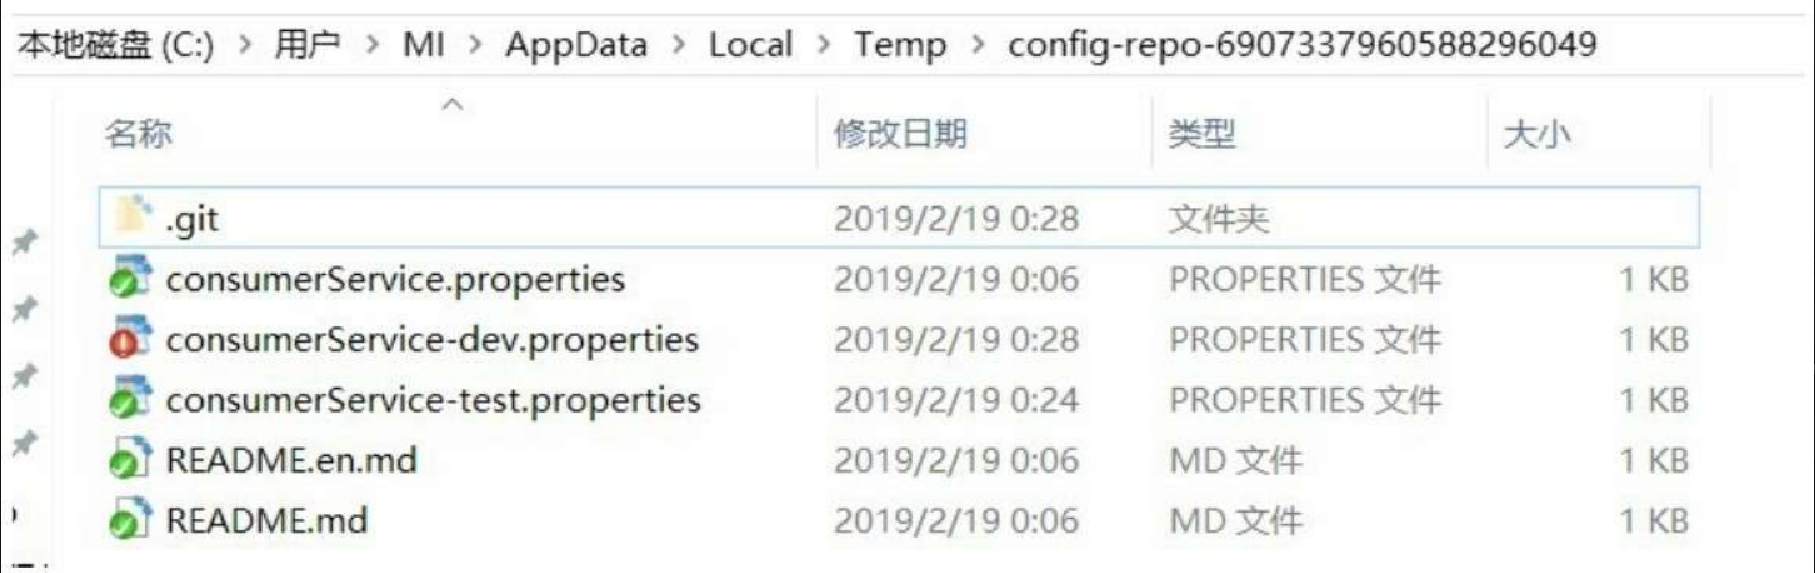
根据上文的 Config 工作流程,远程 Git 上的配置文件将会被读取到本地 Git 中。那么这个配置文件在哪里?我们在启动新建项目 Config 时,可以看到控制台上有如下信息。
2019-02-19 00:28:07.155 INFO 19884 --- [nio-8096-exec-3] .c.s.e.Mu ltipleJGitEnvironmentRepository : Fetched for remote release and found 1 updates
2019-02-19 00:28:08.686 INFO 19884 --- [nio-8096-exec-3] o.s.c.c.s. e.NativeEnvironmentRepository : Adding property source: file:/C:/Users/MI/AppData/Local/Temp/config-repo-6907337960588296049/consumerServicedev.properties
2019-02-19 00:28:08.686 INFO 19884 --- [nio-8096-exec-3] o.s.c.c.s.e .NativeEnvironmentRepository : Adding property source: file:/C:/Users/MI/AppData/Local/Temp/config-repo-6907337960588296049/consumerService.properties
按照控制台日志上的路径,在计算机本地可以找到 Git 上的配置文件,本地 Git 如图14.12所示。
我们是否可以根据自己的需要修改 Git 存放的位置?在配置文件中,可以使用一个配置项,代码如下所示。
spring.cloud.config.server.git.basedir=D:/MySouGo/IDEA_Test/config/basedir重新启动项目,我们会发现 Git 目录被创建。本地 Git 效果如图14.13所示。
