点餐管理系统框架说明
根据业务的划分点餐管理系统适合搭建成微服务框架,所以我们可以基于 Spring Cloud 搭建一个业务系统。本节先对系统的整体框架进行介绍,主要包括系统的搭建,系统的功能模块,系统使用的技术。
系统使用的技术
首先,我们的系统基于 Spring Cloud 框架进行搭建,搭建过程中将会使用第三篇介绍的许多组件,然后在代码中,将会使用 Spring Boot 的基础知识进行开发。在本案例中,不会使用 Spring Cloud 的所有组件,不过,有些没有使用的组件将会在第 17 章的案例中使用。下面说明系统使用的主要技术。
软件 IDEA:在第 2 章讲解的微服务框架的搭建中,使用了 STS 与 IDEA 两种开发软件演示,在本案例中,将会使用 IDEA 进行演示。
Spring Cloud:在点餐管理系统中,我们需要搭建分布式系统,具体一点,是微服务框架的业务系统。通过第 1 章,我们知道有许多框架可以选择,以此作为一个微服务框架的结构。按照前面对微服务框架的介绍,我们使用 Spring 生态圈中的 Spring Cloud 为主要框架进行搭建。因为,在前面第 3 篇的介绍中,可以体会到 Spring Cloud 在微服务框架开发中的快捷、方便、高效,同时,Spring Cloud 的强大功能,让我们选择使用这个框架。
服务治理 Eureka:在 Spring Cloud 的基础框架中,不可忽略的就是服务治理,可以说它是最基础的组件。在 Eureka 中,主要是负责微服务框架中的服务发现,服务治理功能。
声明式服务调用 Feign:Feign 是基于 Netfix Feign,主要整合了 Ribbon 与 Hystrix,同时提供一种声明式调用的方式。服务之间的调用,最先使用 RestTemplate 进行请求,RestTemplate 对 HTTP 请求进行了封装,形成了模板化的接口调用。Feign 在此基础上,做了一些封装。只要在创建接口时,使用注解进行配置,就可以与服务提供者绑定。Feign 的声明式调用,可以帮助我们更加快捷地调用 HTTP API。因此使用 Feign 进行服务间的调用。
分布式配置中心 Config:项目开发中,如果开发人员使用同一个配置文件,就会出现不少问题。首先,不方便维护,多个开发人员可能在线上需要测试不同的配置项,这样就会冲突不断,不能有效地维护;其次,配置的安全与权限也需要进行控制;最后,每次更新配置文件后都需要进行重启,这样会带来很多不便。
第 14 章说过,Spring Cloud Config 是一个全新的项目,也是一个单独的微服务模块,存在服务端和客户端,主要为微服务框架提供了集中化的配置支持。其中,服务端一般被称作配置中心,用来连接配置仓库,并为客户端提供配置信息;客户端则是微服务框架中的各个微服务应用,可以指定使用配置中心管理配置内容,在启动的时候读取远程 Git 的配置文件加载到应用中,并将配置文件加载到本地文件系统。因此,在实际场景中,Config 使用特别广泛,所以,本案例将使用 Config。
数据源访问 MyBatis:在第 6 章中,介绍 Spring Boot 操作数据源的时候,介绍过三种对数据源操作的方式,其中的 MyBatis 与 JPA 各有优缺点。MyBatis 是一款优秀的持久层框架,而且越来越多的互联网企业开始使用这个框架,其优秀的特性主要体现在,支持定制化的 SQL、存储过程和高级映射。因此,在本案例使用 MyBatis 操作数据源。
RestFul 风格接口:第 3 章说明过,Spring 的微服务是基于 Restful 的风格搭建的框架,因此,在本案例中,均采用 Restful 风格的接口。
数据库 MySQL:选择 MySQL 作为数据库。
系统功能模块
回顾16.1.1节的知识点,可以在上面的基础上搭建系统功能模块,为了方便讲解,本案例没有搭建成高可用模块,有兴趣的读者可以将模块搭建成高可用。功能模块如图16.1所示。
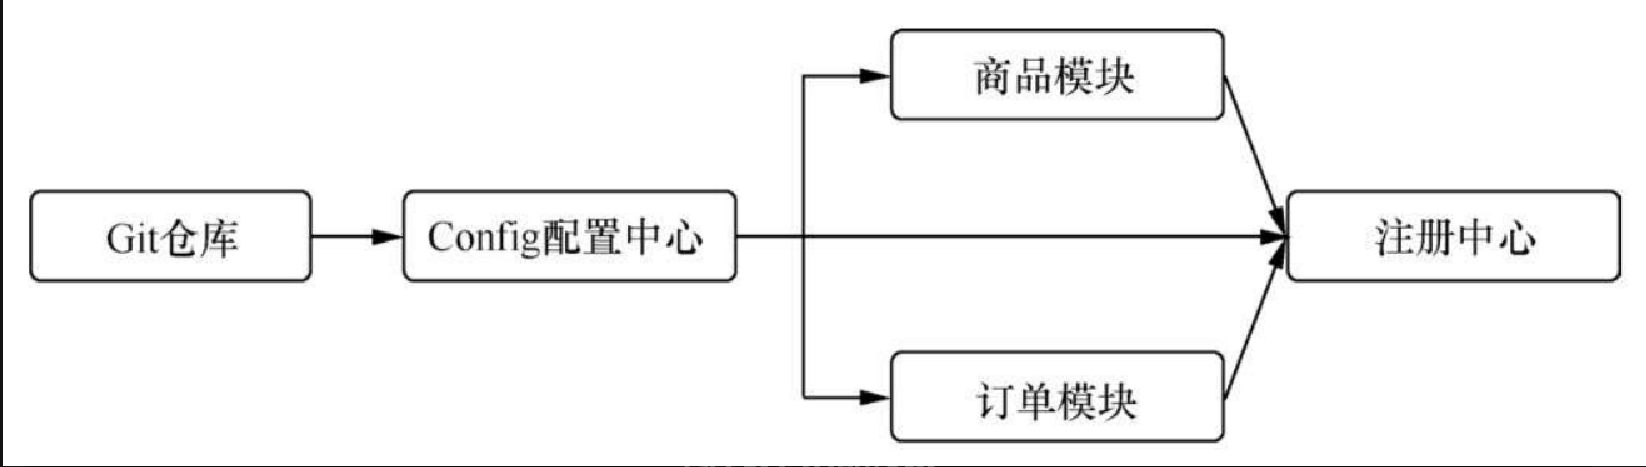
在图16.1中,主要可以分为五个部分,下面对每个模块进行说明:
Git 仓库:考虑到使用 Config,因此需要使用 Git,这里选择第 14 章使用过的本地仓库。
Config 配置中心:这个模块用来做服务端,将客户端需要的功能配置文件写在这个模块引用的远程 Git 中。
商品模块:对于本案例,根据业务分为两个模块,其中一个为商品模块,主要负责对商品的操作。这个模块主要用来实现店家对商品的维护,同时,在下订单时对商品进行消费。
订单模块:本模块主要用于用户下订单。此模块主要是对用户进行开放,在订单的操作中,必会操作商品模块,这时的服务间信息操作使用 Feign。
注册中心:配置中心、商品模块、订单模块三个模块的应用的注册都将注册到注册中心。
系统搭建
具体的搭建,我们需要根据图16.1中的功能模块进行搭建。为了可以一边搭建一边测试。搭建顺序是注册中心,配置中心,商品中心,订单中心。下面,按照顺序对各个模块进行搭建。
注册中心搭建
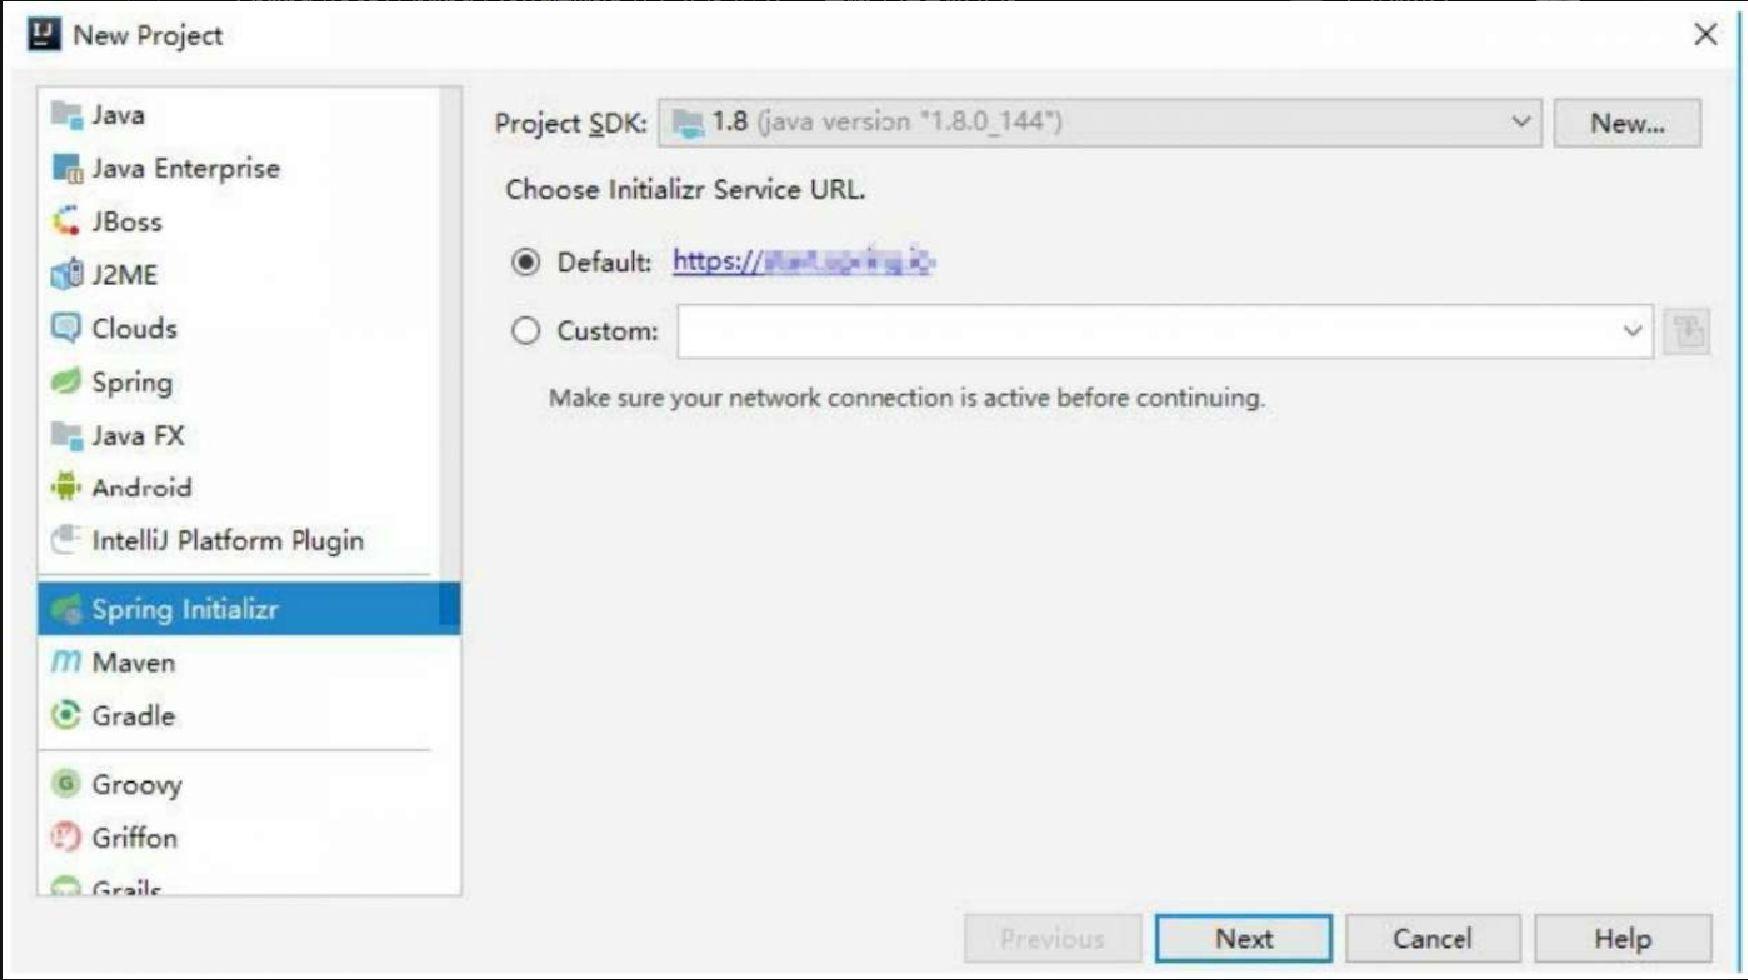
首先,新建项目,选择 Spring Initializr 标签,如图16.2所示。
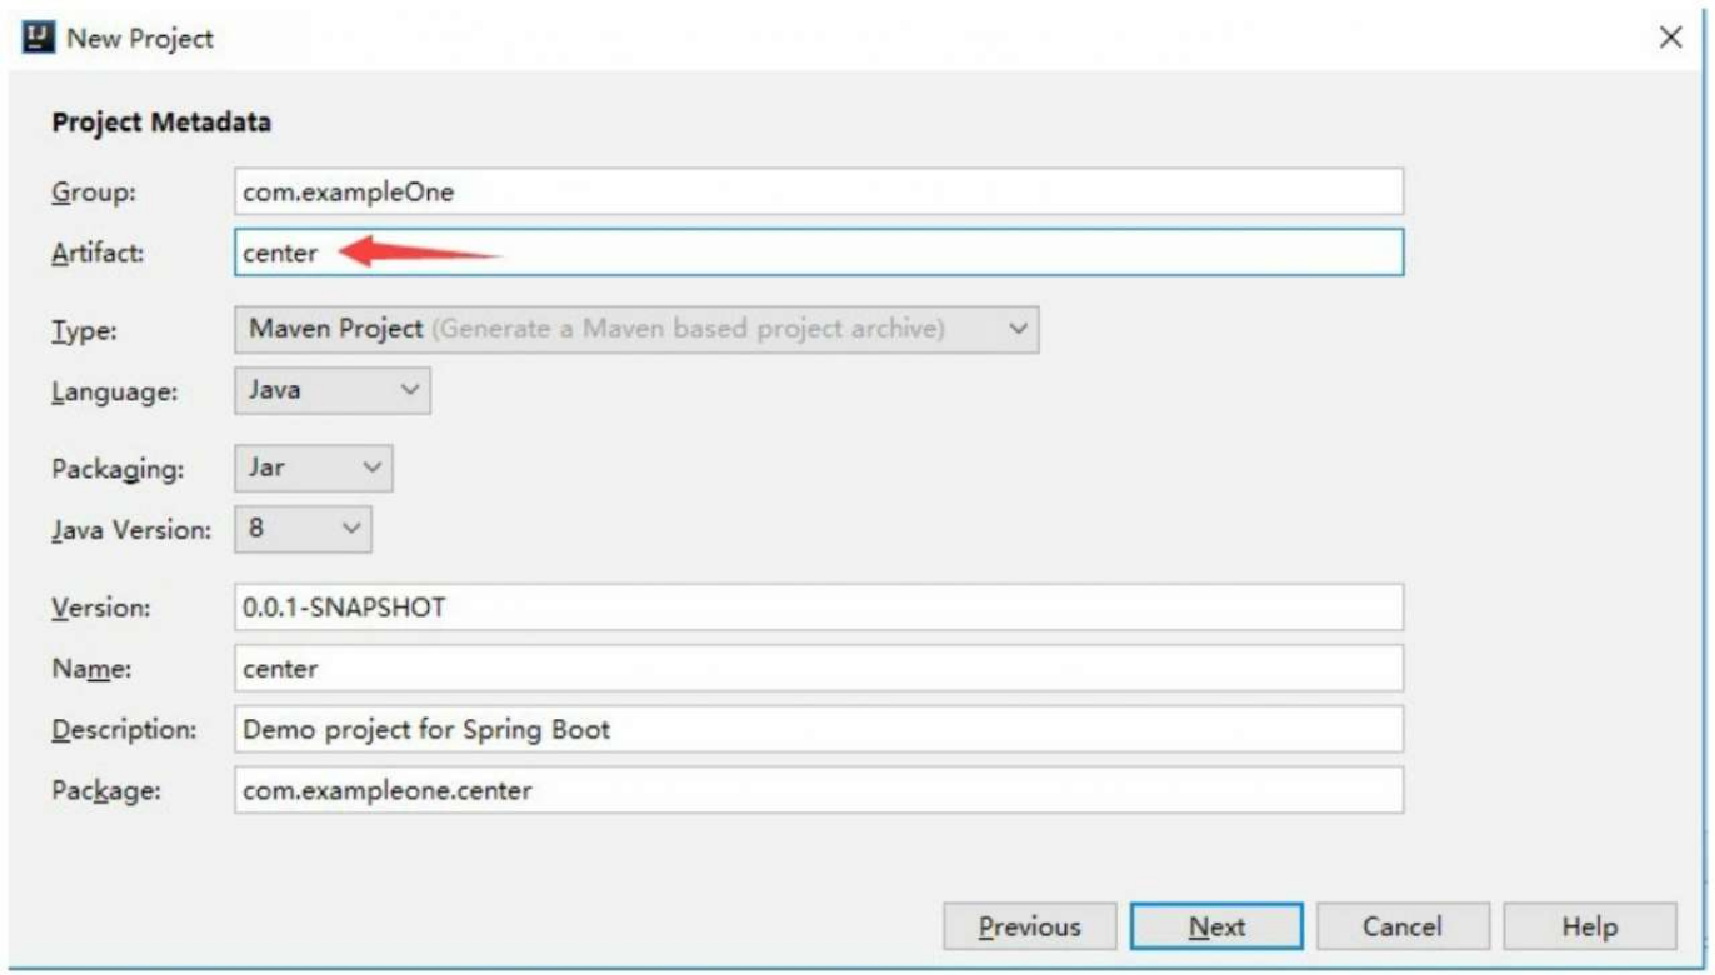
然后,定义项目名称为 center,意思为注册中心,其中项目类型是 Maven Project,如图16.3所示。
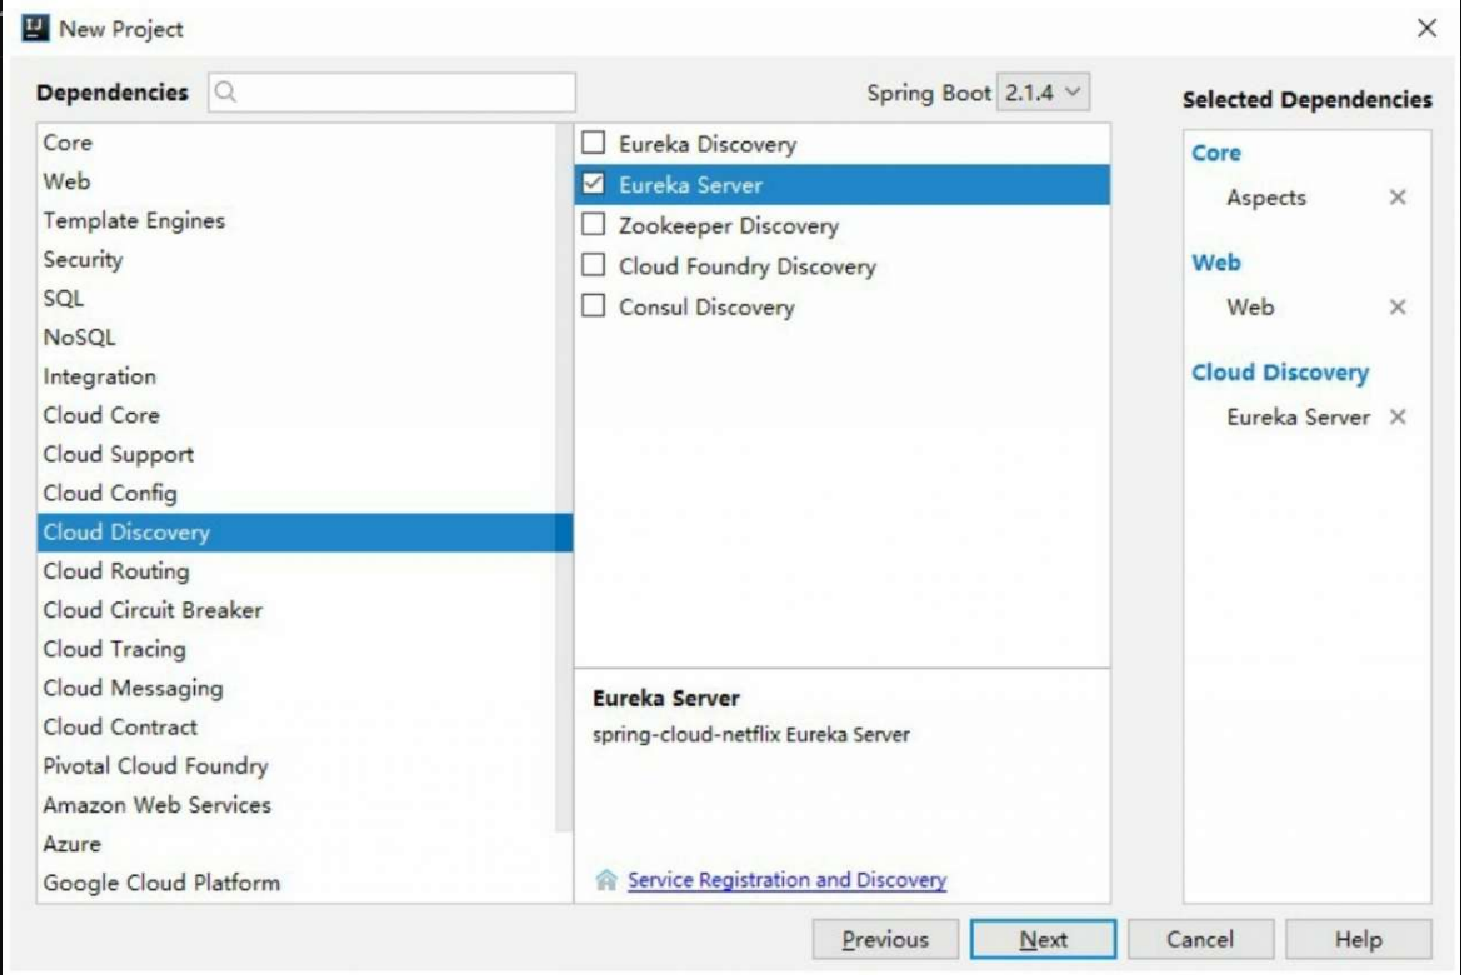
然后,为项目添加依赖,在项目中,主要添加 Web、Aspects 以及 Eureka Server 依赖,如图16.4所示。
修改启动类,在启动类上添加注解 @EnableEurekaServer,代码如下所示。
package com.exampleone.center;
@SpringBootApplication
@EnableEurekaServer
public class CenterApplication {
   public static void main(String[] args) {
      SpringApplication.run(CenterApplication.class, args);
   }
}
然后,修改配置文件,配置文件在第 10 章有详细说明,代码如下所示。
server.port=8764
eureka.client.service-url.defaultZone=http://localhost:8764/eureka/
eureka.client.register-with-eureka=false
eureka.server.enable-self-preservation=false
最后,进行启动。访问链接 http://localhost:8764/ 。如果在浏览器上可以正常访问,则表示注册中心已经搭建完成。注册中心启动效果如图16.5所示。
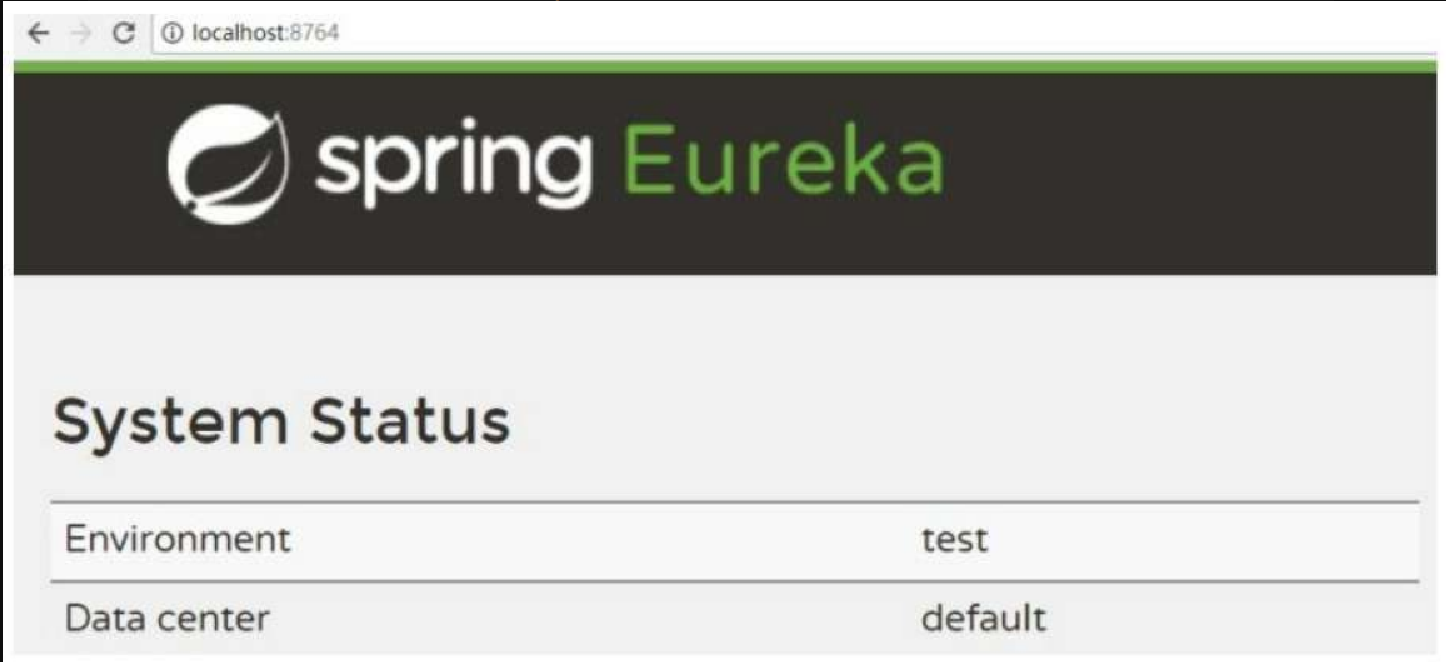
此时,注册中心搭建完成。
配置中心搭建
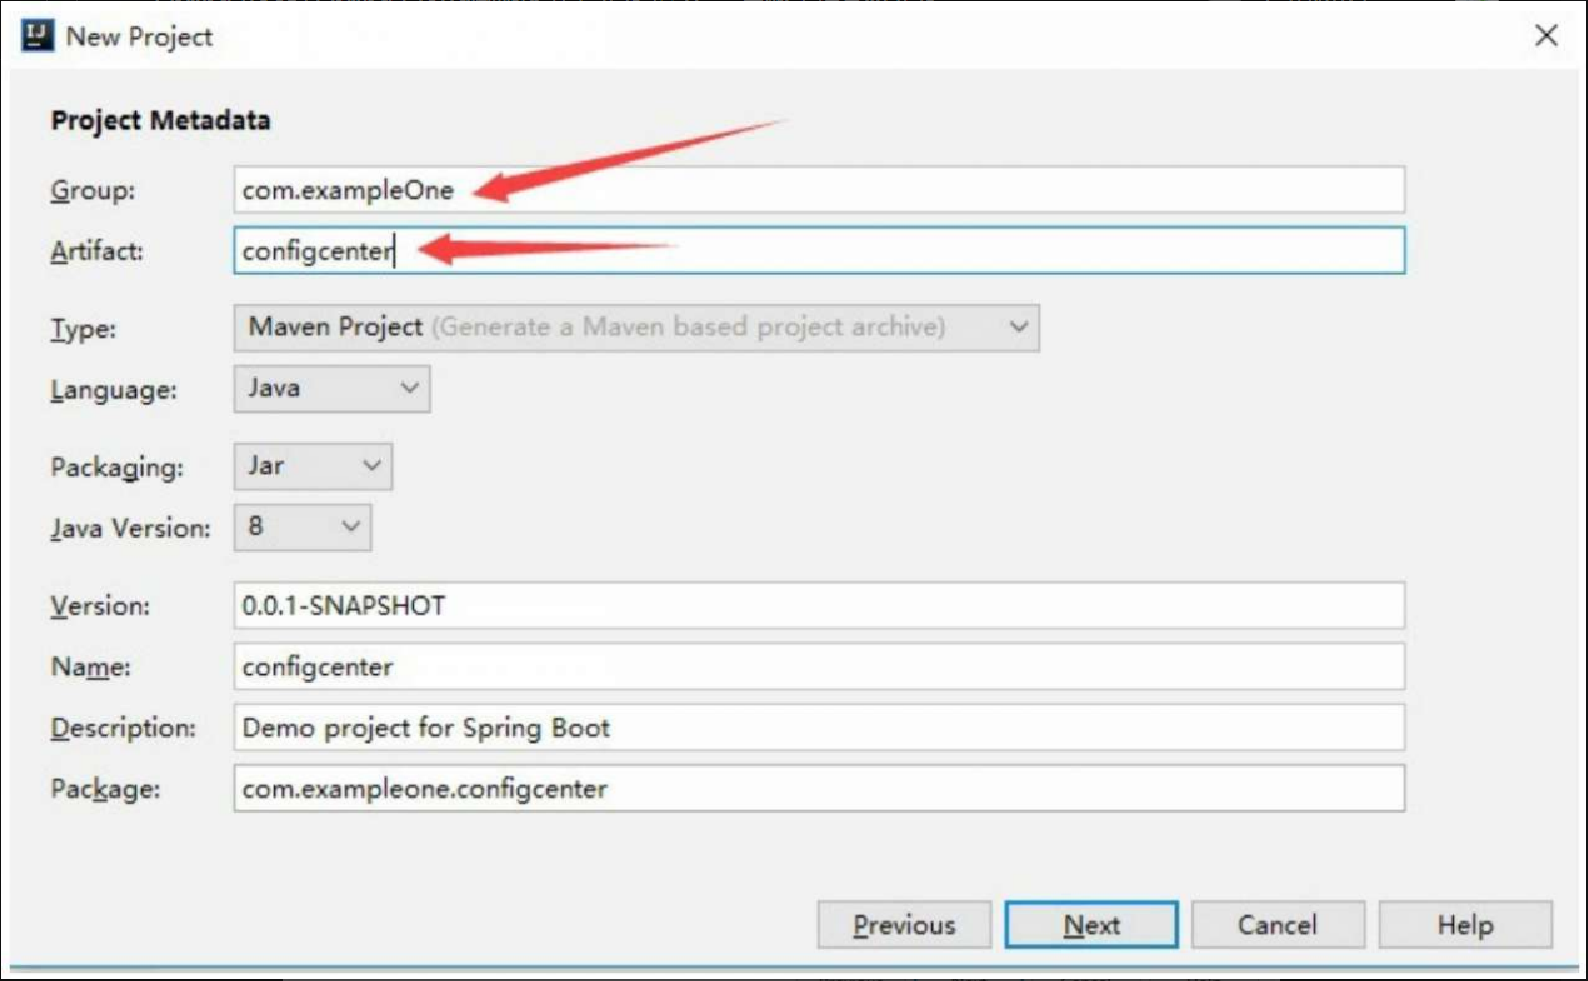
首先,新建 Spring 项目,同注册中心的搭建方式相同。然后,定义项目,其中名称为 configcenter,如图16.6所示。
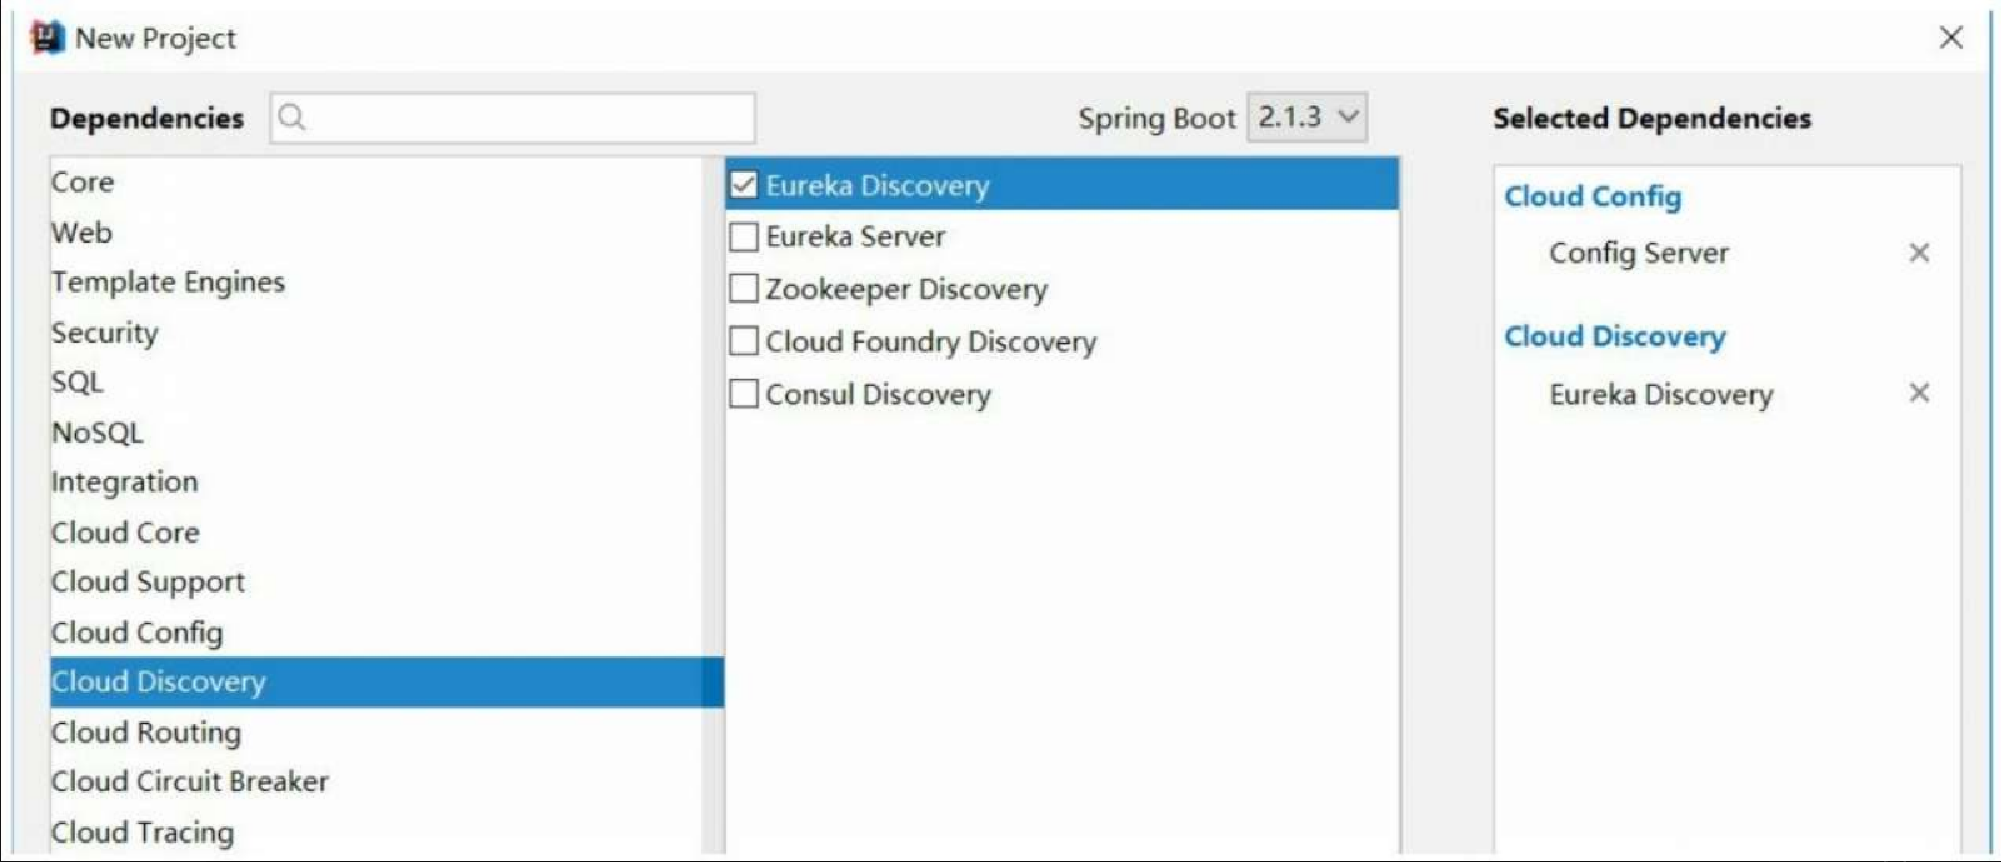
然后,为项目添加依赖,主要添加 Config Server 与 Eureka Discovery 依赖,如图16.7所示。
然后,对启动类添加 Eureka 客户端注解 @EnableDiscoveryClient 和配置中心服务端注解 @EnableConfigServer,代码如下所示。
package com.exampleone.configcenter;
@SpringBootApplication
@EnableDiscoveryClient
//配置中心注解
@EnableConfigServer
public class ConfigcenterApplication {
   public static void main(String[] args) {
      SpringApplication.run(ConfigcenterApplication.class, args);
   }
}
然后,修改 application.properties 文件,代码如下所示。
server.port=8096
spring.application.name=configCenter
eureka.client.service-url.defaultZone=http://localhost:8764/eureka/
spring.cloud.config.server.git.uri=https://×××.com/×××
spring.cloud.config.server.git.username=1354440850@qq.com
spring.cloud.config.server.git.password=xhfx88
然后,使用远程 Git。在 Git 上,先新建一个新的仓库,仓库如图16.8所示。
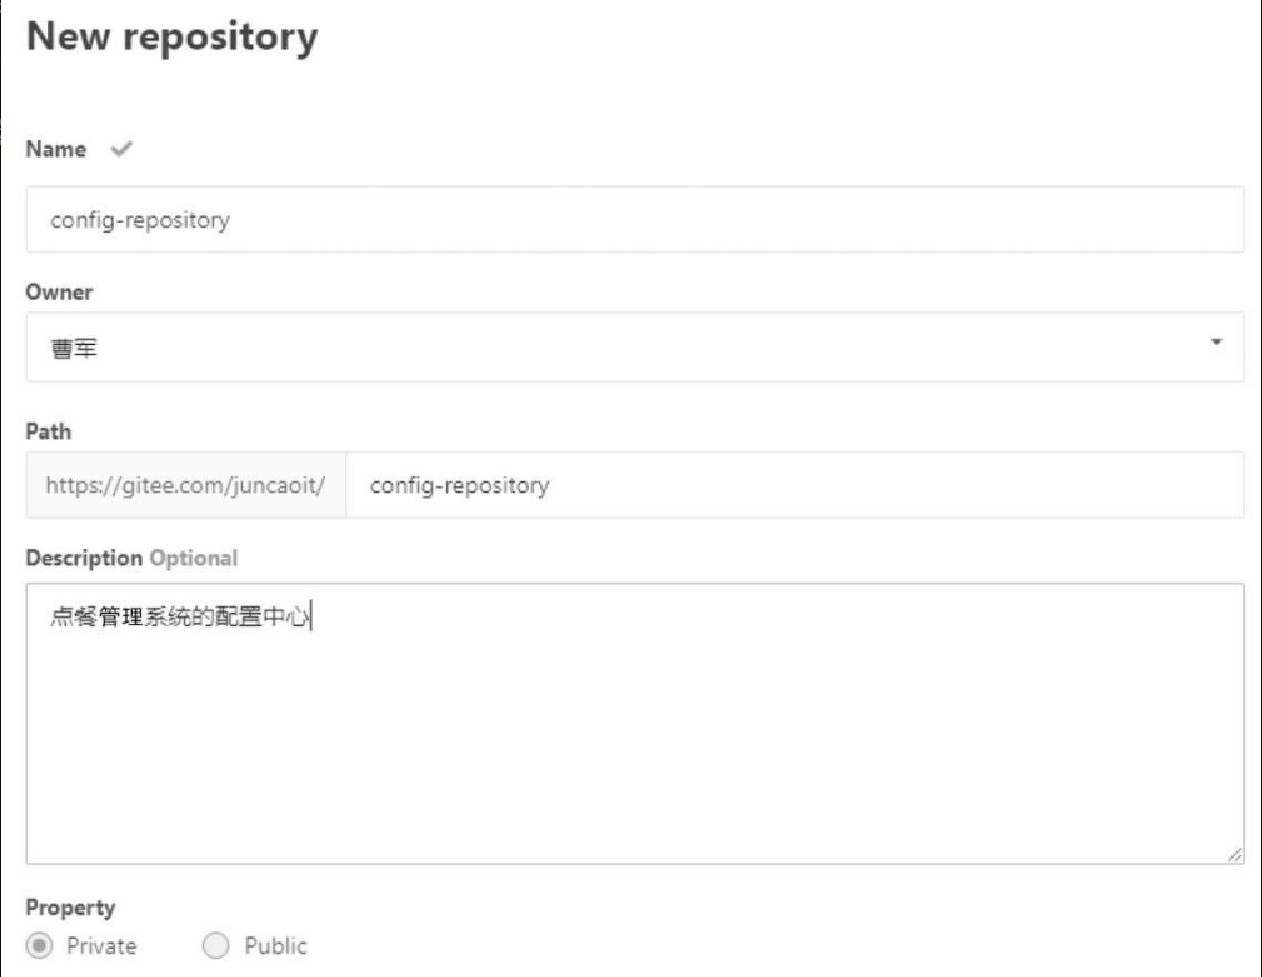
然后,在远程 Git 中的 config-repository 项目中新建一个配置项。为了方便验证,随便给配置文件起一个名称 consumerService-dev.properties,在后续具体使用时,再继续添加。其中配置文件中的配置项代码如下所示。
server.port=8070
spring.application.name=consumerService
eureka.client.service-url.defaultZone=http://localhost:8764/eureka/
hystrix.command.default.execution.isolation.thread.timeoutInMilliseconds=3000
hystrix.command.consumer.circuitBreaker.enabled=true
hystrix.command.consumer.circuitBreaker.requestVolumeThreshold=10
hystrix.command.consumer.circuitBreaker.sleepWindowInMilliseconds=10000
hystrix.command.consumer.circuitBreaker.errorThresholdPercentage=60
env=dev
最后,启动应用,验证模块是否可用。访问链接 http://localhost:8096/consumerServicedev.yml ,验证效果如图16.9所示。

此时,Config 的配置中心模块搭建完成。
商品模块搭建
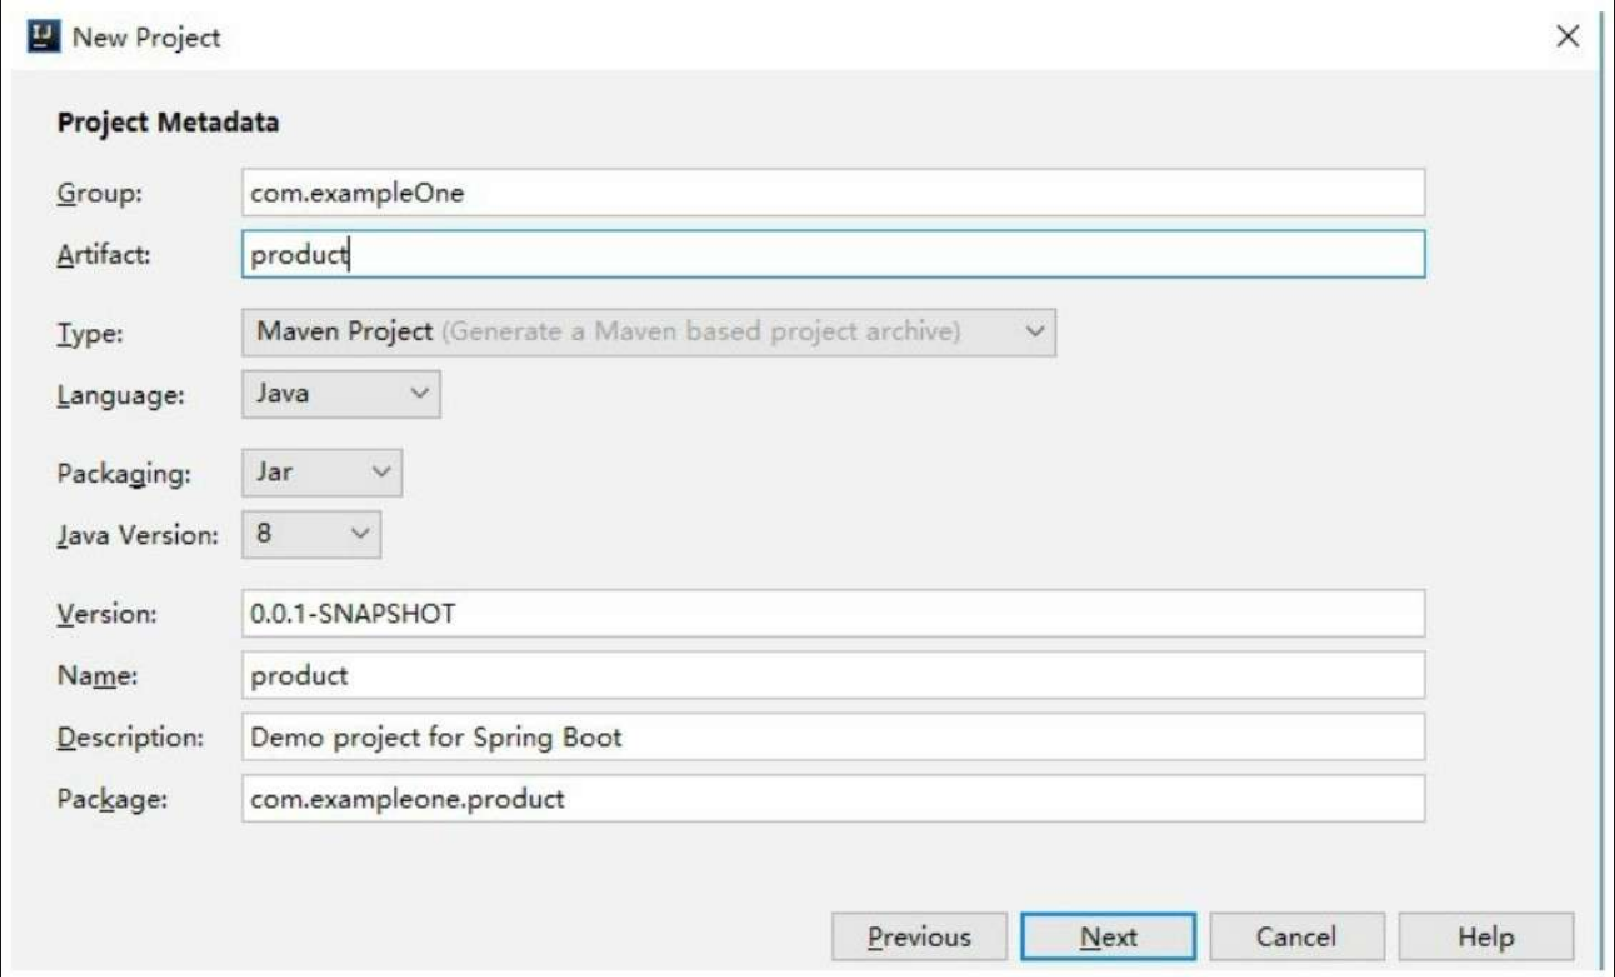
首先,新建 Spring 项目,同注册中心的搭建方式相同。然后,定义项目,名称为 product,如图16.10所示。
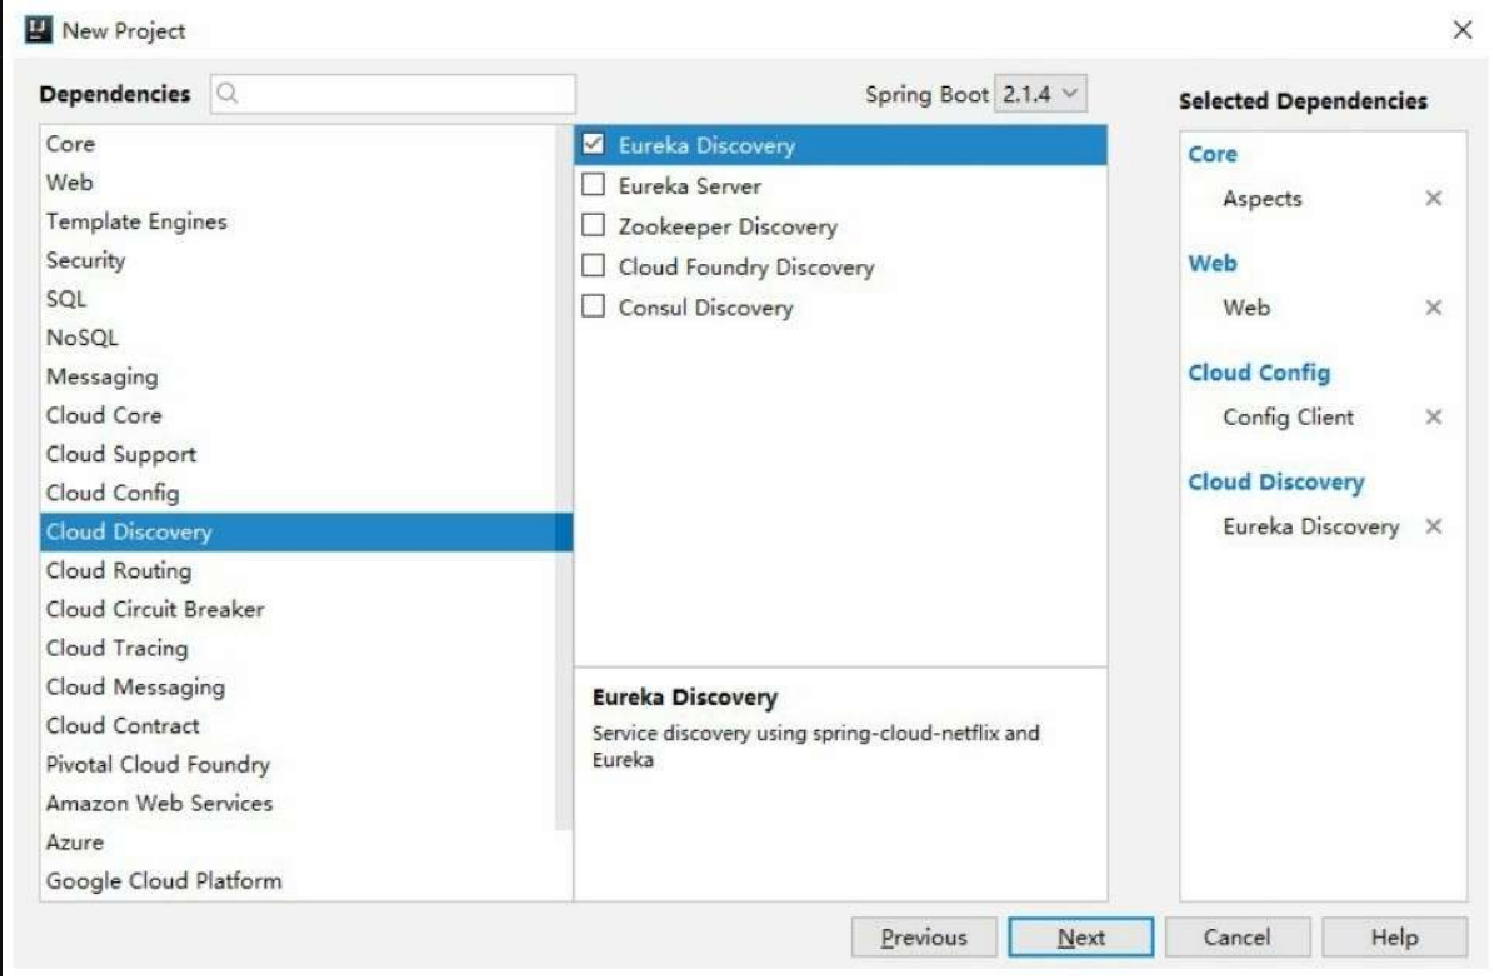
然后添加依赖,如图16.11所示,主要添加的依赖有 Aspects、Web、Config Client 和 Eureka Discovery。
给启动类添加注解,代码如下所示。
package com.exampleone.product;
@SpringBootApplication
@EnableEurekaClient
public class ProductApplication {
   public static void main(String[] args) {
      SpringApplication.run(ProductApplication.class, args);
   }
}
然后,修改 application.properties为bootstrap.properties,代码如下所示。
spring.application.name=productService
eureka.client.service-url.defaultZone=http://localhost:8764/eureka/
spring.cloud.config.discovery.enabled=true
spring.cloud.config.discovery.service-id=CONFIGCENTER
spring.cloud.config.profile=dev
然后,在 Git 上添加一个新的文件,这个文件用于添加 product 中需要使用的配置项,配置项的名称为 productService-dev.properties,主要配置项代码如下所示。
server.port=8070
spring.application.name=productService
hystrix.command.default.execution.isolation.thread.timeoutInMilliseconds=3000
hystrix.command.consumer.circuitBreaker.enabled=true
hystrix.command.consumer.circuitBreaker.requestVolumeThreshold=10
hystrix.command.consumer.circuitBreaker.sleepWindowInMilliseconds=10000
hystrix.command.consumer.circuitBreaker.errorThresholdPercentage=60
env=dev
然后测试 product 应用程序,观察应用是否正常。主要观察两个方面,一个是应用是否可以被注册到注册中心,另一个是应用是否可以读取 Config 配置中心的配置文件。写一个 Restful 接口用于测试,接口代码如下所示。
package com.exampleone.product.controller;
@RestController
public class ConfigTest {
   @Value("${env}")
   private String env;
   @GetMapping("/print")
   public String print(){
      return env;
   }
}
最后,启动应用,然后访问链接 http://localhost:8070/print ,效果如图16.12所示。
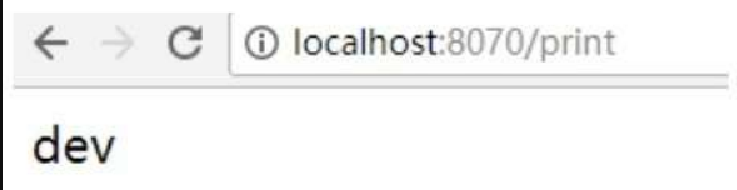
在图16.12中,可以发现 product 模块运行正常。
订单模块搭建
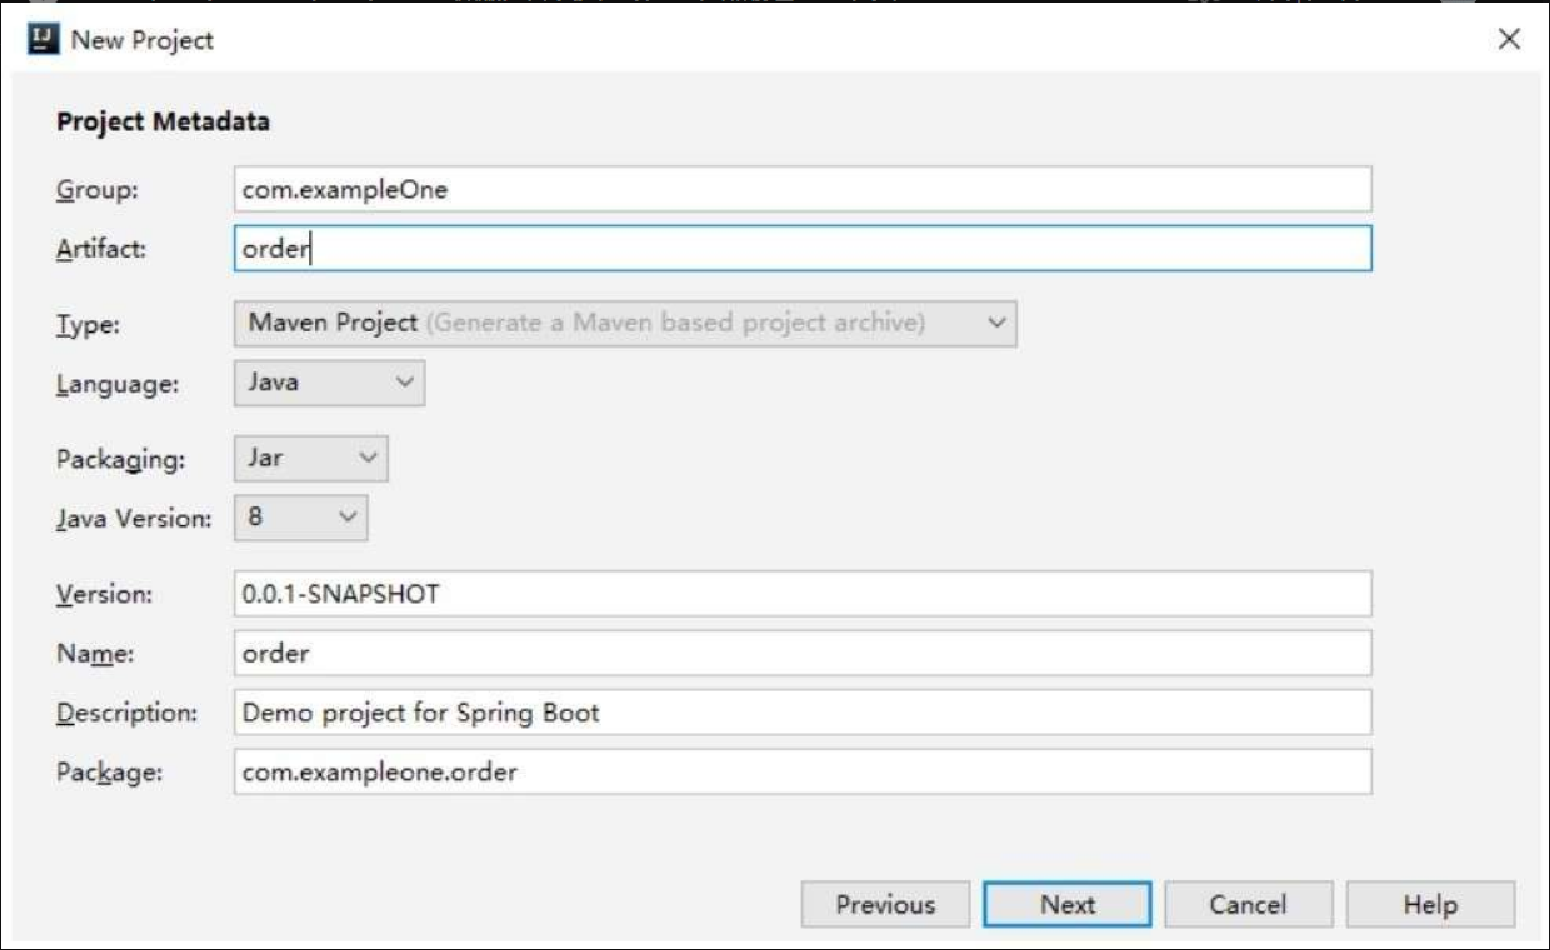
首先,新建 Spring 项目,同注册中心的搭建方式相同。然后,定义项目,名称为 order,如图16.13所示。
然后添加依赖,如图16.14所示。

然后,修改启动类,代码如下所示。
package com.exampleone.order;
@SpringBootApplication
@EnableEurekaClient
public class OrderApplication {
   public static void main(String[] args) {
      SpringApplication.run(OrderApplication.class, args);
   }
}
然后,修改 application.properties为bootstrap.properties,代码如下所示。
spring.application.name=orderService
eureka.client.service-url.defaultZone=http://localhost:8764/eureka/
spring.cloud.config.discovery.enabled=true
spring.cloud.config.discovery.service-id=CONFIGCENTER
spring.cloud.config.profile=dev
然后,在 Git 上添加一个新的文件,这个文件用于添加 product 中需要使用的配置项,配置项的名称为 orderService-dev.properties,主要配置项代码如下所示。
server.port=8071
spring.application.name=orderService
hystrix.command.default.execution.isolation.thread.timeoutInMilliseconds=3000
hystrix.command.consumer.circuitBreaker.enabled=true
hystrix.command.consumer.circuitBreaker.requestVolumeThreshold=10
env=dev
最后,写一个测试类,代码如下所示。
package com.exampleone.order.controller;
@RestController
public class ConfigTest {
   @Value("${env}")
   private String env;
   @GetMapping("/print2")
   public String print(){
      return env;
   }
}
启动应用,访问链接 http://localhost:8071/print2 ,效果如图16.15所示。
到目前为止,我们已经将系统的框架搭建好了。