Feign的配置
在 Feign 中有几个常见的配置,例如日志的配置,自定义配置,以及一些其他的配置,这些都是需要掌握的,下面进行系统的说明。
日志配置
在 Feign 中,我们可以使用日志对象的 Debug 调试程序。当添加注解 @FeignClient 时,客户端将会创建一个实例 feign.Logger。可以通过下面的步骤开启日志。
修改配置文件
首先,在有 Feign 的应用中的配置文件 application.properties 中添加日志输出级别,在配置的时候,按照一定的规则,规则为 logging.level.<Client>=<Value>。
然后,看下如何确定 client 的客户端路径,图12.6是一个客户端程序结构截图。
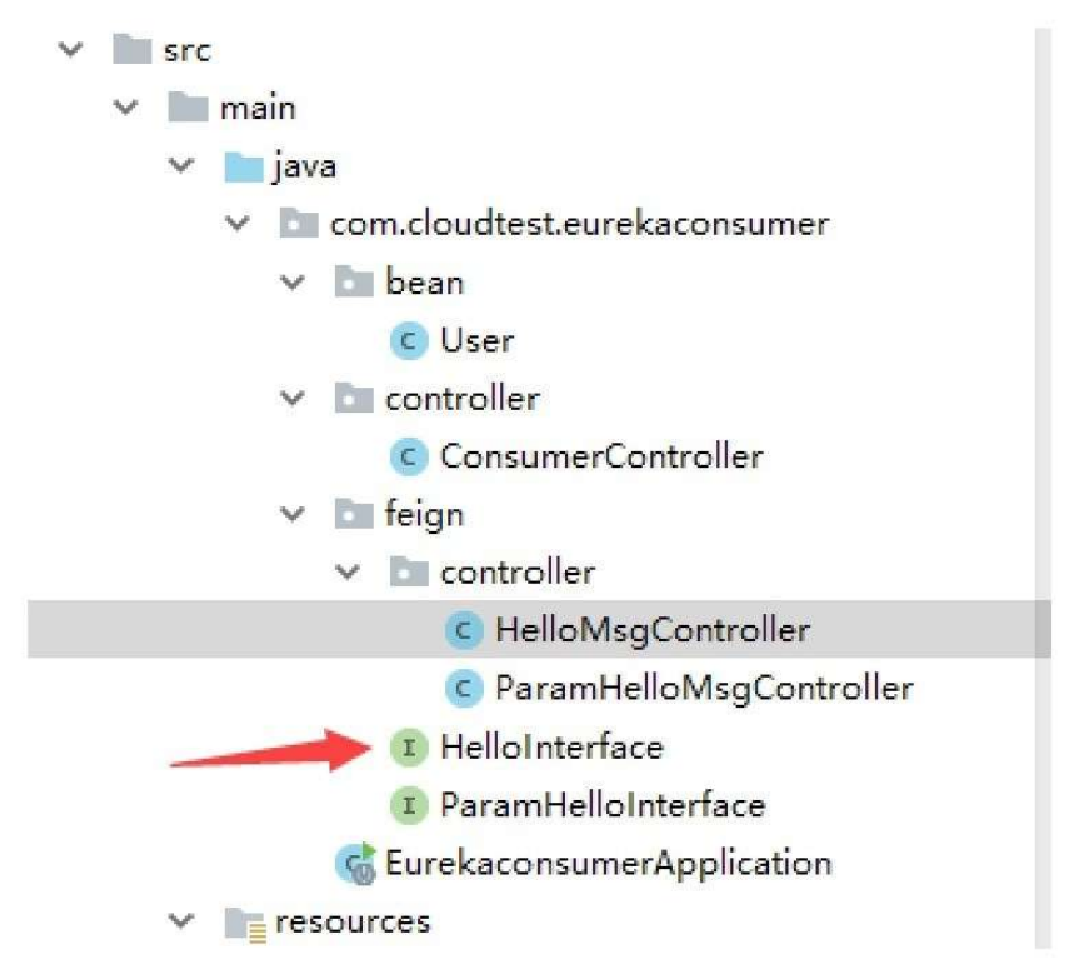
我们的客户端程序在 HelloInterface 接口中,所以,客户端的完整路径到这里查找即可。此时,配置如下所示。
logging.level.com.cloudtest.eurekaconsumer.feign.HelloInterface=debug配置日志Bean
在 Feign 客户端中 Logger.Level 对象默认的级别是NONE级别,这个级别不会记录 Feign 调用过程中的信息,所以,我们需要进行调整。
为了方便,可以直接在启动主类中添加 Bean。为了严格一些,也可以写在配置类中。配置启动类中的代码如下所示。
package com.cloudtest.eurekaconsumer;
@SpringBootApplication
@EnableEurekaClient
@EnableFeignClients
public class EurekaconsumerApplication {
   public static void main(String[] args) {
      SpringApplication.run(EurekaconsumerApplication.class, args);
   }
   @Bean
   @LoadBalanced
   RestTemplate restTemplate(){
      return new RestTemplate();
   }
   @Bean
   Logger.Level feignLoggerLevel(){
      return Logger.Level.FULL;
   }
}
最后,进行测试验证。访问链接 http://localhost:8070/helloTest ,关于这个链接在前面快速演示 Feign 实例中使用过,代码没有变动,读者可以参考前面。这时,我们在控制台上可以看到如下信息。
2019-01-22 23:19:07.520 DEBUG 5376 --- [nio-8070-exec-1]c.c.eurekaconsumer.feign.HelloInterface : [HelloInterface#getHelloMsg]<--- HTTP/1.1 200 (499ms)
2019-01-22 23:19:07.520 DEBUG 5376 --- [nio-8070-exec-1]c.c.eurekaconsumer.feign.HelloInterface : [HelloInterface#getHelloMsg] content-length: 13
2019-01-22 23:19:07.520 DEBUG 5376 --- [nio-8070-exec-1]c.c.eurekaconsumer.feign.HelloInterface : [HelloInterface#getHelloMsg] content-type: text/plain;charset=UTF-8
2019-01-22 23:19:07.520 DEBUG 5376 --- [nio-8070-exec-1]c.c.eurekaconsumer.feign.HelloInterface : [HelloInterface#getHelloMsg] date: Tue, 22 Jan 2019 15:19:07 GMT
2019-01-22 23:19:07.520 DEBUG 5376 --- [nio-8070-exec-1]c.c.eurekaconsumer.feign.HelloInterface : [HelloInterface#getHelloMsg] 2019-01-22 23:19:07.521 DEBUG 5376 --- [nio-8070-exec-1]c.c.eurekaconsumer.feign.HelloInterface : [HelloInterface#getHelloMsg] hello eureka!
2019-01-22 23:19:07.522 DEBUG 5376 --- [nio-8070-exec-1]c.c.eurekaconsumer.feign.HelloInterface : [HelloInterface#getHelloMsg]<--- END HTTP (13-byte body)
+++hello eureka!+++其他配置
Feign 支持对请求的压缩处理,用来提高效率,配置如下所示。
# 配置请求GZIP压缩
feign.compression.request.enabled=true
# 配置响应GZIP压缩
feign.compression.response.enabled=true
# 配置压缩支持的MIME TYPE
feign.compression.request.mime-types=text/xml,application/xml,application/json
# 配置压缩数据大小的下限
feign.compression.request.min-request-size=2048
自定义配置
在 Feign 配置中,很多时候默认的配置不符合场景,就需要自定义 Feign 配置,在这里对 Feign 的自定义配置做一个深入的说明。
默认配置
在配置中,只要把配置写在 application.properties 中即可,但是如何生效的,就需要看 org.springframework.cloud.openfeign. FeignClientFactoryBean 类中的 configureFeign 方法。代码如下所示。
protected void configureFeign(FeignContext context,Feign.Builder builder){
    //配置文件,下面会说
    FeignClientProperties properties=applicationContext.getBean(FeignClientProperties.class);
    if(properties!=null) {
        if(properties.isDefaultToProperties()){
            //使用配置文件
            configureUsingConfiguration(context,builder);configureUsingProperties(properties.getConfig().get(properties.getDefaultConfig()),builder);
            configureUsingProperties(properties.getConfig().get(this.name),builder);
        }else{configureUsingProperties(properties.getConfig().get(properties.getDefaultConfig()),builder);
            configureUsingProperties(properties.getConfig().get(this.name),builder);
            configureUsingConfiguration(context,builder);
        }
    } else {
        configureUsingConfiguration(context,builder);
    }
}
在上面的代码中,可以看到使用 FeignClientProperties 类。在这个类中,应该配置属性,代码如下所示。
@ConfigurationProperties("feign.client")
public class FeignClientProperties {
    private boolean defaultToProperties = true;
    private String defaultConfig = "default";
    private Map<String, FeignClientConfiguration> config = new HashMap<>();
    //省略其他程序
}
上面的代码,说明读取的配置项是以 feign.client 开头的,同时可以知道 config 是一个 Map 类型,并且值为 FeignClientConfiguration。所以为了解 Feign 有哪些配置,可以看看这个类,这个类是 FeignClientProperties 的内部类,代码如下所示。
public static class FeignClientConfiguration {
   private Logger.Level loggerLevel;
   private Integer connectTimeout;
   private Integer readTimeout;
   private Class<Retryer> retryer;
   private Class<ErrorDecoder> errorDecoder;
   private List<Class<RequestInterceptor>> requestInterceptors;
   private Boolean decode404;
   private Class<Decoder> decoder;
   private Class<Encoder> encoder;
   private Class<Contract> contract;
   //省略其他代码
}
上面的代码说明 Feign 支持的一些配置,下面对这些配置项做一个说明。
-
loggerLevel:日志级别。
-
connectTimeout:连接超时时间。
-
readTimeout:读取超时时间。
-
retryer:重试接口实现类,默认是 default 类。
-
errorDecoder:错误编码。
-
requestInterceptors:请求拦截器。
-
decode404: 404 编码是否开启。
-
contract:用于处理 Feign 接口注解,使用 SpringMvcContract 实现,处理 Feign 支持的 Spring MVC 注解。
-
decoder:解码器,将 HTTP 响应转换成对象,使用 ResponseEntityDecoder,这里可以从上面的 Decoder 找到。
-
encoder:编码器,将对象转换到 HTTP 请求体中,使用的是 SpringEncoder。
优先级
这里分三种情况进行说明,优先级从低到高。
第一种,配置文件没有内容。使用 FeignClientConfiguration 类中的全局配置,这个类在上面说明过。并且会使用 @EnableFeignClients 注解中的 defaultConfiguration 自定义属性,本小节的后面会说明这个属性。使用 FeignClient 类中的 configuration,单个 Feign 接口局部配置。
第二种,feign.client.default-to-properties=true。如果我们想让所有的配置都生效,则配置全局配置,配置如下所示。
feign.client.config.default.connectTimeout=5000
feign.client.config.default.readTimeout=5000
如果针对特定名称的,则配置如下所示。
feign.client.config.HelloInterface.connectTimeout=5000
feign.client.config.HelloInterface.readTimeout=5000
对于特定名称,指明了配置文件的配置,如果想给所有的名称进行配置,则可以使用注解 @EnableFeignClients,注解中有自定义属性 defaultConfiguration,可以将配置写成一个类,然后在这里进行引用。
@EnableFeignClients(defaultConfiguration = MyDefaultConfig.class)这时,不仅设置了配置文件,而且配置了 defaultConfiguration 属性,优先级就需要通过我们最开始说的属性来控制了。
因此,这里先说明属性值为 true 的情况,也是默认情况。
-
使用 FeignClientConfiguration 中的全局配置。
-
使用 @EnableFeignClients 注解中的 defaultConfiguration 自定义属性。
-
FeignClient 类中的 configuration,单个 Feign 接口局部配置。
-
application.properties 中配置的全局配置,使用方式上面说明过,使用的是 default。当然,这个是可以控制的,通过 feign.client.default-config 指定即可。
-
application.properties 中配置的局部配置,指定 FeignClient 中的 name 即可。
第三种,feign.client.default-to-properties=false,理解上面的第二种,这里就方便了很多。
-
application.properties 中配置的全局配置。
-
application.properties 中配置的局部配置,指定 FeignClient 中的 name 即可。
-
使用 FeignClientConfiguration 中的全局配置。
-
使用 @EnableFeignClients 注解中的 defaultConfiguration 自定义属性。
-
FeignClient 类中的 configuration,单个 Feign 接口局部配置。