ejs模块
ejs 是 embedded JavaScript 的缩写,翻译为嵌入式 Javascript。ejs 模块是一种高效的 JavaScript 模板引擎,它可以通过解析 JavaScript 代码生成 HTML 页面,并且直接支持在标签内书写简洁的 JavaScript 代码,以让 JavaScript 输出所需的 HTML,使得代码后期维护更轻松。
使用 ejs 模块之前,首先需要使用 npm 命令进行下载和安装,命令如下:
npm install ejs下面介绍如何在 Node.js 中使用 ejs 模块。
ejs模块的渲染方法
使用 ejs 模块之前,首先需要进行导入,代码如下:
var ejs = require('ejs');ejs 模块提供了 3 个方法,用来渲染数据并生成 HTML 页面,下面分别介绍。
render()方法
对 ejs 代码进行渲染,语法格式如下:
render(str,data,options)-
str:要渲染的ejs代码。 -
data:可选的参数,表示渲染的数据,可以是对象或者数组。 -
options:可选参数,指定一些用于解析模板时的变量,如编码方式等。
例如,使用 fs.readFile() 方法读取一个 index.ejs 文件,然后使用 ejs.render() 方法渲染读取的数据,并输出,代码如下:
//读取ejs模板文件
fs.readFile('index.ejs', 'utf8', function (error, data) {
     response.writeHead(200, {'Content-Type': 'text/html'});
     response.end(ejs.render(data));       //渲染数据并输出
}
compile()方法
对指定数据进行渲染,语法格式如下:
ejs.compile(str,options)-
str:渲染的数据展示区域。 -
options:可选参数,表示一些额外的参数配置。
例如,下面代码用来对 ejs 代码内容进行渲染:
var season = ['spring', 'summer', 'autumn',"winter"]
var template = ejs.compile('<%= season.join(" 、 ") %>')
var html = template(people)
document.getElementById('app').innerHTML = html
renderFile()方法
对模板文件进行渲染,语法格式如下:
ejs.renderFile(filename,data,options,function(err,str){})-
filename:ejs文件路径。 -
data:渲染的数据,可以是对象或者数组。 -
options:额外的参数配置,如编码格式等。 -
err:渲染文件失败时的错误信息。 -
str:渲染的数据展示区。
例如,下面代码用来直接渲染 index.ejs 文件并输出:
ejs.renderFile("index.ejs","utf8",function(err,data){
     response.end(data)
});
下面通过一个实例,演示如何使用 ejs 模块进行数据的渲染。
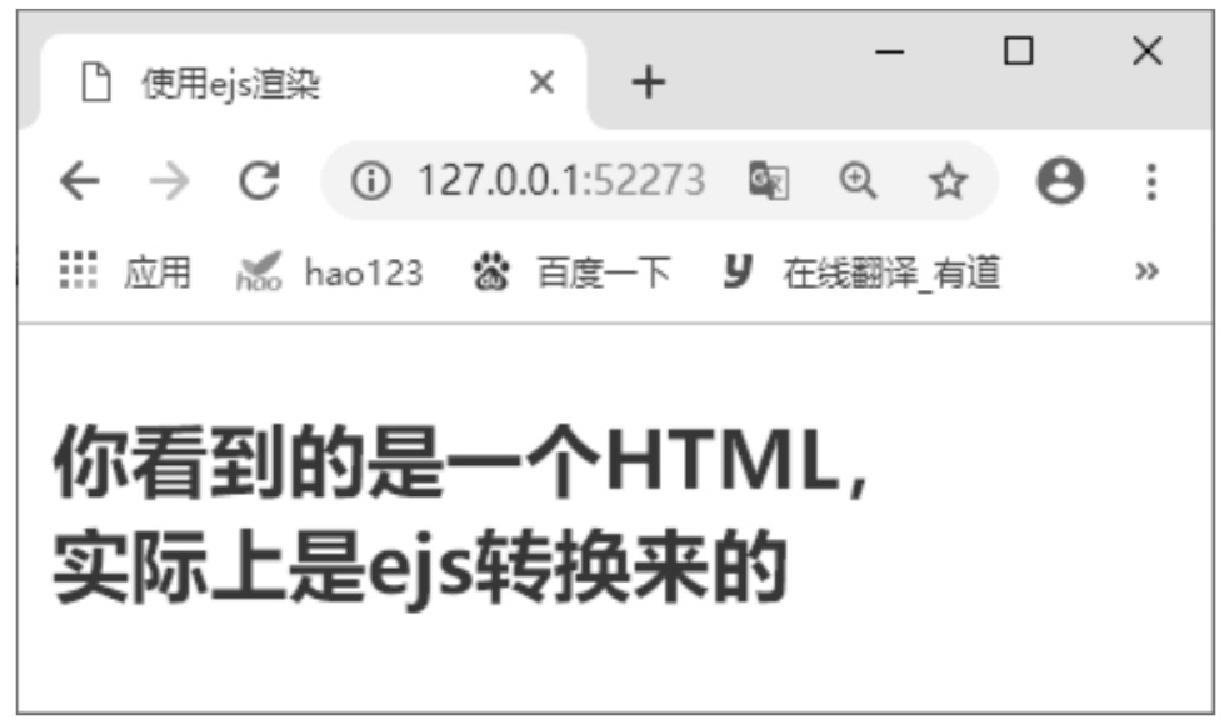
【例13.1】渲染 ejs 文件并显示。(实例位置:资源包\源码\13\01)
本实例实现在 index.ejs 文件中添加一行文字,然后在服务器端将 index.ejs 文件进行渲染并显示。具体步骤如下。
(1) 在 WebStorm 中创建一个 .js 文件,在该文件中引入 http、fs、ejs 模块,然后创建服务器,并在服务器中使用 ejs.renderFile() 方法读取并渲染 index.ejs 文件。代码如下:
//引入模块
var http = require('http');
var fs = require('fs');
var ejs = require('ejs');
//创建服务器
http.createServer(function (request, response) {
     response.writeHead(200, {'Content-Type': 'text/html'});
     //渲染ejs模板文件
     ejs.renderFile('index.ejs', 'utf8', function (error, data) {
          response.end(data);
     });
}).listen(52273, function () {
     console.log('服务器监听端口是 http://127.0.0.1:52273');
});|
上述代码中,一定不要漏写 |
(2) 创建 index.html 文件,并将文件的后缀名改为 ejs,该文件主要作为一个简单的 ejs 模板文件,其中显示一行文字,代码如下:
<!DOCTYPE html>
<html lang="en">
<head>
    <meta charset="UTF-8">
    <title>使用ejs渲染</title>
</head>
<body>


<h3 style="color: red">你看到的是一个HTML,<br>实际上是ejs转换来的</h3>
</body>
</html>
运行 .js 文件,在浏览器中输入网址 http://127.0.0.1:52273/ ,浏览器中的效果如图 13.1 所示。
从例 13.1 可以看出,ejs 文件与 HTML 文件很相似,它们都使用 HTML 标签构建页面内容。不同的是,ejs 文件中可以有一些特殊的渲染标识,以便进行动态数据渲染。在 ejs 文件中,可以使用以下标签表示一些特殊的含义。
-
<%:脚本标签,用于流程控制,无输出。 -
<%_:删除其前面的空格符。 -
<%=:输出数据到模板(输出是转义HTML标签)。 -
<%-:输出非转义的数据到模板。 -
<%#:注释标签,不执行、不输出内容。 -
<%%:输出字符串 '<%'。 -
%>:一般结束标签。 -
-%>:删除紧随其后的换行符。 -
_%>:将结束标签后面的空格符删除。
例如,可以使用下面的代码在 ejs 文件中定义 JavaScript 代码或者输出数据。
-
<%Code%>:输入JavaScript代码。 -
<%=Value%>:输出数据,如字符串和数字等。
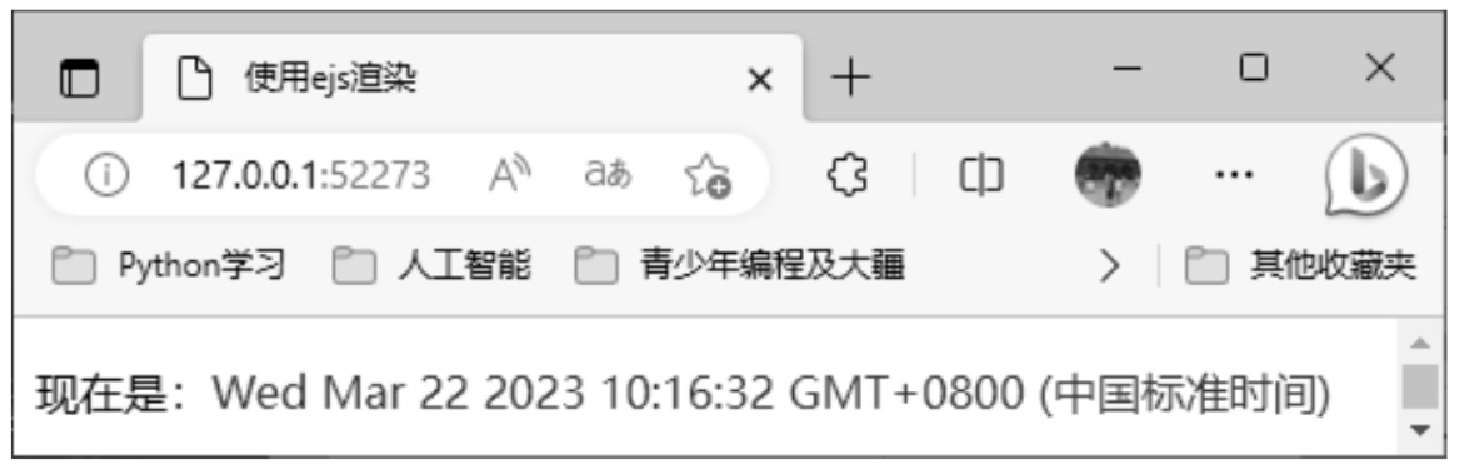
例如,将例 13.1 中的 index.ejs 文件中的代码修改如下:
<!DOCTYPE html>
<html lang="en">
<head>
     <meta charset="UTF-8">
     <title>使用ejs渲染</title>
</head>
<body>
     <%
          var today = new Date()
     %>
     <p><span>现在是:</span><span style="color: red"><%=today%></span></p>
</body>
</html>
再次运行程序,可以在浏览器中看到如图 13.2 所示的效果。
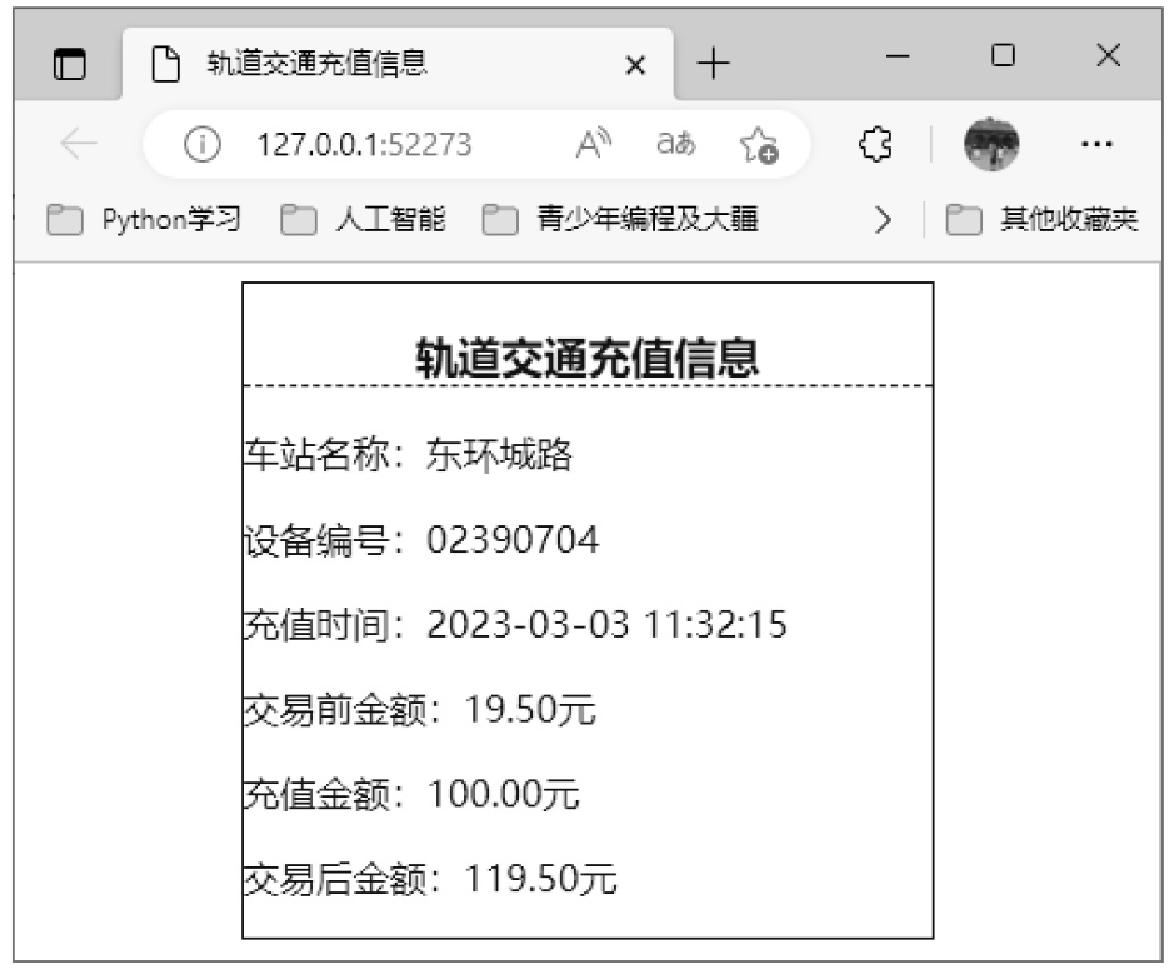
【例13.2】为客户端返回充值信息。(实例位置:资源包\源码\13\02)
步骤如下。
(1) 在 WebStorm 中创建一个 .js 文件,其中主要使用 ejs.renderFile() 方法渲染 ejs 模板文件并显示,代码如下:
//引入模块
var http = require('http');
var fs = require('fs');
var ejs = require('ejs');
//创建服务器
http.createServer(function (request, response) {
     response.writeHead(200, { 'Content-Type': 'text/html' });
     //渲染ejs模板文件
     ejs.renderFile("index.ejs","utf8",function(err,data){
          response.end(data)
     });
}).listen(52273, function () {
     console.log('服务器监听端口是 http://127.0.0.1:52273');
});
(2) 新建 index.html 文件,并将其后缀名修改为 ejs,该文件中首先使用 <%Code%> 形式嵌入 JavaScript 代码,定义一些变量;然后使用 <%=Value%> 形式在页面中输出相应的变量。index.ejs 文件中的代码如下:
<!DOCTYPE html>
<html lang="en">
<head>
     <meta charset="UTF-8">
     <title>轨道交通充值信息</title>
     <style>
          .info{
               margin:0 auto;
               width:300px;
               border: solid  blue 1px;
               color:blue
          }
          .info h3{
               text-align: center;
               border-bottom:dashed blue 1px
          }
     </style>
</head>
<body>
     <% var title='轨道交通充值信息'%>
     <% var A='东环城路'%>
     <% var B='02390704'%>
     <% var C='2023-03-03 11:32:15'%>
     <% var D='19.50元'%>
     <% var E='100.00元'%>
     <% var F='119.50元'%>
     <section class="info">
          <h3><%=title%></h3>
          <p>车站名称:<%=A%></p>
          <p>设备编号:<%=B%></p>
          <p>充值时间:<%=C%></p>
          <p>交易前金额:<%=D%></p>
          <p>充值金额:<%=E%></p>
          <p>交易后金额:<%=F%></p>
     </section>
</body>
</html>
运行 .js 文件,在浏览器中输入 http://127.0.0.1:52273/ ,可以看到浏览器中的界面效果如图 13.3 所示。
ejs模块的数据传递
本节将讲解动态向 ejs 模板中传递数据的方法。要动态向 ejs 前端页面中传递数据,首先需要在 ejs.render() 方法中渲染要显示的数据时,定义要传递的数据;然后在 ejs 文件中使用 <%=Value%> 形式读取定义好的数据进行显示。这里需要注意的是,在读取定义好的数据时,如果数据是列表或者数组形式,要获取其中的某项内容,需要使用 forEach 遍历。
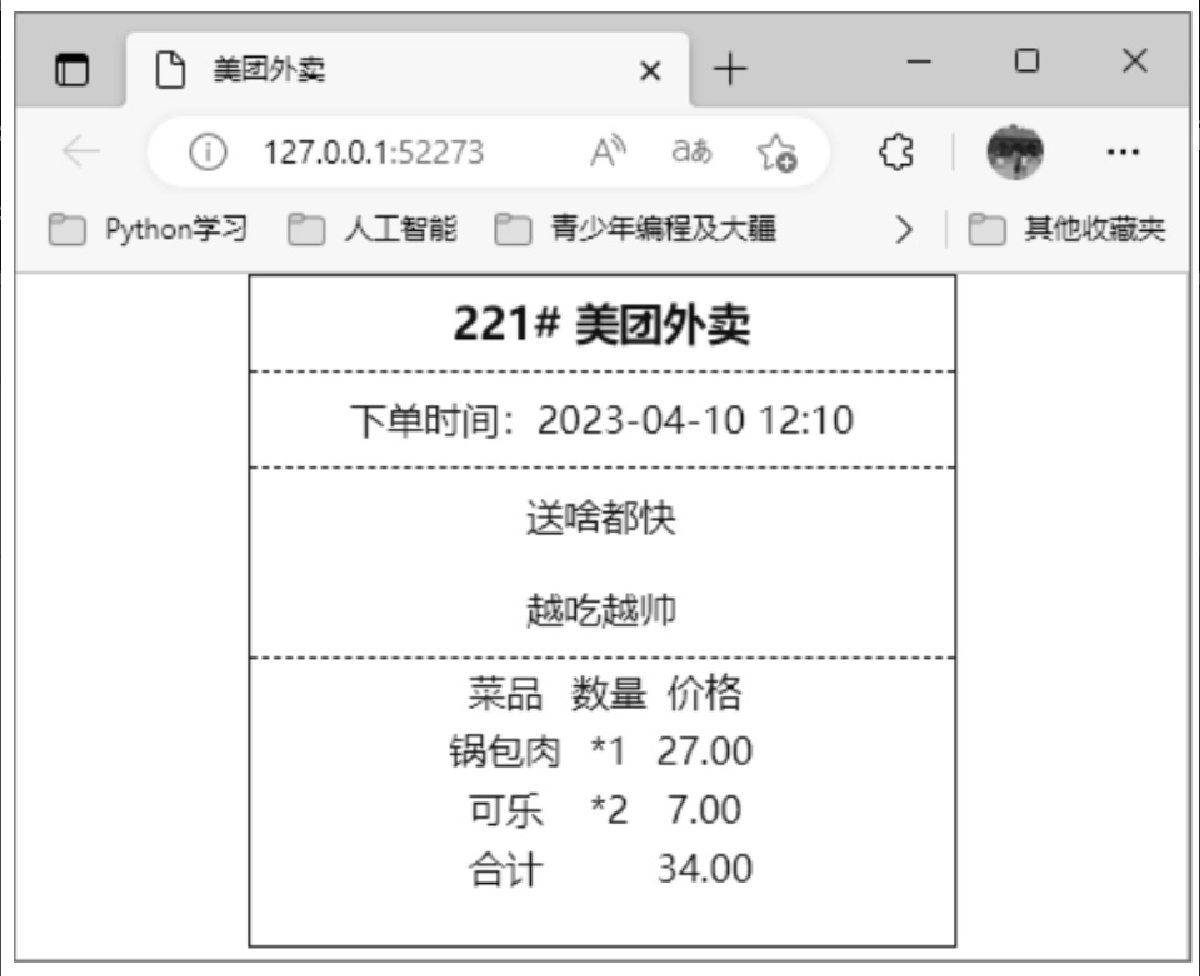
【例13.3】显示美团外卖单据。(实例位置:资源包\源码\13\03)
步骤如下。
(1) 在 WebStorm 中创建一个 .js 文件,其中使用 render() 方法将自定义的 No 属性、orderTime 属性和 orderPrice 属性渲染到 index.ejs 文件中。代码如下:
//引入模块
var http = require('http');
var fs = require('fs');
var ejs = require('ejs');
//创建服务器
http.createServer(function (request, response) {
     //读取ejs模板文件
     fs.readFile('index.ejs', 'utf8', function (error, data) {
          response.writeHead(200, {'Content-Type': 'text/html'});
          response.end(ejs.render(data, {
               No: '221#',
               orderTime: '2023-04-10 12:10',
               orderPrice: [{
                     menu: "锅包肉",
                     orderNo: '*1',
                     price: '27.00',
               }, {
                     menu: "可乐",
                     orderNo: '*2',
                     price: '7.00',
               }, {
                     menu: "合计",
                     orderNo: '',
                     price: '34.00',
               }]
          }));
     });
}).listen(52273, function () {
     console.log('服务器监听端口是 http://127.0.0.1:52273');
});
(2) 新建一个 index.html 文件,并将其后缀名修改为 ejs,该文件中使用 ejs 渲染标识,将 .js 文件中渲染数据时自定义的属性分别显示到指定的 HTML 标签中。index.html 文件中的代码如下:
<!DOCTYPE html>
<html lang="en">
<head>
     <meta charset="UTF-8">
     <title>美团外卖</title>
     <style>
          *{
               margin: 0 auto;
          }
          .info{
               margin:0 auto;
               width:300px;
               border: solid  blue 1px;
               color:blue
          }
          .info h3{
               text-align: center;
               border-bottom:dashed blue 1px;
               line-height: 40px;
          }
          .info p{
               text-align: center;
               border-bottom:dashed blue 1px;
               line-height: 40px;
          }
          .info div{
               text-align: center;
               border-bottom:dashed blue 1px;
               line-height: 40px;
          }
          .info table{
               margin:0 auto;
               text-align: center;
               padding-bottom: 20px;
          }
     </style>
</head>
<body>
     <section class="info">
          <h3><%=No%> 美团外卖</h3>
          <p>下单时间:<%=orderTime%></p>
          <div>
               送啥都快<br>
               越吃越帅
          </div>
          <table>
               <tr>
                     <td>菜品</td>
                     <td>数量</td>
                     <td>价格</td>
               </tr>
               <%orderPrice.forEach(function(item){%>
                     <tr>
                          <td><%=item.menu%></td>
                          <td><%=item.orderNo%></td>
                          <td><%=item.price%></td>
                     </tr>
               <% }) %>
          </table>
     </section>
</body>
</html>
运行 .js 文件,在浏览器中输入 http://127.0.0.1:52273/ ,可以看到浏览器中的界面效果如图 13.4 所示。