express模块中间件
例 14.1 和例 14.2 中向客户端返回相应数据时,都使用了 express 模块的 use() 方法,为什么要使用该方法呢?这里涉及了 express 模块中的中间件技术,本节将对该技术进行详细讲解。
认识中间件
app.use() 方法在 express 模块中的主要作用是注册全局中间件。所谓中间件,是指业务流程的中间处理环节。app.use() 方法的语法格式如下:
app.use([path,] callback[,callback])-
path:可选参数,指定的中间件函数的路径(路由地址)。 -
callback:指定的中间件函数,可以是多个,并且这些回调函数可以调用next()。
使用 app.use() 方法将指定的中间件功能放到指定的路径下,当请求的路径地址(客户端发过来的地址)与定义的路由(app.get/post)相同时,就会执行指定的中间件功能。中间件的调用流程是:当一个请求到达 express 的服务器后,可以连续调用多个中间件,从而对这次请求进行预处理,在这中间,next() 函数是实现多个中间件连续调用的关键,它表示把流转关系转交给下一个中间件或路由。
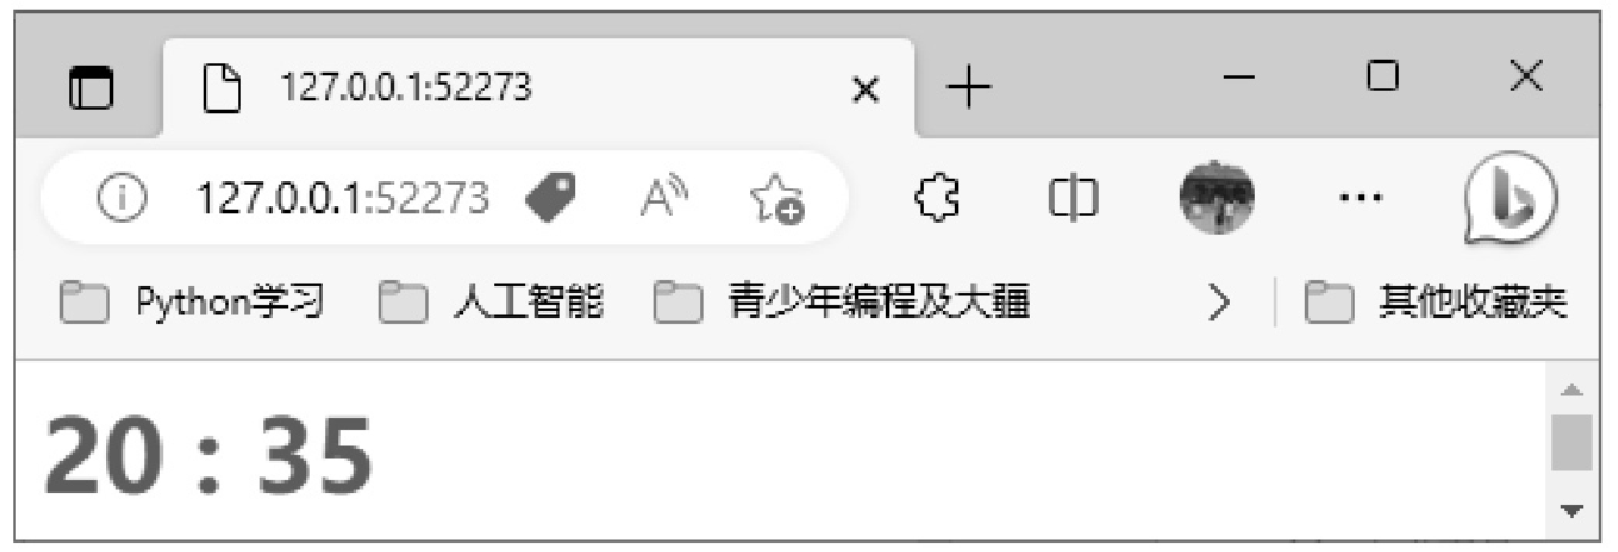
例如,新建一个 .js 文件,使用 express 模块创建一个 Web 服务器,然后使用两次 use() 方法设置中间件,其中第一个 use() 方法中,定义了两个变量,并通过 next() 设置了中间件,最后在第二个 use() 方法中使用第一个 use() 方法中定义的变量。代码如下:
//导入express模块
var express = require('express');
//创建服务器
var app = express();
//设置中间件
app.use(function (request, response, next) {
     //定义变量
     request.number = 20;
     response.number =35;
     next();
});
app.use(function (request, response, next) {
     //发送响应信息
     response.send('<h1 style="color:green">' + request.number + ' : ' + response.number + '</h1>');
});
//启动服务器
app.listen(52273, function () {
     console.log('服务器监听地址在 http://127.0.0.1:52273');
});
运行上面代码,在浏览器中输入 http://127.0.0.1:52273/ ,可以看到如图 14.3 所示的界面效果。
有的读者会问,为什么要将两个 use() 方法分开写呢?把两个 use() 方法合在一起不可以吗?其实这样处理是为了分离中间件。在实际开发中,代码数量和模块数量很多,为了提高代码的使用效率,可以将常用的功能函数分离出来,做成中间件的形式,这样可以让更多模块重复使用中间件。
express 中常用的中间件及说明如表 14.4 所示。
|
更多关于 |
router中间件
express 模块中使用 router 中间件来处理页面路由。在 http 模块中,通常使用 if 语句来处理页面的路由跳转,而在 express 模块中,使用 router 中间件就可以很方便地实现页面的路由跳转。router 中间件的常用方法及说明如表14.5所示。

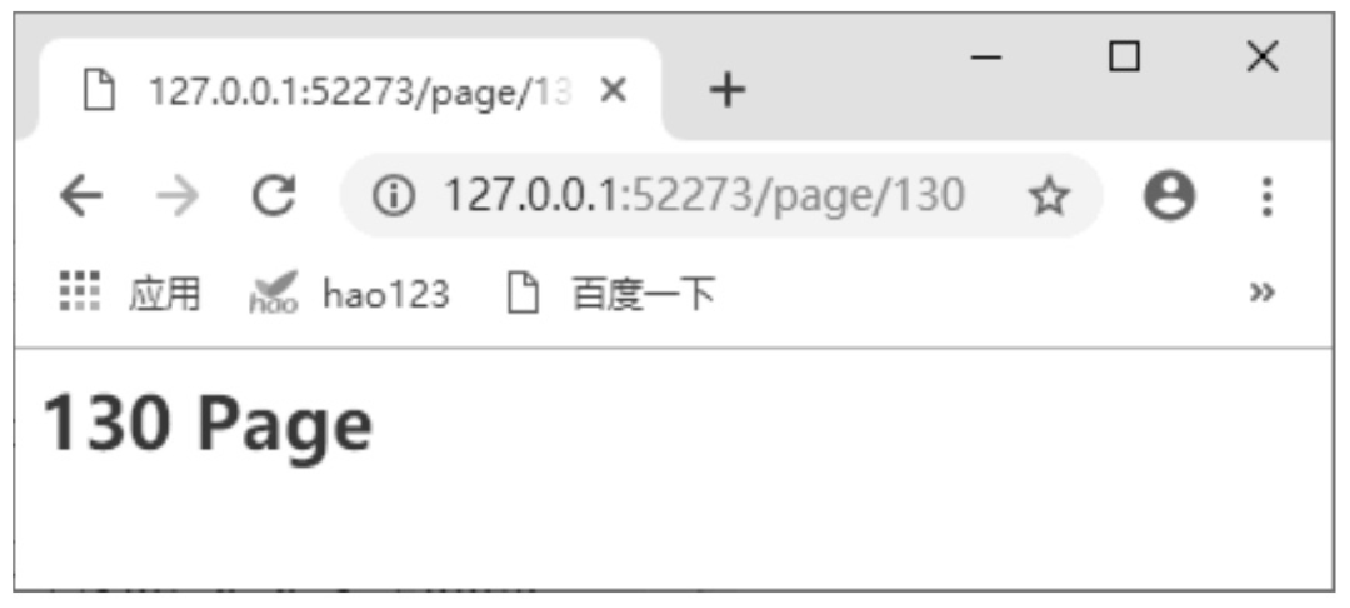
例如,新建一个 .js 文件,使用 express 模块创建一个 Web 服务器,然后使用 app.get() 方法设置页面的路由跳转规则,在访问页面时需要使用 “/page/id” 的形式。代码如下:
//导入express模块
var express = require('express');
//创建服务器
var app = express();
//设置页面路由规则
app.get('/page/:id', function (request, response) {
     //获取request对象
     var name = request.params.id;
     //发送响应信息
     response.send('<h2 style="color:red">' + name + ' Page</h2>');
});

//启动服务器
app.listen(52273, function () {
     console.log('服务器监听地址在 http://127.0.0.1:52273');
});
运行程序,在浏览器中输入 http://127.0.0.1:52273/page/130 后,可以看到如图 14.4 所示的界面效果,该页面就是通过 router 中间件的形式实现了页面的跳转。
static中间件
static 中间件是 express 模块内置的托管静态文件的中间件,可以非常方便地将图片、视频、CSS 文件和 JavaScript 文件等资源导入项目中。static 中间件的使用方法如下:
express.static(root[,options])-
root:指定从中提供静态资源的根目录。 -
options:可选参数,指定一些配置选项。
下面通过一个实例演示如何使用 static 中间件。
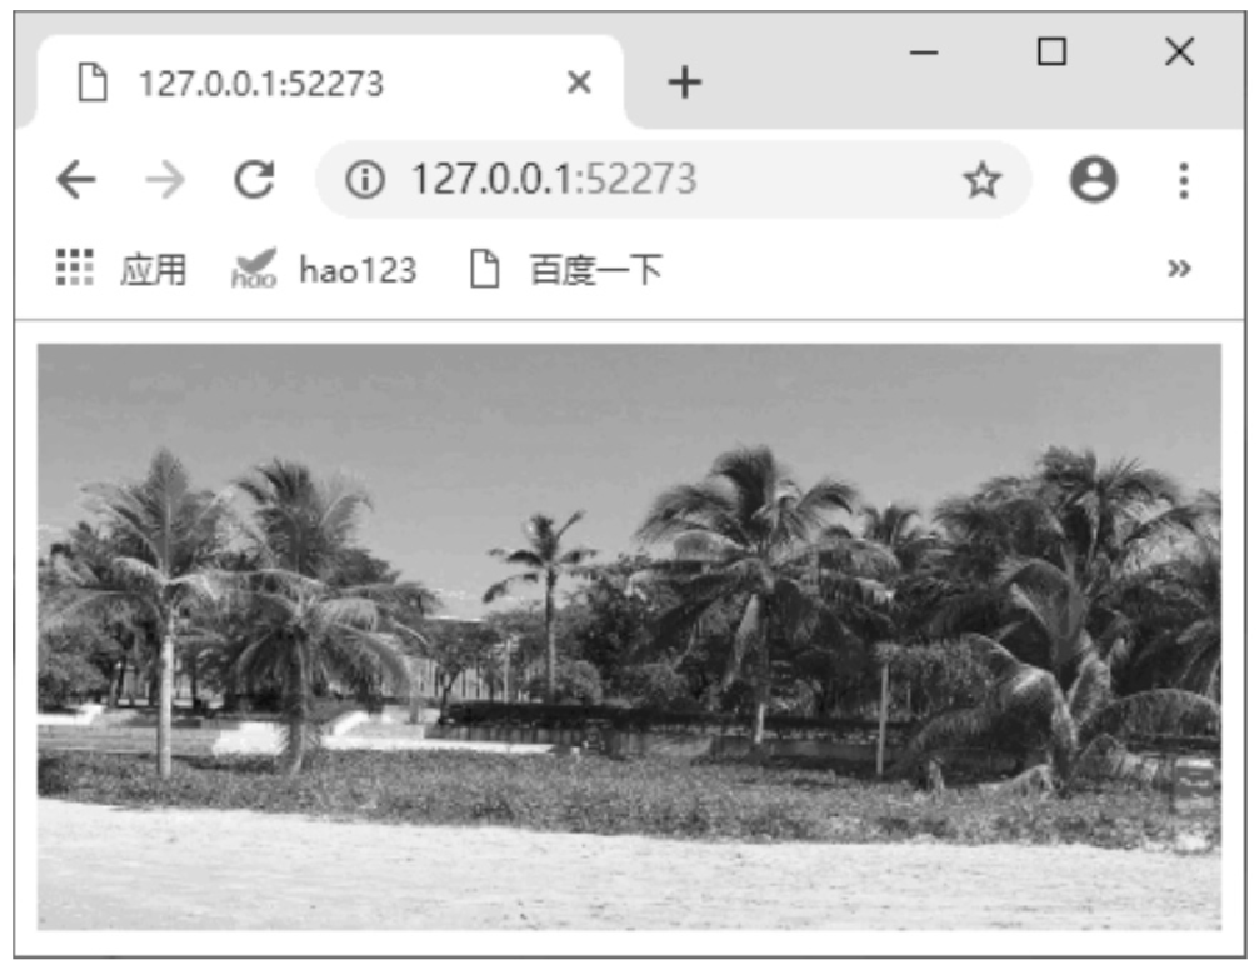
【例14.3】实现向客户端返回图片。(实例位置:资源包\源码\14\03)
本实例需要在项目中创建一个文件夹,名称为 image,在该文件夹中存放一张图片,名为 view.jpg;然后创建一个 .js 文件,在该文件中,首先使用 express 模块创建 Web 服务器,然后使用 express.static() 方法设置静态中间件,以便导入图片资源,其中 __dirname 表示项目的根目录。代码如下:
var express = require('express');
//创建服务器
var app = express();
//使用static中间件
app.use(express.static(__dirname + '/image'));
app.use(function (request, response) {
     //发送响应信息
     response.writeHead(200, {'Content-Type': 'text/html'});
     response.end('<img src="/view.jpg"> width="100%" />');
});

//启动服务器
app.listen(52273, function () {
     console.log('服务器地址在 http://127.0.0.1:52273');
});
运行程序,在浏览器中输入 http://127.0.0.1:52273/ ,可以看到浏览器中的界面效果如图 14.5 所示。
cookie parser中间件
cookie parser 中间件主要用来处理 cookie 请求与响应,由于 cookie parser 中间件不是 express 模块内置的中间件,因此需要通过 npm 命令进行下载和安装,命令如下:
npm install cookie-parsercookie parser 中间件的使用方法如下:
cookie parser([secret])参数 secret 为可选参数,用来设置加密签名。
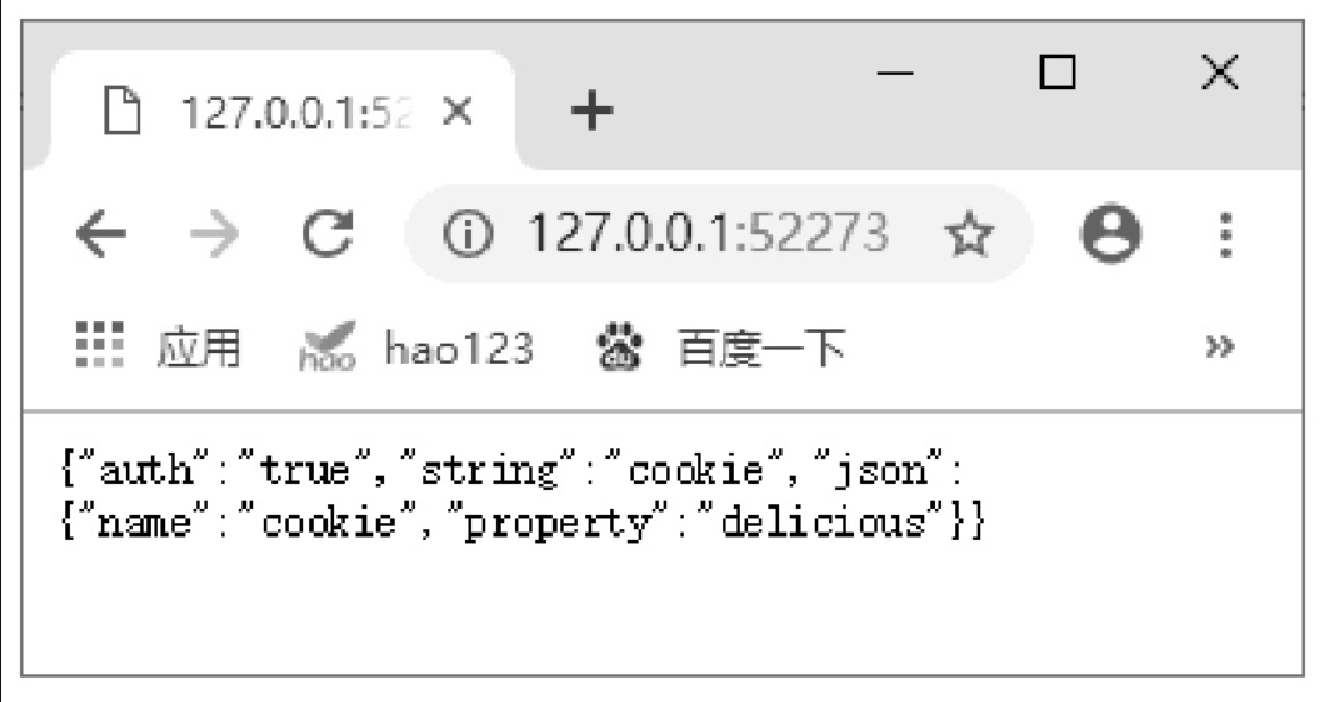
例如,创建一个 .js 文件,通过在 app.use() 方法中调用 cookieParser() 来设置一个没有签名的 cookie parser 中间件,然后设置服务器端响应的 cookie 内容,并将该响应信息发送到客户端进行显示。代码如下:
//导入模块
var express = require('express');
var cookieParser = require('cookie-parser');
//创建服务器
var app = express();
//设置cookie parser中间件
app.use(cookieParser());
app.get('/', function (request, response) {
     //设置cookie内容
     response.cookie('string', 'cookie');
     response.cookie('json', {
          name: 'cookie',
          property: 'delicious'
     })
     response.send(request.cookies)
     app.get('/get', function (request, response) {
          //发送响应信息
          response.send(request.cookies);
     });
});
//启动服务器
app.listen(52273, function () {
     console.log('服务器地址在 http://127.0.0.1:52273');
});
运行程序,在浏览器中输入 http://127.0.0.1:52273 ,可以看到浏览器中的界面效果如图 14.6 所示。
如果将上面代码中的 “app.use(cookieParser());” 注释掉并再次运行程序,则在浏览器中将不会看到任何信息。
body parser中间件
body parser 中间件主要用来处理 POST 请求数据,使用 body parser 中间件的前提是设置 request 对象的 body 属性。body parser 中间件不是 express 对象内置的中间件,需要使用 npm 命令进行下载和安装,命令如下:
npm install body-parserbody parser 中间件的常用方法及说明如表 14.6 所示。

【例14.4】通过设置中间件实现登录验证功能。(实例位置:资源包\源码\14\04)
实现本实例需要的文件有 js.js 文件和 login.html 文件,步骤如下。
(1) 在 WebStorm 中创建 js.js 文件,在该文件中,主要通过 cookie parser 中间件和 body parser 中间件结合,实现用户登录验证的功能。其中,cookie parser 中间件用来记录用户登录成功标识,body parser 中间件用来处理用户登录请求数据。另外,通过 app.get() 方法分别设置了初始页面、登录成功页面和登录失败页面的路由规则。代码如下:
var fs = require('fs');
var express = require('express');
var cookieParser = require('cookie-parser');
var bodyParser = require('body-parser');
//创建服务器
var app = express();
//设置中间件
app.use(cookieParser());
//extended选项为false,表示使用querystring库转换URL-encoded数据
app.use(bodyParser.urlencoded({ extended: false }));
//设置路由配置
app.get('/', function (request, response) {
if (request.cookies.auth) {
response.send('<h1 style="color:red;text-align: center">登录成功</h1>');
} else {
response.redirect('/login');
}
});
app.get('/login', function (request, response) {
//读取登录页面
fs.readFile('login.html', function (error, data) {
response.send(data.toString());
});
});
app.post('/login', function (request, response) {
//记录登录用户
var login = request.body.login;
//记录登录密码
var pass = request.body.pass;
//判断登录是否成功
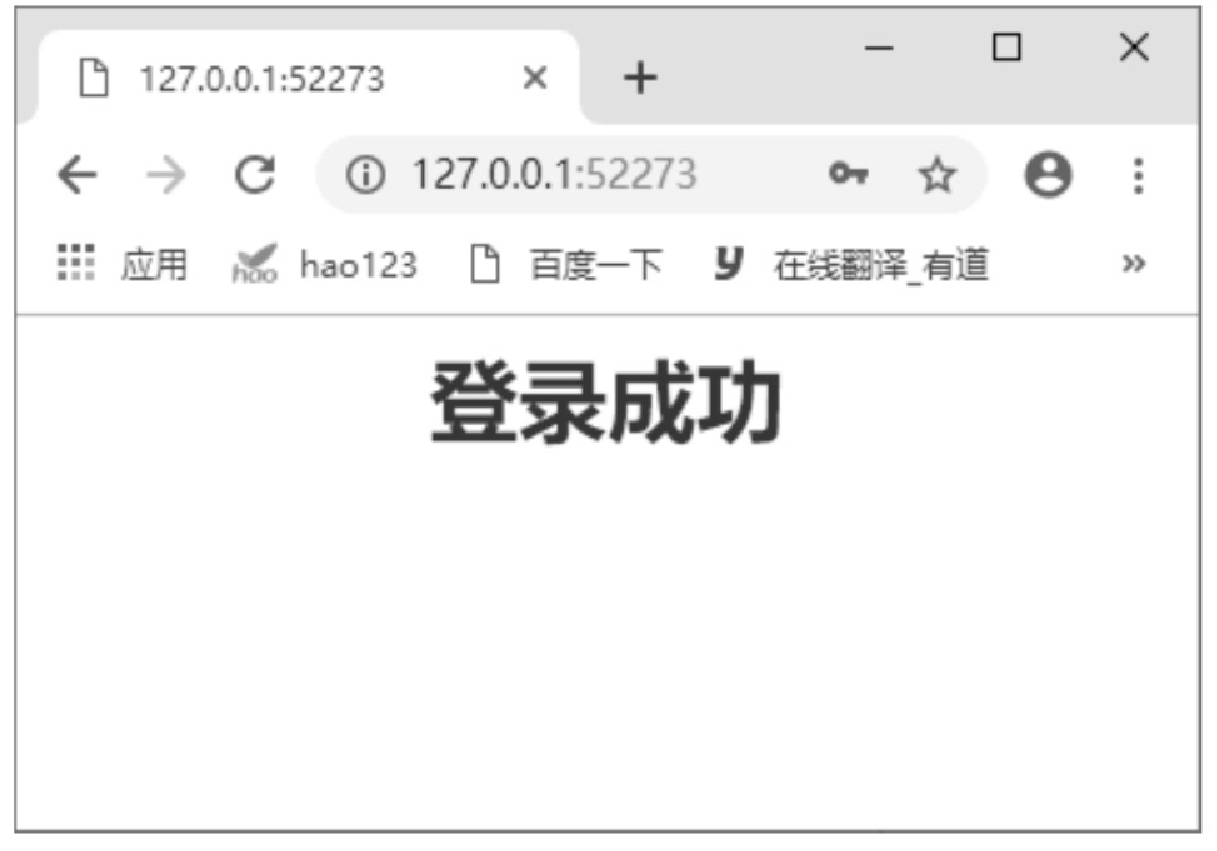
if (login == 'mingrisoft' && pass == '123456') {
//登录成功,使用cookie记录登录成功标识
response.cookie('auth', true);
response.redirect('/'); //跳转页面
} else {
//登录失败
response.redirect('/login');
}
});
//启动服务器
app.listen(52273, function () {
console.log('服务器监听地址是 http://127.0.0.1:52273');
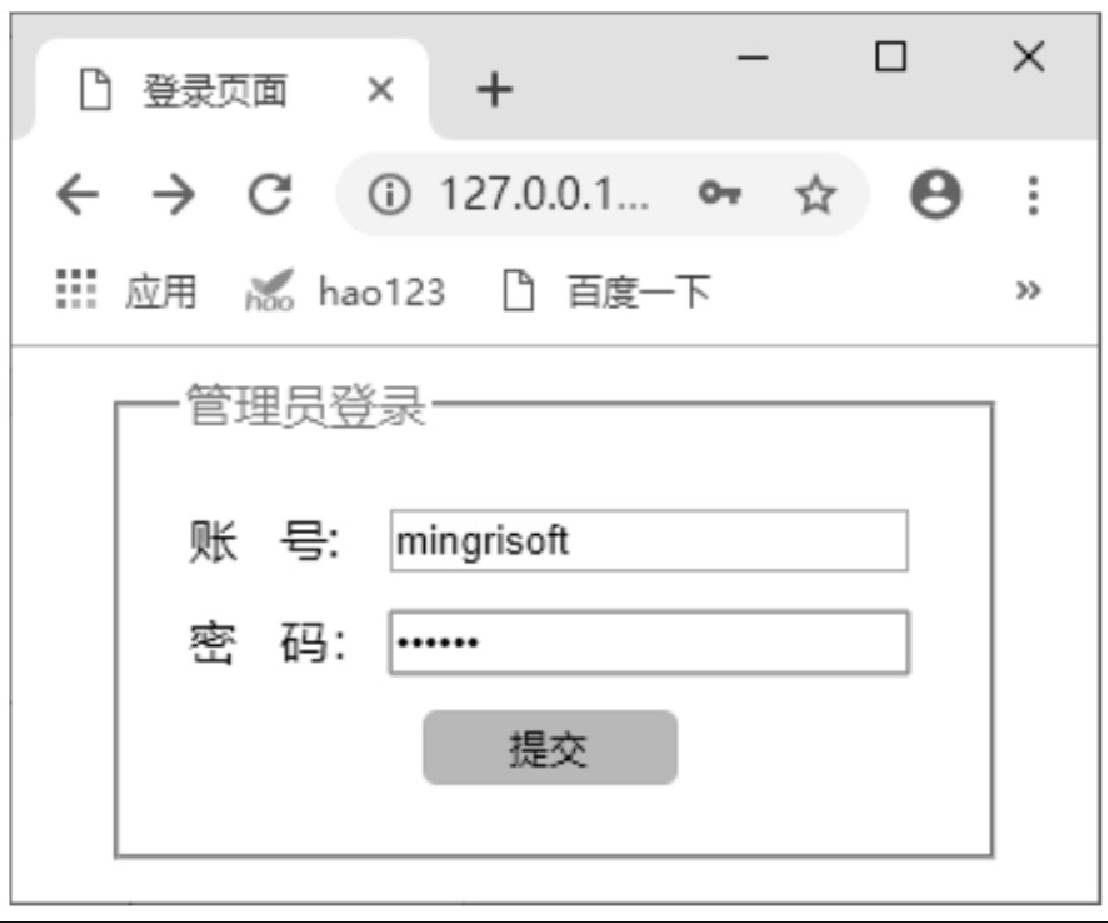
});(2) 创建 login.html 文件,用来作为用户登录页面,代码如下:
<!DOCTYPE html>
<html>
<head>
<meta charset="utf-8">
<title>登录页面</title>
</head>
<body>
<form method="post">
<fieldset style="width: 250px;margin: 0 auto;padding:20px">
<legend style="color:#ff5722">管理员登录</legend>
<table>
<tr>
<td><label for="user">账 号:</label></td>
<td><input type="text" name="user" id="user"/></td>
</tr>
<tr height="40">
<td><label for="pass">密 码:</label></td>
<td><input type="password" name="pass" id="pass"/></td>
</tr>
<tr>
<td colspan="2" align="center">
<input type="submit" style="background: #41d7ea;width: 85px;height: 25px;border: 1px solid #e0ac5e;outline: none;border-radius: 5px;"/>
</td>
</tr>
</table>
</fieldset>
</form>
</body>
</html>运行 js.js 文件,在浏览器中输入 http://127.0.0.1:52273/ ,可以看到一个管理员登录页面,如图 14.7 所示。
在页面中输入账号(mingrisoft)和密码(123456),单击 “提交” 按钮,效果如图 14.8 所示。