功能实现方法
Python 默认自带的模块已经可以实现简单的 HTTP 服务器,如 BaseHTTPServer 模块提供基本的 Web 服务和处理器类;SimpleHTTPServer 模块包含 GET 与 HEAD 请求与处理支持;CGIHTTPServer 模块包含处理 POST 请求的支持。Yorserver 是基于 BaseHTTPServer 模块 Web 服务类 HTTPServer 扩展而来,同时也使用 CGIHTTPServer 模块提供 CGI 程序的接收与执行。下面详细介绍各个功能点。
HTTP缓存功能
Expires机制
在 HTTP/1.1 协议中,Expires 字段声明了一个网页或 URL 地址不再被浏览器缓存的时间,一旦超过了这个时间,浏览器会重新向原始服务器发起新请求,在 Yorserver 中 Expires 字段的配置如下,指定 Expires="7d",表示文件在客户端缓存 7 天。
# Expires: Add response HTTP header Expires and Max-age version. format:d/h/
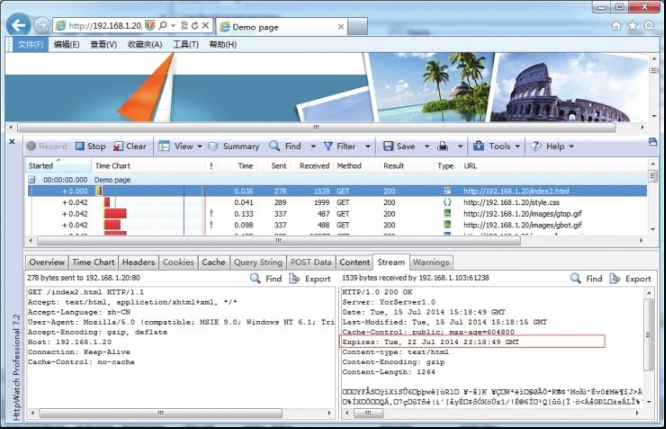
m(day/hour/minute).Expires="7d"访问 Yorserver 服务下的站点URL http://192.168.1.20/index2.html,通过 HttpWatch 进行跟踪,跟踪结果见图8-2,可见 Expires 字段显示 Tue, 22Jul 2014 23:18:49 GMT,请求原始服务器时间 Date 字段为 Tue, 15 Jul 2014 15:18:49 GMT,由于 Date 描述的时间为世界标准时间,换算成本地时间需 +8,即 Tue, 15 Jul 2014 23:18:49,加上配置的 7 天(7d)过期值,结果等于 Expires 字段值。
关于 Yorserver 实现文件过期 Expires 的方法,实现原理为返回 “当前时间”+“配置过期时间”,“过期时间” 是通过 datetime.timedelta() 方法转换不同单位时间后,再与 “当前时间” 累加,“过期时间” 支持通过 days(日)、hours(小时)、minutes(分钟)等单位来表示,以下为 Yorserver 文件过期 Expires 的实现方法:
# 文件过期Expires实现方法
def get_http_expiry(_Expirestype, _num):
    if _Expirestype == "d":  # 当前时间+过期时间(日、小时、分钟)
        expire_date = datetime.datetime.now() + datetime.timedelta(days=_num)
    elif _Expirestype == "h":
        expire_date = datetime.datetime.now() + datetime.timedelta(hours=_num)
    else:
        expire_date = datetime.datetime.now() + datetime.timedelta(minutes=_num)
    return expire_date.strftime('%a, %d %b %Y %H:%M:%S GMT')  # 格式化时间为
    # Expires格式
max-age机制
客户端另一缓存机制则是利用 HTTP 消息头中的 “cache-control” 来控制,其中 max-age 字段实现在原始服务器返回的 max-age 配置的秒数内,浏览器将不会发送相关请求到服务器,而是由缓存直接提供,超过这一时间段后才向原始服务器发起请求,由服务器决定返回新数据还是仍由缓存提供。与 Expires 不同,max-age 是通过指定相对时间秒数来实现缓存过期,当与 Expires 同时存在时,max-age 会覆盖 Expires。下面详细介绍 max-age 的实现原理,由于 max-age 与 Expires 的时间结果是等价的,只是表现形式不同,因此只要得到其中一个值都可以计算出另一个值。Yorserver 是通过已知 Expires 值计算出 max-age,实现源码如下:
# 定义过期时间类型,统一成“秒”单位
ExpiresTypes = {
"d": 86400,
"h": 3600,
"m": 60,
}
# 返回max-age方法,通过不同时间单位秒*数量得到
def secs_from_days(_seconds, _num):
return _seconds * _num
# 定义“cache_control”返回内容
Expirestype = "d"
Expirenum = 7
CACHE_MAX_AGE = pubutil.secs_from_days(ExpiresTypes[Expirestype], int(Expirenum))
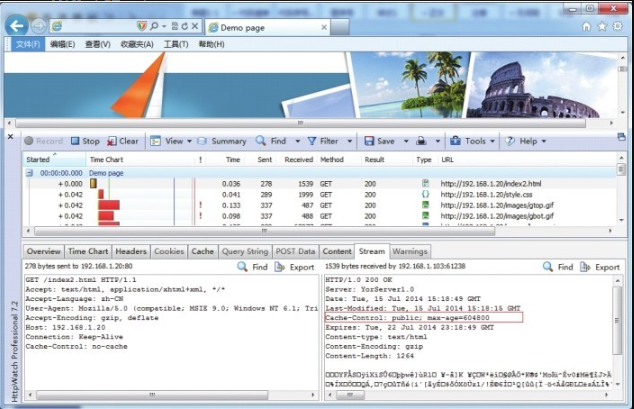
cache_control = 'public; max-age=%d' % (CACHE_MAX_AGE,)以过期时间 “7d” 为例,计算公式为 “86400*7=604800”,返回完整“Cache-Control” 内容为 “Cache-Control: public;max-age=604800”,效果如图8-3所示。
Last-Modified机制
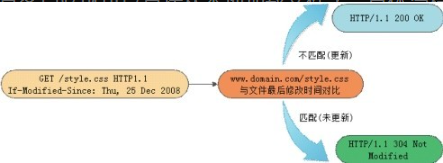
最后一种浏览缓存机制为 Last-Modified,其原理是客户端通过 If-Modified-Since 请求头将先前接收到服务器端文件的 Last-Modified 时间戳信息进行发送,目的是让服务器端进行比对验证,通过这个时间戳判断客户端的文件是否是最新,如不是最新的,则返回新的内容(HTTP 200),如果是最新的,则返回 HTTP 304 告诉客户端其本地缓存的文件是最新的,无需重启下载。于是客户端就可以直接从本地加载文件了。具体流程图如图8-4所示。
Yorserver 实现 Last-Modified 缓存机制的原理,首先获取请求头是否包含 Pragma、Cache-Control 字段,检查其值是否为 no-cache,表示客户端要求不缓存,通常是用户主动强制刷新页面,如 “Ctrl+F5” 组合键,将返回 HTTP 200 状态,否则,将请求头部 If-Modified-Since 字段与服务器端文件 mtime(最后更新时间)进行比较,相匹配则说明文件没有更新,将返回 “HTTP/1.0304 Not Modified”,不匹配则返回 “HTTP 200”,实现源码如下:
client_cache_cc = self.headers.getheader('Cache-Control') # 获取请求头Cache-Control值
client_cache_p = self.headers.getheader('Pragma') # 获取请求头Pragma值
# 获取请求头If-Modified-Since值,以便与服务器端文件mtime进行比较
Modified_Since = self.headers.getheader('If-Modified-Since')
# 过滤用户强制刷新的场景,将返回HTTP 200状态,否则获取If-Modified-Since值
if client_cache_cc == 'no-cache' or client_cache_p == 'no-cache' or \
(client_cache_cc == None and client_cache_p == None and Modified_Since == None):
client_modified = None
else:
try: # 兼容不同浏览器请求异常
client_modified = Modified_Since.split(';')[0]
except:
client_modified = None
# 将文件mtime时间格式转为Last-Modified格式,如“Mon, 29 Dec 2008 16:51:22 GMT”
file_last_modified = self.date_time_string(fs.st_mtime)
if client_modified == file_last_modified: # 比较If-Modified-Since与文件mtime值
self.send_response(304) # 匹配则返回304状态
self.end_headers()
else:
self.send_response(200) # 不匹配则返回200状态
# 将文件mtime作为Last-Modified返回
self.send_header('Last-Modified', file_last_modified)
self.send_header('Cache-Control', cache_control)
self.send_header('Expires', expiration)
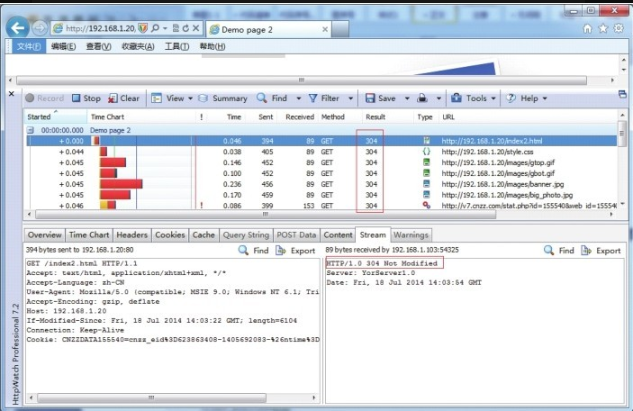
self.send_header('Content-type', content_type)客户端请求及响应效果如图8-5所示,当文件没有发生更新时返回 “HTTP/1.0304 Not Modified” 状态,当手工修改文件,使文件 mtime 发生改变时,将返回 “HTTP 200” 状态。
HTTP压缩功能
启用 HTTP 内容压缩,可为我们节省不少带宽成本,并且也可以加快网页访问速度,提升用户体验。目前主流的浏览器都支持客户端解压功能,Yorserver 服务器端采用 gzip 压缩机制,其原理是在文件传输之前,先使用 gzip 压缩后再传输给客户端,客户端接收之后再由浏览器解压显示,这样虽然稍微占用了一些服务器和客户端的 CPU 资源,但是换来的是更高的带宽利用率。对于纯文本(html、css、js等)来讲,效果非常显著。Yorserver 压缩配置选项如下,其中 compresslevel 为压缩比,其值为 1~9,“1” 压缩比最小处理速度最快,“9” 压缩比最大但处理速度最慢,损耗 CPU 资源。
[gzip]
# gzip: Enable(on) or Disable(off) gzip options.
gzip="on"
# configure compress level(1~9)
compresslevel=9
关于实现 HTTP 内容压缩的方法,需要加载 gzip、cStringIO 两个模块,gzip实现内容的压缩功能,cStringIO 的作用是操作内存文件,读取磁盘文件内容写入内存文件,再做压缩处理,最后输出压缩后的内容返回给客户端,详细源码如下:
# HTTP内容压缩方法,参数buf为文件内容,_compresslevel为压缩比
def compressBuf(buf, _compresslevel):
import gzip, cStringIO
zbuf = cStringIO.StringIO() # 创建一个内存流文件对象
# 创建一个gzip文件对象
zfile = gzip.GzipFile(mode='wb', fileobj=zbuf, compresslevel=_compresslevel)
zfile.write(buf) # 写入文件压缩内容
zfile.close()
return zbuf.getvalue() # 返回压缩内容
f = open(DocumentRoot + sep + self.path)
if gzip == "on": # 开启gzip选项则调用压缩方法compressBuf(),否则直接读取文件内容
compressed_content = compressBuf(f.read(), compresslevel)
else:
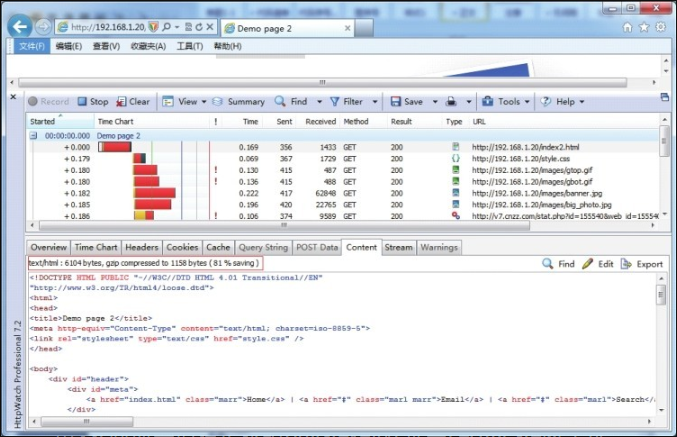
compressed_content = f.read()HTTP 内容压缩效果如图8-6所示,index2.html 文件原始大小为 6104 字节,gzip 压缩后为 1158 个字节,压缩了 81% 的内容,效果很理想。
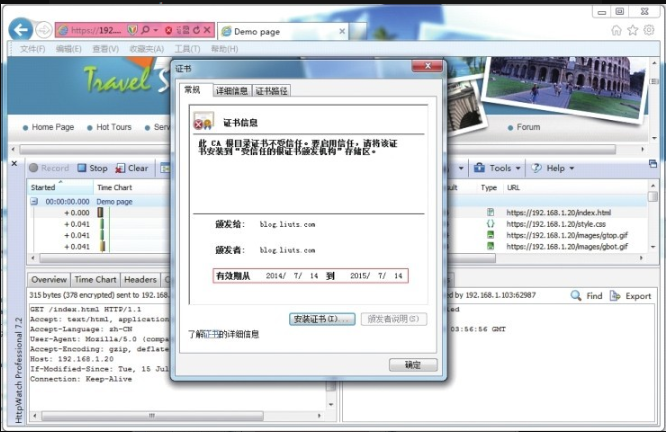
HTTP SSL功能
HTTPS(Hyper Text Transfer Protocol over Secure Socket Layer)是以安全为目标的 HTTP 通道,可以理解成 HTTP 的安全版,即 HTTP 协议下加入 SSL 层,HTTPS 的安全基础是 SSL,因此加密的详细内容就需要 SSL(Secure Sockets Layer,安全套接层)。目前 HTTPS 广泛用于互联网上安全敏感的通信,例如电商在线交易支付方面。
关于 Yorserver 配置 SSL 的选项,需要修改监听端口为 443,在启用 SSL 同时需要指定私钥 privatekey 及证书 certificate 两个选项,具体配置如下:
# port: Allows you to bind yorserver's port, http default 80 and Https 443.
port=443
[ssl]
# ssl: Enable(on) or Disable(off) HTTPS options,port options must configure "443".
ssl="on"
# configure privatekey and certificate pem.
privatekey="/usr/local/yorserver/key/app.key"
certificate="/usr/local/yorserver/key/server.crt"
具体的功能实现使用了 OpenSSL、SocketServer 两个模块,其中 OpenSSL 负责 SSL 的功能,SocketServer 负责基础通信。详细源码如下:
class SecureHTTPServer(HTTPServer):
    def __init__(self, server_address, HandlerClass):
        BaseServer.__init__(self, server_address, HandlerClass)
        ctx = SSL.Context(SSL.SSLv23_METHOD)  # 定义一个SSL连接
        ctx.use_privatekey_file(privatekey)  # 指定私钥文件
        ctx.use_certificate_file(certificate)  # 指定证书文件
        self.socket = SSL.Connection(ctx, socket.socket(self.address_family,
                                                        self.socket_type))  # 创建一个连接对象,参数使用给定的OpenSSL.SSL.Context实例和Socket
        self.server_bind()  # 服务绑定并激活
        self.server_activate()
生成密钥与证书可以参考以下步骤:
# 生成RSA密钥server.key
# openssl genrsa -des3-out server.key 1024
# 复制一个密钥文件app.key(无需输入密码)
# openssl rsa -in server.key -out app.key
# 生成一个证书请求server.csr
# openssl req -new -key server.key -out server.csr
# 签发证书server.crt
# openssl x509-req -days 365-in server.csr -signkey server.key -out server.crt
下一步将生成的密钥文件 app.key、证书文件 server.crt 复制到 yorserver.conf 配置指定路径即可,如 /usr/local/yorserver/key/app.key 与 /usr/local/yorserver/key/server.crt,最后重启 Yorserver 服务,效果如图8-7所示。
目录列表功能
Web 目录列表很直观地展示了站点目录的结构,普遍应用在文档及下载服务中,当然,对安全级别要求较高的站点,建议还是关闭此功能。Yorserver 支持目录列表功能,在配置中开启/关闭的方法如下:
# Indexes: directory list (on/off).
Indexes="on"
实现的方法是通过 os.listdir() 方法获取站点目录(系统绝对路径)列表,通过前端 “<li>”、“<a>” HTML 标签格式化输出,具体实现源码如下:
def list_directory(self, path):
    try:
        list = os.listdir(path)  # 获取当前目录系统绝对路径列表
    except os.error:
        self.send_error(404, "No permission to list directory");
        return None
    list.sort(lambda a, b: cmp(a.lower(), b.lower()))  # 不区分大小写对目录列表做排序
    f = StringIO()  # 创建内存文件对象
    f.write("<h2>Directory listing for %s</h2>\n" % self.path)  # self.path为当前URL路径
    f.write("<hr>\n<ul>\n")
    # 输出上一级目录URL链接
    f.write('<li><a href="%s">Parent Directory</a>\n' % (pubutil.parent_dir(self.path)))
    for name in list:  # 遍历输出目录文件列表
        fullname = os.path.join(path, name)
        displayname = name = cgi.escape(name)  # HTML字符转义
        if os.path.islink(fullname):
            displayname = name + "@"
        elif os.path.isdir(fullname):
            displayname = name + "/"
            name = name + os.sep
        f.write('<li><a href="%s">%s</a>\n' % (name, displayname))
    f.write("</ul>\n<hr>\n")
    f.seek(0)
    return f
目录列表效果如图8-8所示。
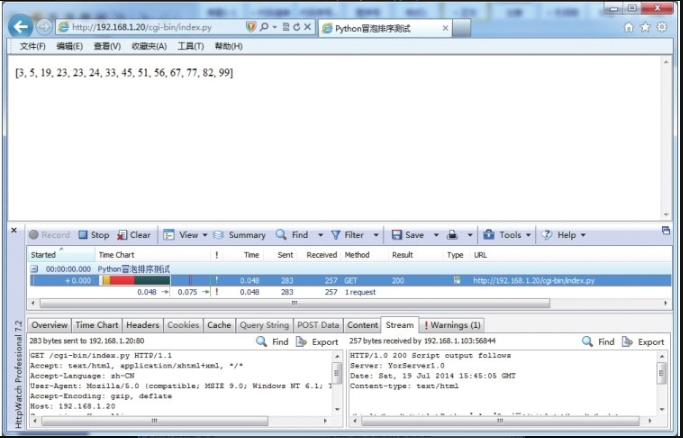
动态CGI功能
CGI(Common Gateway Interface,通用网关接口)实现让一个客户端从网页浏览器向在网络服务器上的程序请求数据。CGI 描述了客户端和服务器程序之间传输数据的一种标准。编写 CGI 程序的语言有 Shell、Perl、Python、Ruby、PHP、TCL、C/C++ 等。Yorserver 支持这些 CGI 程序的调用,需要修改相关配置,cgi_path 参数指定 CGI 程序的存放目录,默认为 yorserver/bin/cgi-bin 目录,指定多个目录使用“,”号分隔; cgi_extensions 参数指定 CGI 程序扩展名支持,详细见下面的配置:
[cgim]
# cgi_moudle: Enable(on) or Disable(off) cgi support.
cgi_moudle="on"
# cgi_path: configure cgi path,multiple cgi path use ',' delimited,cgi_path in
bin directory.
cgi_path='/cgi-bin',
# cgi_extensions: configure cgi file extension.
cgi_extensions="('.cgi','.py','.pl','.php')"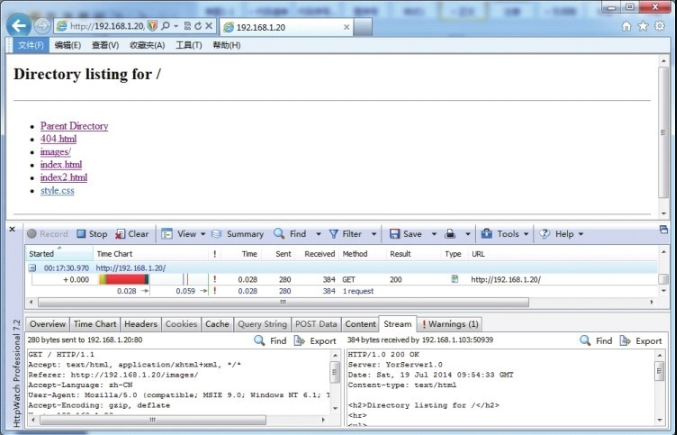
Yorserver 采用 CGIHTTPServer 模块来实现 CGI 支持,其 CGIHTTPRequestHandler 类继承了 SimpleHTTPRequestHandler 类,因此,该类除了可以执行 CGI 程序外还支持静态文件服务。另外在主服务类中需要继承 CGIHTTPRequestHandler 基类,例如:class ServerHandler(CGIHTTPRequestHandler),其他实现源码如下:
CGIHTTPRequestHandler.cgi_directories = cgi_path  # 指定CGI路径
if cgi_moudle == "on" and self.path.endswith(cgi_extensions):  # 开启CGI且在配置
    # 扩展名列表中
    return CGIHTTPRequestHandler.do_GET(self)  # 调用cgi do_GET()方法,返回执行结果
下面列举 Python 与 PHP CGI 实现冒泡排序法的示例。代码如下:
Unresolved include directive in modules/ROOT/pages/section02/ch08/ch8-02.adoc - include::example$第八章/yorserver/bin/cgi-bin/index.py[]执行结果如图8-9所示。
Unresolved include directive in modules/ROOT/pages/section02/ch08/ch8-02.adoc - include::example$第八章/yorserver/bin/cgi-bin/index.php[]执行结果如图8-10所示。
