服务器端功能设计
Django配置
安全审计功能作为 OMServer 的一个功能扩展,需要 Web 服务器端开发框架(Django)同样做些变更来支持新增的功能。由于该功能作为项目的一个 App,因此,第一步需要创建一个 App,操作如下:
# cd /data/www/OMserverweb
# python manage.py startapp omaudit 在创建的omaudit目录中修改urls.py,添加App的URL映射规则,内容如下:
from django.conf.urls.defaults import *
urlpatterns = patterns('omaudit.views',
                       (r'^$', 'index'),
                       (r'omaudit_pull/$', 'omaudit_pull'),  # 映射到omaudit_pull方法,实现客户端数据接收
                       (r'omaudit_run/$', 'omaudit_run'),  # 映射到omaudit_run方法,实现前端实时查询
                       )
修改 App 的 models.py,实现与数据库的关系映射,内容如下:
from django.db import models

# Create your models here.
class ServerHistory(models.Model):
    id = models.IntegerField(primary_key=True, db_column='ID')  # Field name made lowercase.
    history_id = models.IntegerField()
    history_ip = models.CharField(max_length=45)
    history_user = models.CharField(max_length=45)
    history_datetime = models.DateTimeField()
    db_datetime = models.DateTimeField()
    history_command = models.CharField(max_length=765)

    class Meta:
        db_table = u'server_history'
如果数据库结构已经存在,可以通过 python manage.py inspectdb 命令来生成 models 代码。最后修改项目 settings.py,注册该 App 名称,内容如下:
INSTALLED_APPS = (
… …
    # 'django.contrib.admindocs',
    'public',
    'autoadmin',
    'omaudit',    #添加此行,注册该App
)
功能实现方法
服务器端提供了两个关键视图方法,分别实现前端实时展示(omaudit_run)及数据接收(omaudit_pull),下面针对两个方法进行说明。
(1) 前端实时展示(omaudit_run)方法
关于前端数据实时展示的实现原理,通过前端 JavaScript 的 setInterval() 方法实现定时函数调用,首次请求默认返回 ID 倒序最新5条记录,并记录下 LastID(最新记录ID),后面的定时调用将传递 LastID 参数,数据库查询条件是 “ID>LastID”,从而达到实时获取最新记录的目的,同时也支持选择主机来作为过滤条件,功能实现流程图见图14-5。
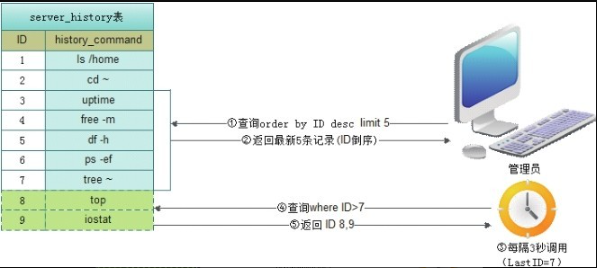
Figure 1. 图14-5 前端数据展示流程图
omaudit_run() 方法实现源码如下:
"""
=事件任务前端展示方法
"""
def omaudit_run(request):
if not 'LastID' in request.GET: # 获取上次查询到的最新记录ID
LastID = ""
else:
LastID = request.GET['LastID']
if not 'hosts' in request.GET: # 获取选择的主机地址信息
Hosts = ""
else:
Hosts = request.GET['hosts']
ServerHistory_string = ""
host_array = target_host(Hosts, "IP").split(';') # 调用target_host方法过滤出IP地址
if LastID == "0": # 符合第一次提交条件,查询不加“id>LastID”条件,反之
if Hosts == "": # 符合没有选择主机条件,查询不加“history_ip in host_array”
# 条件,反之
ServerHistoryObj = ServerHistory.objects \
.order_by('-id')[:5]
else:
ServerHistoryObj = ServerHistory.objects \
.filter(history_ip__in=host_array).order_by('-id')[:5]
else:
if Hosts == "":
ServerHistoryObj = ServerHistory.objects \
.filter(id__gt=LastID).order_by('-id')
else:
ServerHistoryObj = ServerHistory.objects \
.filter(id__gt=LastID, history_ip__in=host_array).order_by('-id')
lastid = ""
i = 0
for e in ServerHistoryObj: # 遍历查询结果,返回给前端
if i == 0:
lastid = e.id
ServerHistory_string += "<font color=#cccccc>" + e.history_ip + \
"</font> \t" + e.history_user + " \t" + \
str(e.db_datetime) + "\t # <font color=#ffffff>" + e.history_command + "</font>*"
i += 1
ServerHistory_string += "@@" + str(lastid) # 通过“@@”字符分隔事件记录与lastid,
# 前端拆分
return HttpResponse(ServerHistory_string)(2) 数据接收(omaudit_pull)方法
数据接收方法相对比较简单,即将接收到的信息直接入库,实现的源码如下:
"""
=事件任务pull方法
"""
def omaudit_pull(request):
    if request.method == 'GET':  # 校验HTTP(GET)请求参数合法性
        if not request.GET.get('history_id', ''):
            return HttpResponse("history_id null")
        if not request.GET.get('history_ip', ''):
            return HttpResponse("history_ip null")
        if not request.GET.get('history_user', ''):
            return HttpResponse("history_user null")
        if not request.GET.get('history_datetime', ''):
            return HttpResponse("history_datetime null")
        if not request.GET.get('history_command', ''):
            return HttpResponse("history_command null")

        history_id = request.GET['history_id']  # 获取HTTP请求参数值
        history_ip = request.GET['history_ip']
        history_user = request.GET['history_user']
        history_datetime = request.GET['history_datetime']
        history_command = request.GET['history_command']

        historyobj = ServerHistory(history_id=history_id, \  # 数据入库(insert)
        history_ip = history_ip, \
            history_user = history_user, \
            history_datetime = history_datetime, \
            history_command = history_command)
        try:
            historyobj.save()
        except Exception as e:
            return HttpResponse("入库失败,请与管理员联系!" + str(e))

        Response_result = "OK"  # 输出“OK”字符作为成功标志
        return HttpResponse(Response_result)
    else:
        return HttpResponse("非法提交!")
当然,如接入的集群过于庞大,服务器端数据库会逐步形成瓶颈,主机审计信息入库会出现一定延时,影响 Linux 用户操作体验,一个可行的方案是采用信息异步入库,即先将信息写入本地,再通过上报程序后台提交信息,用户将无感知。