示例:基于 Saltstack 实现的配置集中化管理
本示例实现一个集中化的 Nginx 配置管理,根据业务不同设备型号、分区、内核参数的差异化,动态产生适合本机环境的 Nginx 配置文件。本示例结合了 Saltstack 的 grains、grains_module、pillar、state、jinja(template)等组件。
主控端配置说明
master 主配置文件的关键配置项如下:
nodegroups:
    web1group: 'L@SN2012-07-010,SN2012-07-011,SN2012-07-012'
    web2group: 'L@SN2013-08-021,SN2013-08-022'
file_roots:
  base:
    - /srv/salt
pillar_roots:
  base:
    - /srv/pillar
定义的 pillar、module api、state 目录结构,如图10-16所示。

使用 Python 编写 grains_module,实现动态配置被控主机 grains 的 max_open_file 键,值为 ulimit -n 的结果,以便动态生成 Nginx.conf 中的 worker_rlimit_nofile、worker_connections 参数的值,具体代码如下:
import os,sys,commands
def NginxGrains():
    '''
        return Nginx config grains value
    '''
    grains = {}
    max_open_file=65536
    try:
        getulimit=commands.getstatusoutput('source /etc/profile;ulimit -n')
    except Exception as e:
        pass
    if getulimit[0]==0:
        max_open_file=int(getulimit[1])
    grains['max_open_file'] = max_open_file
    return grains
代码说明见 “10.4.2 定义 Grains 数据” 得 “主控端扩展模块定制 Grains 数据”
同步 grains 模块,运行:
# salt '*' saltutil.sync_all刷新模块(让 minion 编译模块),运行:
# salt '*' sys.reload_modules验证 max_open_file key 的 key 操作命令见图10-17。

配置pillar
本示例使用分组规则定义 pillar,即不同分组引用各自的 sls 属性,使用 match 属性值进行区分,除了属性值为 nodegroup 外,还支持 grain、pillar 等形式。以下是使用 grain 作为区分条件例子:
dev:
      'os:Debian':
        - match: grain
        - servers
本示例通过 /etc/salt/master 中定义好的组信息,如 web1group 与 web2group 与业务组,分别引用 web1server.sls 与 web1server.sls,详见 /srv/pillar/top.sls 中的内容:
base:
web1group:
- match: nodegroup
- web1server
web2group:
- match: nodegroup
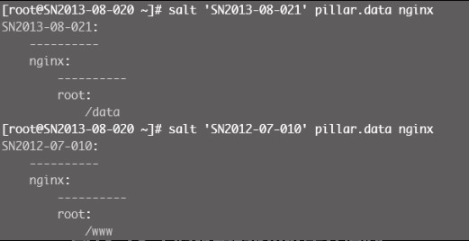
- web2server定义私有配置。本示例通过 pillar 来配置 web_root 的数据,当然,也可以根据不同需求进行定制,格式为 python 字典形式,即 "key:value"。
nginx:
root: /wwwnginx:
root: /data通过查看不同分组主机的 pillar 信息来验证配置结果,如图10-18所示。
配置state
定义入口top.sls:
base:
  '*':
    - nginx
下面定义 nginx 包、服务状态管理配置 sls,其中,salt://nginx/nginx.conf 为配置模板文件位置,-enable: True 检查服务是否在开机自启动服务队列中,如果不在则加上,等价于 chkconfig nginx on 命令 “reload: True”,表示服务支持 reload 操作,不加则会默认执行 restart 操作。watch 一则检测 /etc/nginx/nginx.conf 是否发生变化,二则确保 nginx 已安装成功。
nginx:
      pkg:
    - installed
      file.managed:
    - source: salt://nginx/nginx.conf
    - name: /etc/nginx/nginx.conf
    - user: root
    - group: root
    - mode: 644
    - template: jinja
      service.running:
    - enable: True
    - reload: True
    - watch:
      - file: /etc/nginx/nginx.conf
      - pkg: nginx
定制 Nginx 配置文件 jinja 模板,各参数的引用规则如下:
-
worker_processes 参数采用 grains['num_cpus'] 上报值(与设备 CPU 核数一致);
-
worker_cpu_affinity 分配多核 CPU,根据当前设备核数进行匹配,分别为2、4、8、核或其他;
-
worker_rlimit_nofile、worker_connections 参数理论上为grains['max_open_file'];
-
root 参数为定制的 pillar['nginx']['root'] 值。
# For more information on configuration, see:
user nginx;
worker_processes {{ grains['num_cpus'] }};
{% if grains['num_cpus'] == 2 %}
worker_cpu_affinity 01 10;
{% elif grains['num_cpus'] == 4 %}
worker_cpu_affinity 1000010000100001;
{% elif grains['num_cpus'] >= 8 %}
worker_cpu_affinity 00000001 00000010 00000100 00001000 00010000 00100000
0100000010000000;
{% else %}
worker_cpu_affinity 1000010000100001;
{% endif %}
worker_rlimit_nofile {{ grains['max_open_file'] }};
error_log /var/log/nginx/error.log;
#error_log /var/log/nginx/error.log notice;
#error_log /var/log/nginx/error.log info;
pid /var/run/nginx.pid;
events {
worker_connections {{ grains['max_open_file'] }};
}
http {
include /etc/nginx/mime.types;
default_type application/octet-stream;
log_format main '$remote_addr - $remote_user [$time_local] "$request" '
'$status $body_bytes_sent "$http_referer" '
'"$http_user_agent" "$http_x_forwarded_for"';
access_log /var/log/nginx/access.log main;
sendfile on;
#tcp_nopush on;
#keepalive_timeout 0;
keepalive_timeout 65;
#gzip on;
# Load config files from the /etc/nginx/conf.d directory
# The default server is in conf.d/default.conf
#include /etc/nginx/conf.d/*.conf;
server {
listen 80 default_server;
server_name _;
#charset koi8-r;
#access_log logs/host.access.log main;
location / {
root {{ pillar['nginx']['root'] }};
index index.html index.htm;
}
error_page 404 /404.html;
location = /404.html {
root /usr/share/nginx/html;
}
# redirect server error pages to the static page /50x.html
#
error_page 500502 503504 /50x.html;
location = /50x.html {
root /usr/share/nginx/html;
}
}
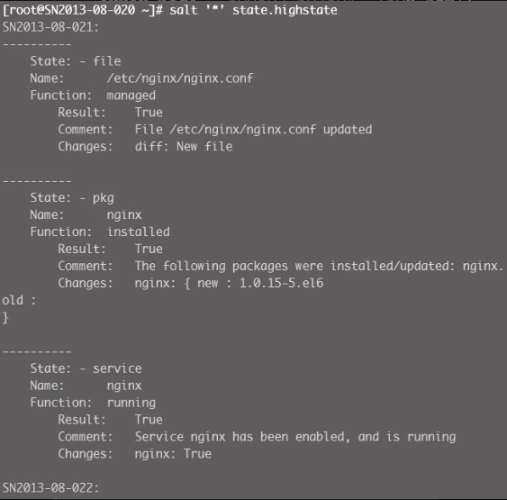
}执行刷新 state 配置,结果如图10-19所示。
校验结果
登录 web1group 组的一台服务器,检查 Nginx 的配置,尤其是变量部分的参数值,配置片段如下:
user               nginx;
worker_processes   2;
worker_cpu_affinity 01 10;
worker_rlimit_nofile 65535;
error_log   /var/log/nginx/error.log;
#error_log  /var/log/nginx/error.log  notice;
#error_log  /var/log/nginx/error.log  info;
pid         /var/run/nginx.pid;
events {
    worker_connections  65535;
}
……
        location / {
            root   /www;
            index  index.html index.htm;
        }
再登录 web2group 组的一台服务器,检查 Nginx 的配置,对比 web1group 组的服务器差异化,包括不同硬件配置、内核参数等,配置片段如下:
user               nginx;
worker_processes   4;
worker_cpu_affinity 1000010000100001;
worker_rlimit_nofile 65535;
error_log   /var/log/nginx/error.log;
#error_log  /var/log/nginx/error.log  notice;
#error_log  /var/log/nginx/error.log  info;
pid         /var/run/nginx.pid;
events {
    worker_connections  65535;
}
……
        location / {
            root   /data;
            index  index.html index.htm;
        }
至此,一个模拟生产环境 Web 服务集群的配置集中化管理平台已经搭建完成,大家可以利用这个思路扩展到其他功能平台。
参考提示
-
10.1 至 10.6 节的 Saltstack 介绍可参考官网文档 http://docs.saltstack.com/en/latest/ 。