自定义 Func 模块
Func 自带的模块已经非常丰富,但在日常系统运维当中,尤其是面对大规模的服务器集群、不同类别的业务平台,此时 Func 自带的模块或许已经不能满足我们的需求,所以有必要通过自定模块来填补这块的不足。本节介绍一个简单的 Func 自定义模块的,通过采用 Func 自带的建模块工具 func-create-module 来现实。
(1) 自定义模块步骤
如图11-3所示,自定义模块分为四个步骤进行,第一步生成模块,即通过 fun-create-module 命令创建模块初始模板;第二步编写逻辑,即填充我们的业务功能逻辑,生成模块;第三步分发模块,将编写完成的模块分发到所有被控主机;第四步执行已经分发完成的模块,调用方法与 Func 自带模块无差异。详细过程见图11-3。

(2) 生成模块
+
切换到 Func 安装包 minion 模块存储目录。笔者使用的是系统自带的 Python 2.6,具体路径为 /usr/lib/python2.6/site-packages/func/minion/modules 。
# cd /usr/lib/python2.6/site-packages/func/minion/modules运行创建模块命令 func-create-module,根据图11-14填写相关信息。
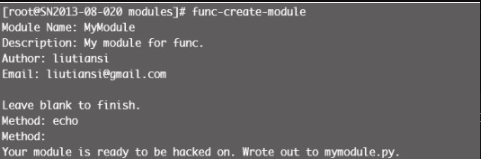
最终生成了一个初始化的模块代码文件 mymodule.py:
#
# Copyright 2014
# liutiansi <liutiansi@gmail.com>
#
# This software may be freely redistributed under the terms of the GNU
# general public license.
#
# You should have received a copy of the GNU General Public License
# along with this program; if not, write to the Free Software
# Foundation, Inc., 675 Mass Ave, Cambridge, MA 02139, USA.

import func_module
class Mymodule(func_module.FuncModule):
    # Update these if need be.
    version = "0.0.1"
    api_version = "0.0.1"
    description = "My module for func."
    def echo(self):
        """
        TODO: Document me ...
        """
        pass
(3) 编写逻辑
这一步只需在上述模块基础上做修改即可,如模块实现一个根据指定的条数返回最新系统日志( /var/log/messages )信息,修改后的代码如下:
#
# Copyright 2010
# liutiansi <liutiansi@gmail.com>
#
# This software may be freely redistributed under the terms of the GNU
# general public license.
#
# You should have received a copy of the GNU General Public License
# along with this program; if not, write to the Free Software
# Foundation, Inc., 675 Mass Ave, Cambridge, MA 02139, USA.
import func_module
from func.minion import sub_process


class Mymodule(func_module.FuncModule):
    # Update these if need be.
    version = "0.0.1"
    api_version = "0.0.1"
    description = "My module for func."

    def echo(self, vcount):
        """
        TODO: response system messages info
        """
        command = "/usr/bin/tail -n " + str(vcount) + " /var/log/messages"
        cmdref = sub_process.Popen(command, stdout=sub_process.PIPE,
                                   stderr=sub_process.PIPE, shell=True,
                                   close_fds=True)
        data = cmdref.communicate()
        return (cmdref.returncode, data[0], data[1])
(4) 分发模块
首先编写分发模块的功能,使用 Func 的 copyfile 模块来实现,原理比较简单,即读取主控端 func minion 包下的模块文件(参数传入),通过 Func 的 copyfile 模块同步到目标主机的同路径下。一次编写可持续使用,源码如下:
#!/usr/bin/python
import sys
import func.overlord.client as fc
import xmlrpclib
module = sys.argv[1]
pythonmodulepath="/usr/lib/python2.6/site-packages/func/minion/modules/"
client = fc.Client("*")
fb = file(pythonmodulepath+module, "r").read()
data = xmlrpclib.Binary(fb)
#分发模块
print client.copyfile.copyfile(pythonmodulepath+ module,data)
#重启Func服务
print client.command.run("/etc/init.d/funcd restart")
分发模块的运行结果如图11-5所示。

检查被控主机 /usr/lib/python2.6/site-packages/func/minion/modules 目录是否多了一个 mymodule.py 文件,是则说明模块已经成功分发。
(5) 执行模块
最后,执行模块及返回结果见图11-6。

正常返回了 5 条 /var/log/messages 信息,完成了自定义模块的全过程。