示例讲解
官网提供的 Haproxy+LAMP+Nagios 经典示例,也是目前国内最常用的技术架构,此案例访问地址为: https://github.com/ansible/ansible-examples/tree/master/lamp_haproxy 。下面将对该示例进行详细说明,内容覆盖前面涉及的几乎所有知识点,起到温故的作用,同时作为对 Ansible 的总结内容。
下面介绍 playbook 的基本信息。
-
目录结构
示例 playbook 目录结构见图9-9。
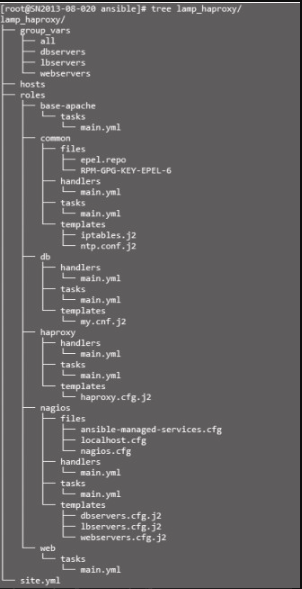 Figure 1. 图9-9 示例目录结构
 -
设备环境说明
两台 Web 主机、1台数据库主机、1台负载均衡器主机、1台监控主机,hosts 配置如下:
hosts[webservers] web1 web2 [dbservers] db1 [lbservers] lb1 [monitoring] nagios -
palybook 入口文件 site.yml
需要注意的是 base-apache 角色,由于 webservers 及 monitoring 都需要部署 Apache 环境,为提高复用性,将部署 Apache 独立成 base-apache 角色。
Site.yml--- - hosts: all roles: - common - hosts: dbservers user: root roles: - db - hosts: webservers user: root roles: - base-apache - web - hosts: lbservers user: root roles: - haproxy - hosts: monitoring user: root roles: - base-apache - nagios -
定义组变量
下面定义 playbook 全局变量,变量作用域为所有主机。
group_vars/all--- # Variables here are applicable to all host groups httpd_port: 80 ntpserver: 192.168.1.2all 文件定义了匹配所有主机作用域的变量,一般为系统公共类基础配置,如 ntpserver 地址、sysctl 变量、iptables 配置等。
下面为定义 webservers 组的变量,变量作用域为 webservers 组主机。
group_vars/webservers--- # Variables for the web server configuration # Ethernet interface on which the web server should listen. # Defaults to the first interface. Change this to: # # iface: eth1 # # ...to override. # iface: '{{ ansible_default_ipv4.interface }}' # this is the repository that holds our sample webapp repository: https://github.com/bennojoy/mywebapp.git # this is the sha1sum of V5 of the test webapp. webapp_version: 351e47276cc66b018f4890a04709d4cc3d3edb0dwebservers 文件定义了 webservers 组作用域的变量。本示例涉及 Apache 相关配置,其中 “iface: '{{ansible_default_ipv4.interface }}'” 引用了 Facts 获取的本地网卡接口名信息,另外定义了一个 GitHub 的 repository,方便下载 Web 测试文件,如内部搭建 git 版本控制环境,此处也可以修改成本地的服务地址。
下面为定义 dbservers 组的变量,变量作用域为 dbservers 组主机。
group_vars/dbservers--- # The variables file used by the playbooks in the dbservers group. # These don't have to be explicitly imported by vars_files: they are autopopulated. mysqlservice: mysqld mysql_port: 3306 dbuser: root dbname: foodb upassword: abcdbservers 文件定义了 dbservers 组作用域变量,本示例涉及 MySQL 数据库的基本应用信息。
下面为定义 lbservers 组作用域变量文件,本示例主要涉及 haproxy 环境涉及的配置参数值。
group_vars/lbservers--- # Variables for the HAproxy configuration # HAProxy supports "http" and "tcp". For SSL, SMTP, etc, use "tcp". mode: http # Port on which HAProxy should listen listenport: 8888 # A name for the proxy daemon, this wil be the suffix in the logs. daemonname: myapplb # Balancing Algorithm. Available options: # roundrobin, source, leastconn, source, uri # (if persistance is required use, "source") balance: roundrobin # Ethernet interface on which the load balancer should listen # Defaults to the first interface. Change this to: # # iface: eth1 # # ...to override. # iface: '{{ ansible_default_ipv4.interface }}' -
playbook角色详解
本示例划分了 6 个角色,包括 base-apache、common、db、haproxy、nagios、web,分别对应 6 个功能环境部署,根据不同业务场景的需求,可以随意加、减角色,如将 base-apache 更换成 nginx,然后在 site.yml 中引用。
-
common角色
common 的主要功能是部署、配置系统基础服务,包括 yum源、安装 nagios插件、NTP服务、iptables、SELinux 等,任务(tasks)的定义如下:
common/tasks/main.yml--- # This role contains common plays that will run on all nodes. - name: Create the repository for EPEL copy: src=epel.repo dest=/etc/yum.repos.d/epel.repo - name: Create the GPG key for EPEL copy: src=RPM-GPG-KEY-EPEL-6 dest=/etc/pki/rpm-gpg - name: install some useful nagios plugins yum: name={{ item }} state=present with_items: - nagios-nrpe - nagios-plugins-swap - nagios-plugins-users - nagios-plugins-procs - nagios-plugins-load - nagios-plugins-disk - name: Install ntp yum: name=ntp state=present tags: ntp - name: Configure ntp file template: src=ntp.conf.j2 dest=/etc/ntp.conf tags: ntp notify: restart ntp - name: Start the ntp service service: name=ntpd state=started enabled=true tags: ntp - name: insert iptables template template: src=iptables.j2 dest=/etc/sysconfig/iptables notify: restart iptables - name: test to see if selinux is running command: getenforce register: sestatus changed_when: false上述代码定义了两个远程文件复制 copy,其中 src(源文件)的默认位置在 roles/common/files,使用 with_item 标签实现循环安装 nagios 插件,同时安装 ntp 服务,引用模块文件 roles/common/templatesntp.conf.j2,且同步到目标主机 /etc/ntp.conf 位置。配置系统 iptables,引用 roles/common/templates/iptables.j2 模板,“notify:restart iptables”,状态或模板发生变化时将通知处理程序(handlers)来处理。“command: getenforce” 运行 getenforce 来检测 selinux 是否在运行状态,“changed_when:false” 作用为不记录命令运行结果的 changed 状态,即 changed 为 False。
下面定义 common 角色的处理程序。
common/handlers/main.yml--- # Handlers for common notifications - name: restart ntp service: name=ntpd state=restarted - name: restart iptables service: name=iptables state=restarted上述代码定义了两个处理程序,功能分别为重启 ntp、iptables 服务,其中 “name: restart ntp” 与任务(tasks)定义中的 “notify: restart ntp” 是一一对应的,“name: restart iptables” 同理。
下面定义了 common 角色 iptables 的配置模板:
common/templates/iptables.j2{% if (inventory_hostname in groups['webservers']) or (inventory_hostname in groups['monitoring']) %} -A INPUT -p tcp --dport 80-j ACCEPT {% endif %} … … {% for host in groups['monitoring'] %} -A INPUT -p tcp -s {{ hostvars[host].ansible_default_ipv4.address }} --dport 5666-j ACCEPT {% endfor %}"inventory_hostname" 作为存放在 Ansible 的 inventory 文件中的主机名或 IP,好处是可以不依靠 Facts 的主机名参数 ansible_hostname 或其他原因,一般情况下 inventory_hostname 等于 ansible_hostname,但有时候我们习惯在 Ansible 的 inventory 中使用 IP 地址,而 ansible_hostname 则返回主机名。模板使用了 jinja2 的语法,本例 if…endif 语句判断当前的 inventory_hostname 是否在 webservers 及 monitoring 组中(定义具体在 hosts 文件中),条件成立则添加 80 端口访问权限(-A INPUT -p tcp --dport 80-j ACCEPT)。For…endfor 语句实现了循环开通允许 monitoring 组主机访问 5666 端口,使用 hostvars[host] 得到主机对象,可以获得主机的 Facts 信息,如 hostvars[host].ansible_default_ipv4.address 获取主机 IP。
-
haproxy角色
haproxy 角色主要实现了 haproxy 平台的部署、配置功能,任务(tasks)的定义:
haproxy/tasks--- # This role installs HAProxy and configures it. - name: Download and install haproxy and socat yum: name={{ item }} state=present with_items: - haproxy - socat - name: Configure the haproxy cnf file with hosts template: src=haproxy.cfg.j2 dest=/etc/haproxy/haproxy.cfg notify: restart haproxy任务(tasks)定义了两个功能,一为安装,二为同步配置文件,安装使用了 yum 模块,循环安装 haproxy、socat 两个工具,同时根据配置参数渲染 roles/haproxy/templates/haproxy.cfg.j2 模板文件,完成后同步到目标主机 /etc/haproxy/haproxy.cfg 位置,状态发生变化时重启 haproxy 服务,使之生效。
下面定义了 haproxy 角色 haproxy.cfg 的配置模板:
haproxy/templates/haproxy.cfg.j2… … backend app {% for host in groups['lbservers'] %} listen {{ daemonname }} {{ hostvars[host]['ansible_' + iface].ipv4. address }}:{{ listenport }} {% endfor %} balance {{ balance }} {% for host in groups['webservers'] %} server {{ hostvars[host].ansible_hostname }} {{ hostvars[host] ['ansible_' + iface].ipv4.address }}:{{ httpd_port }} {% endfor %}{{ hostvars[host]['ansible_' + iface].ipv4.address }}实现了获取网卡名变量 iface(group_vars/lbservers 中定义)的 IPv4 IP 地址。 -
web角色
web 角色主要实现了 php、php-mysql、git 平台部署及 SELinux 的配置功能,任务(tasks)的定义如下:
web/tasks/main.yml--- # httpd is handled by the base-apache role upstream - name: Install php and git yum: name={{ item }} state=present with_items: - php - php-mysql - git - name: Configure SELinux to allow httpd to connect to remote database seboolean: name=httpd_can_network_connect_db state=true persistent=yes when: sestatus.rc != 0 - name: Copy the code from repository git: repo={{ repository }} version={{ webapp_version }} dest=/var/www/html/判断 sestatus 变量( roles/common/tasks/main.yml 中定义)返回的 rc(运行代码)不等于 0(失败)则配置 selinux httpd 访问远程数据库的权限,使用的是 Ansible 的 seboolean 模块,该条语句等价于命令行 “setsebool httpd_can_network_connect_db 1”,其中 “persistent=yes” 表示开机自启动。
-
nagios角色
nagios 角色主要实现了 nagios 监控平台的部署,重点介绍任务(tasks)的定义:
nagios/tasks/main.yml… … - name: create the nagios object files template: src={{ item + ".j2" }} dest=/etc/nagios/ansible-managed/{{ item }} with_items: - webservers.cfg - dbservers.cfg - lbservers.cfg notify: restart nagiostemplate 分发多个模板文件时可以使用 with_items 来循环同步,变量与字符使用 “+” 号连接(具体见 jinja2 语法)。理解以上 4 个角色的定义后,再理解 ansible-examples 其他 playbook 的内容已经没有太大的困难,本书将不一一说明。
-
参考提示
-
YAML 语法介绍参考 http://zh.wikipedia.org/zh-cn/YAML 。
-
Ansible 介绍及示例参考 http://docs.ansible.com 官网文档。