实现
根据 6.3 节给出的定义,可以使用以下函数创建并操作二叉树。
-
BinaryTree() 创建一个二叉树实例。
-
getLeftChild() 返回当前节点的左子节点所对应的二叉树。
-
getRightChild() 返回当前节点的右子节点所对应的二叉树。
-
setRootVal(val) 在当前节点中存储参数 val 中的对象。
-
getRootVal() 返回当前节点存储的对象。
-
insertLeft(val) 新建一棵二叉树,并将其作为当前节点的左子节点。
-
insertRight(val) 新建一棵二叉树,并将其作为当前节点的右子节点。
实现树的关键在于选择一个好的内部存储技巧。Python 提供两种有意思的方式,我们在选择前会仔细了解这两种方式。第一种称作 “列表之列表”,第二种称作 “节点与引用”。
列表之列表
用 “列表之列表” 表示树时,先从 Python 的列表数据结构开始,编写前面定义的函数。尽管为列表编写一套操作的接口与已经实现的其他抽象数据类型有些不同,但是做起来很有意思,因为这会给我们提供一个简单的递归数据类型,供我们直接查看和检查。在 “列表之列表” 的树中,我们将根节点的值作为列表的第一个元素;第二个元素是代表左子树的列表;第三个元素是代表右子树的列表。要理解这个存储技巧,来看一个例子。图 6-6 展示了一棵简单的树及其对应的列表实现。
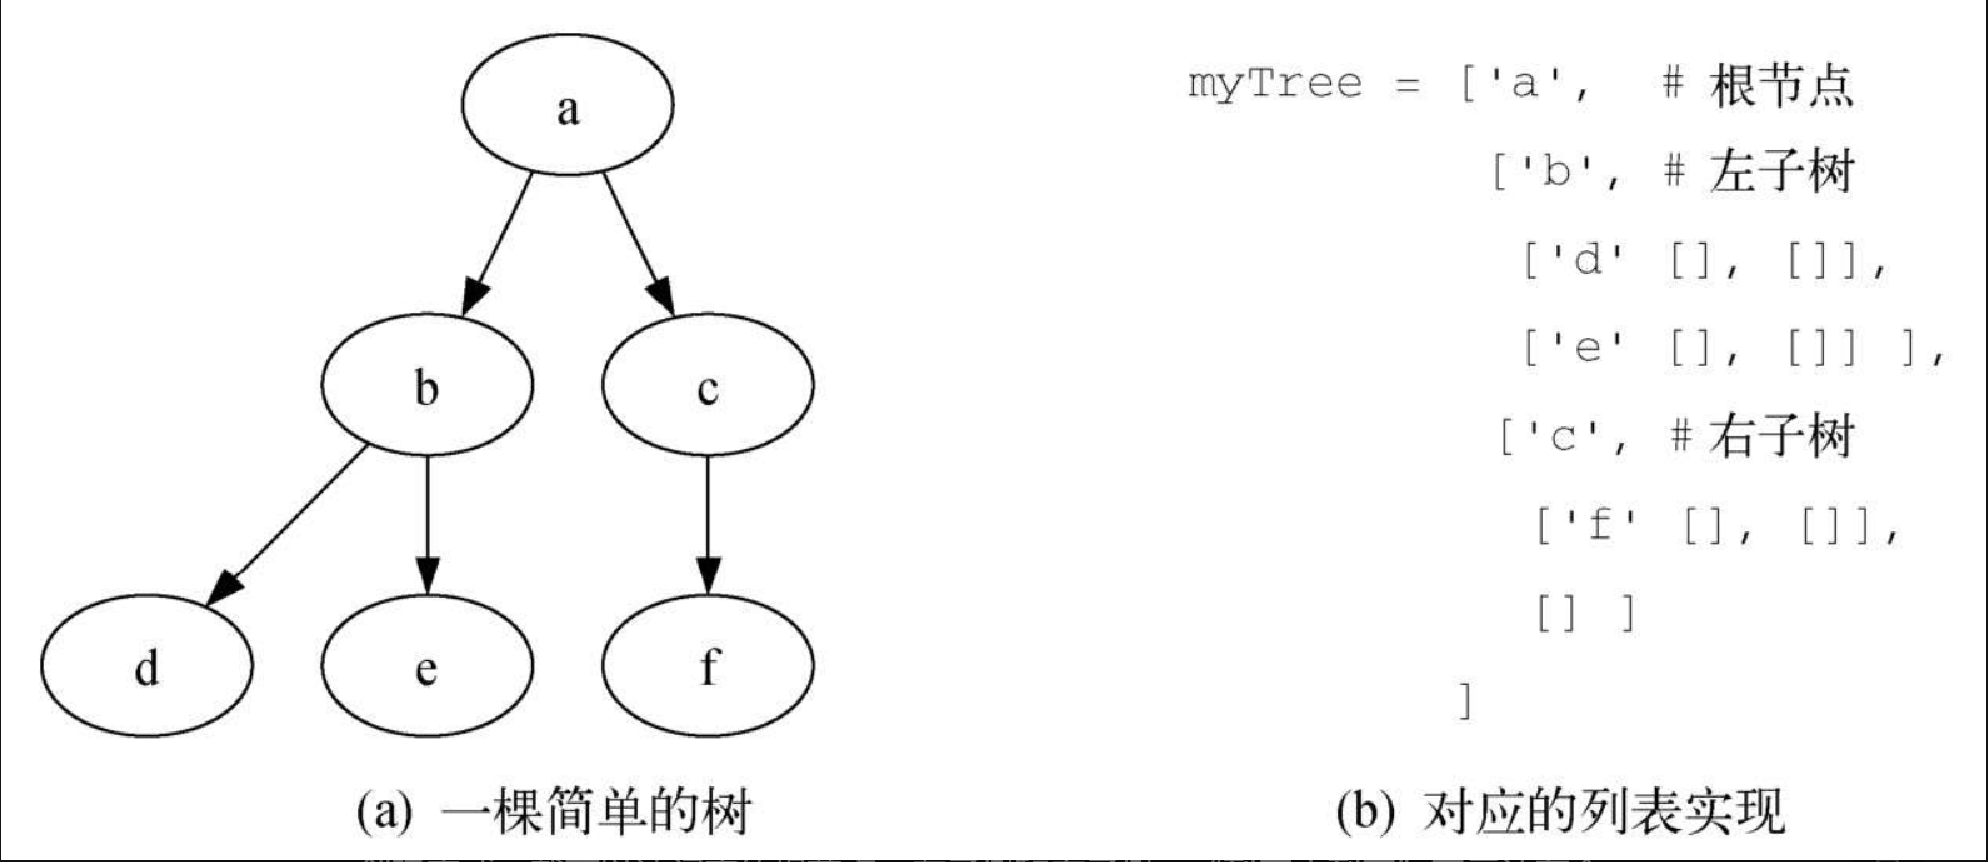
注意,可以通过标准的列表切片操作访问子树。树的根节点是 myTree[0],左子树是 myTree[1],右子树是 myTree[2]。以下会话展示了如何使用列表创建树。一旦创建完成,就可以访问它的根节点、左子树和右子树。“列表之列表” 表示法有个很好的性质,那就是表示子树的列表结构符合树的定义,这样的结构是递归的!由一个根节点和两个空列表构成的子树是一个叶子节点。还有一个很好的性质,那就是这种表示法可以推广到有很多子树的情况。如果树不是二叉树,则多一棵子树只是多一个列表。
>>> myTree = ['a', ['b', ['d', [], []], ['e', [], []]], \
                    ['c', ['f', [], []], []]]
>>> myTree
['a', ['b', ['d', [], []], ['e', [], []]],
      ['c', ['f', [], []], []]]
>>> myTree[1]
['b', ['d', [], []], ['e', [], []]]
>>> myTree[0]
'a'
>>> myTree[2]
['c', ['f', [], []], []]
接下来提供一些便于将列表作为树使用的函数,以正式定义树数据结构。注意,我们不是要定义二叉树类,而是要创建可用于标准列表的函数。
def BinaryTree(r):
    return [r, [], []]
BinaryTree 函数构造一个简单的列表,它仅有一个根节点和两个作为子节点的空列表,如代码清单 6-1 所示。要给树添加左子树,需要在列表的第二个位置加入一个新列表。请务必当心:如果列表的第二个位置上已经有内容了,我们要保留已有内容,并将它作为新列表的左子树。代码清单 6-2 给出了插入左子树的 Python 代码。
def insertLeft(root,newBranch):
    t = root.pop(1)
    if len(t) > 1:
        root.insert(1,[newBranch,t,[]])
    else:
        root.insert(1,[newBranch, [], []])
    return root
在插入左子树时,先获取当前的左子树所对应的列表(可能为空),然后加入新的左子树,将旧的左子树作为新节点的左子树。这样一来,就可以在树的任意位置插入新节点。insertRight 与 insertLeft 类似,如代码清单 6-3 所示。
def insertRight(root,newBranch):
    t = root.pop(2)
    if len(t) > 1:
        root.insert(2,[newBranch,[],t])
    else:
        root.insert(2,[newBranch,[],[]])
    return root
为了完整地创建树的函数集,让我们来编写一些访问函数,用于读写根节点与左右子树,如代码清单 6-4 所示。
def getRootVal(root):
    return root[0]

def setRootVal(root,newVal):
    root[0] = newVal

def getLeftChild(root):
    return root[1]

def getRightChild(root):
    return root[2]
图 6-7 中的 Python 会话执行了刚创建的树函数。请自己输入代码试试。在章末的练习中,你需要画出这些调用得到的树状结构。
def BinaryTree(r):
    return [r, [], []]

def insertLeft(root,newBranch):
    t = root.pop(1)
    if len(t) > 1:
        root.insert(1,[newBranch,t,[]])
    else:
        root.insert(1,[newBranch, [], []])
    return root

def insertRight(root,newBranch):
    t = root.pop(2)
    if len(t) > 1:
        root.insert(2,[newBranch,[],t])
    else:
        root.insert(2,[newBranch,[],[]])
    return root

def getRootVal(root):
    return root[0]

def setRootVal(root,newVal):
    root[0] = newVal

def getLeftChild(root):
    return root[1]

def getRightChild(root):
    return root[2]

r = BinaryTree(3)
insertLeft(r,4)
insertLeft(r,5)
insertRight(r,6)
insertRight(r,7)
l = getLeftChild(r)
print(l)

setRootVal(l,9)
print(r)
insertLeft(l,11)
print(r)
print(getRightChild(getRightChild(r)))
节点与引用
树的第二种表示法是利用节点与引用。我们将定义一个类,其中有根节点和左右子树的属性。这种表示法遵循面向对象编程范式,所以本章后续内容会采用这种表示法。
采用 “节点与引用” 表示法时,可以将树想象成如图 6-8 所示的结构。

首先定义一个简单的类,如代码清单 6-5 所示。“节点与引用” 表示法的要点是,属性 left 和 right 会指向 BinaryTree 类的其他实例。举例来说,在向树中插入新的左子树时,我们会创建另一个 BinaryTree 实例,并将根节点的 self.leftChild 改为指向新树。
class BinaryTree:
    def __init__(self,rootObj):
        self.key = rootObj
        self.leftChild = None
        self.rightChild = None
在代码清单 6-5 中,构造方法接受一个对象,并将其存储到根节点中。正如能在列表中存储任何对象,根节点对象也可以成为任何对象的引用。就之前的例子而言,我们将节点名作为根的值存储。采用 “节点与引用” 法表示图 6-8 中的树,将创建 6 个 BinaryTree 实例。
下面看看基于根节点构建树所需要的函数。为了给树添加左子树,我们新建一个二叉树对象,将根节点的 left 属性指向新对象。代码清单 6-6 给出了 insertLeft 函数的代码。
def insertLeft(self,newNode):
    if self.leftChild == None:
        self.leftChild = BinaryTree(newNode)
    else:
        t = BinaryTree(newNode)
        t.leftChild = self.leftChild
        self.leftChild = t
在插入左子树时,必须考虑两种情况。第一种情况是原本没有左子节点。此时,只需往树中添加一个节点即可。第二种情况是已经存在左子节点。此时,插入一个节点,并将已有的左子节点降一层。代码清单 6-6 中的 else 语句处理的就是第二种情况。
insertRight 函数也要考虑相应的两种情况:要么原本没有右子节点,要么必须在根节点和已有的右子节点之间插入一个节点。代码清单 6-7 给出了 insertRight 函数的代码。
def insertRight(self,newNode):
    if self.rightChild == None:
        self.rightChild = BinaryTree(newNode)
    else:
        t = BinaryTree(newNode)
        t.rightChild = self.rightChild
        self.rightChild = t
为了完成对二叉树数据结构的定义,我们来编写一些访问左右子节点与根节点的函数,如代码清单 6-8 所示。
def getRightChild(self):
    return self.rightChild

def getLeftChild(self):
    return self.leftChild

def setRootVal(self,obj):
    self.key = obj

def getRootVal(self):
    return self.key
有了创建与操作二叉树的所有代码,现在用它们来进一步了解结构。我们创建一棵简单的树,并为根节点 a 添加子节点 b 和 c。下面的 Python 会话创建了这棵树,并查看 key、left 和 right 中存储的值。注意,根节点的左右子节点本身都是 BinaryTree 类的实例。正如递归定义所言,二叉树的所有子树也都是二叉树。
>>> from pythonds.trees import BinaryTree
>>> r = BinaryTree('a')
>>> r.getRootVal()
'a'
>>> print(r.getLeftChild())
None
>>> r.insertLeft('b')
>>> print(r.getLeftChild())
<__main__.BinaryTree instance at 0x6b238>
>>> print(r.getLeftChild().getRootVal())
b
>>> r.insertRight('c')
>>> print(r.getRightChild())
<__main__.BinaryTree instance at 0x6b9e0>
>>> print(r.getRightChild().getRootVal())
c
>>> r.getRightChild().setRootVal('hello')
>>> print(r.getRightChild().getRootVal())
hello
>>>