在公共祖先组件中保存状态
为了仅使用组件状态和属性保存状态并使用事件更新它,我们将其存储在最近的公共祖先组件中。
状态仅通过 props 传播,并且仅通过事件更新。在这种情况下,所有状态(state)都将存在于需要状态的组件的共享祖先中。App 组件,因为它是根组件,所以它是保存共享状态的一个很好的默认组件。
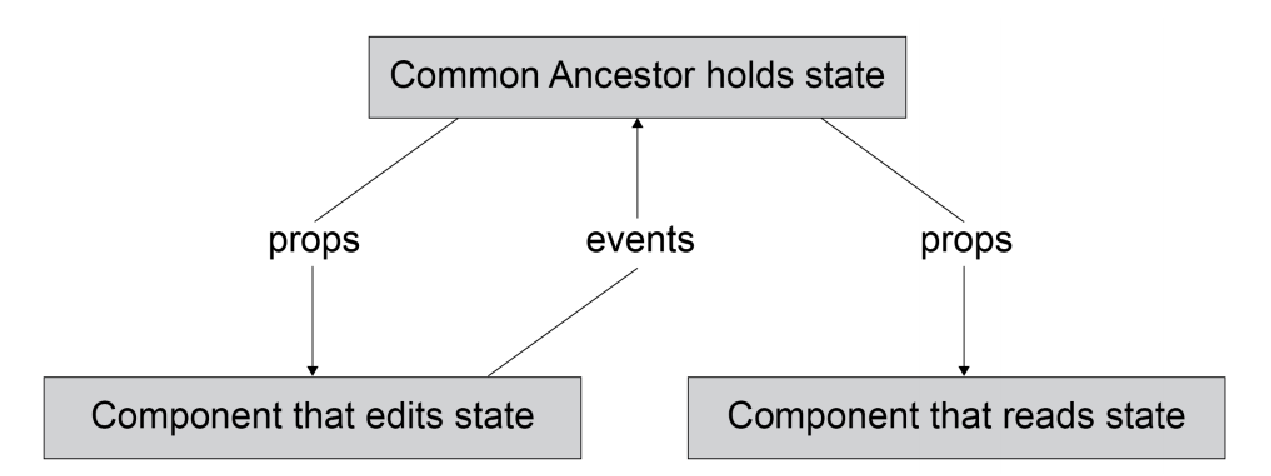
要更改状态,组件需要向保持状态的组件(共享祖先)发出事件(event)。共享祖先需要根据事件数据和类型更新状态。这反过来会导致重新渲染,在此期间祖先组件将更新的 props 传递给读取状态(state)的组件。

为了构建一个 header,我们需要在 AppHeader.vue 中创建一个 AppHeader 组件。其中将包含一个模板和一个带有 TailwindCSS 类的 h2 标题:
<template>
    <header class="w-full block p-4 border-b bg-blue-300 border-gray-700">
        <h2 class="text-xl text-gray-800">Profile Card Generator</h2>
    </header>
</template>
然后我们将导入它、注册它并在 App.vue 文件中渲染它:
<template>
    <div id="app">
        <AppHeader />
    </div>
</template>

<script>
import AppHeader from './components/AppHeader.vue'

export default {
    components: {
        AppHeader
    }
}
</script>
上述代码的输出如下:

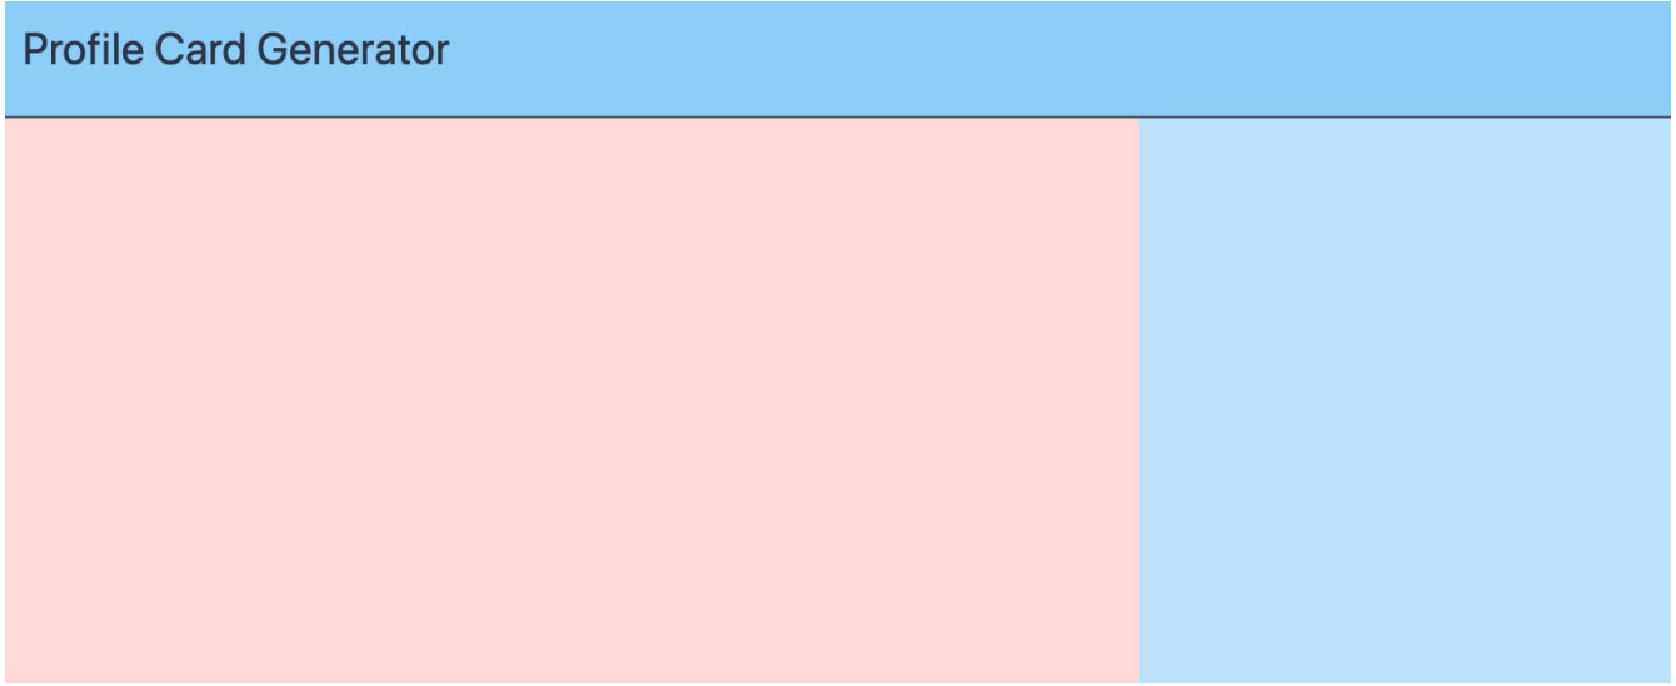
我们将类似地创建一个 AppProfileForm 文件:
<template>
    <section class="md:w-2/3 h-64 bg-red-200 flex">
    <!-- Inputs -->
    </section>
</template>
我们将创建一个具有以下初始内容的 AppProfileDisplay 文件:
<template>
    <section class="md:w-1/3 h-64 bg-blue-200 flex">
    <!-- Profile Card -->
    </section>
</template>我们的两个容器(AppProfileForm 和 AppProfileDisplay)现在都可以在 App 中导入和渲染:
<template>
    <!-- rest of template, including AppHeader -->
    <div class="flex flex-col md:flex-row">
        <AppProfileForm />
        <AppProfileDisplay />
    </div>
    <!-- rest of template -->
</template>

<script>
// other imports
import AppProfileForm from './components/AppProfileForm.vue'
import AppProfileDisplay from './components/AppProfileDisplay.vue'

export default {
    components: {
        // other component definitions
        AppProfileForm,
        AppProfileDisplay,
        }
}
</script>
上述代码的输出如下:
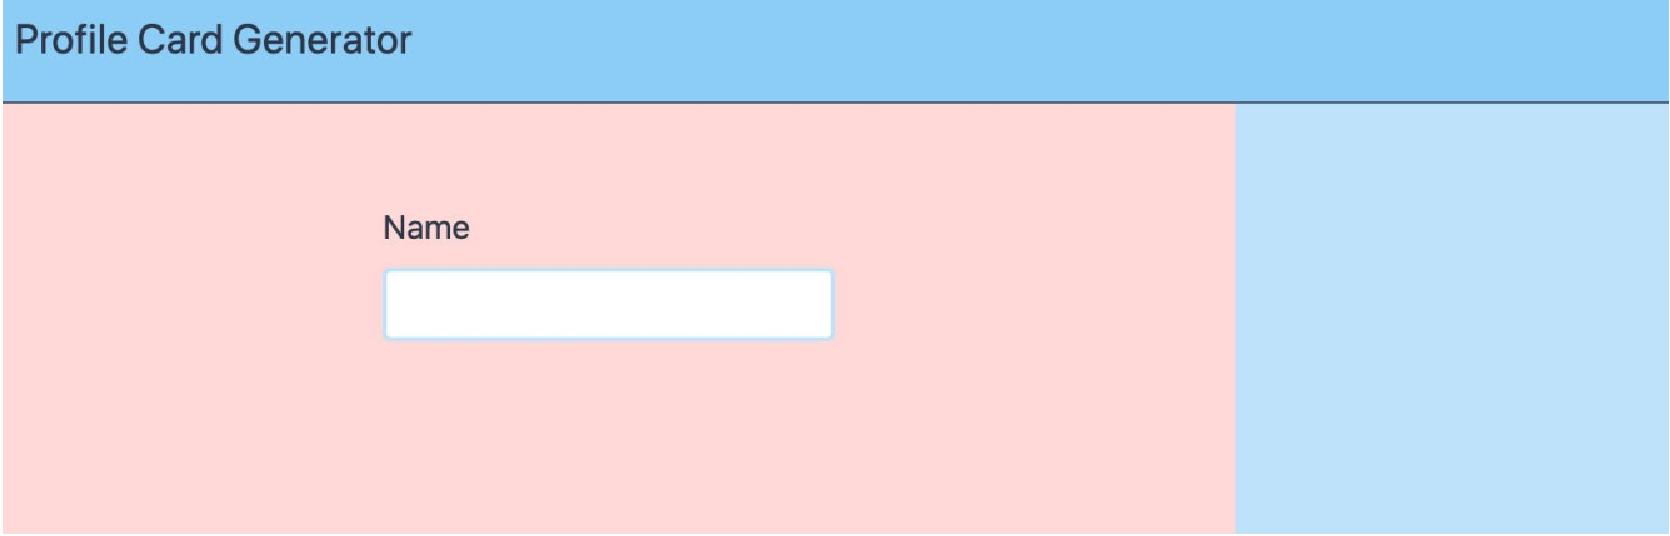
要添加表单字段(在本例中为 name),我们首先向 AppProfileForm 添加输入:
<template>
    <section class="md:w-2/3 h-64 bg-red-200 flex flex-col p-12 items-center">
        <!-- Inputs -->
        <div class="flex flex-col">
            <label class="flex text-gray-800 mb-2" for="name">Name</label>
            <input
                id="name"
                type="text"
                name="name"
                class="border-2 border-solid border-blue-200 rounded px-2 py-1"
            />
        </div>
    </section>
</template>
前面的代码将显示如下:
为了跟踪名称输入数据,我们将使用 v-model 添加双向绑定,并在组件的 data 初始值设定项中设置 name 属性:
<template>
<!-- rest of the template -->
<input
id="name"
type="text"
name="name"
class="border-2 border-solid border-blue-200 rounded px-2 py-1"
v-model="name"
/>
<!-- rest of the template -->
</template>
<script>
export default {
data() {
return {
name: '',
}
}
}
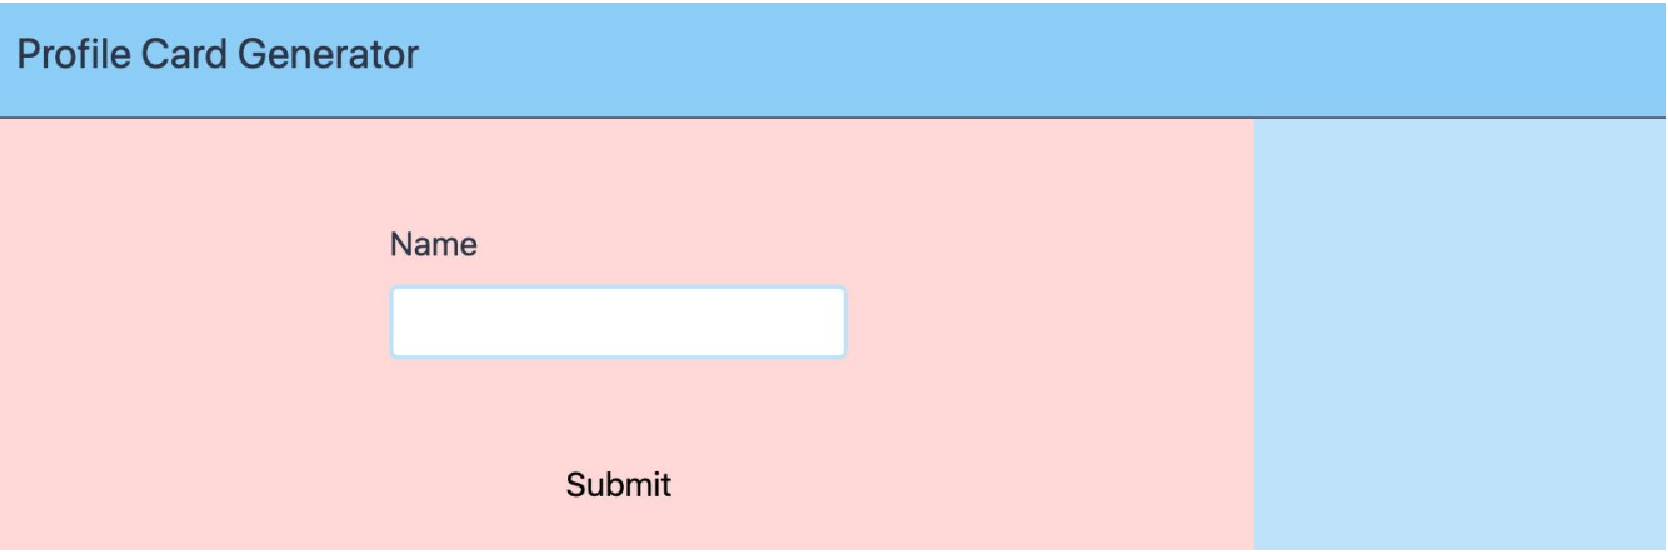
</script>我们还需要一个提交按钮,单击该按钮时,通过发出包含表单内容的提交事件将表单数据发送到父级:
<template>
    <!-- rest of template -->
    <div class="flex flex-row mt-12">
        <button type="submit" @click="submitForm()">Submit</button>
    </div>
    <!-- rest of template -->
</template>

<script>
export default {
    // rest of component
    methods: {
        submitForm() {
            this.$emit('submit', {
                name: this.name
            })
        }
    }
}
</script>
这将显示如下:
下一步是将表单的状态存储在 App 组件中。它是存储表单状态的良好候选者,因为它是 AppProfileForm 和 AppProfileDisplay 的共同祖先。
首先,我们需要一个从 data() 返回的 formData 属性。我们还需要一种更新 formData 的方法。因此,我们将添加一个 update(formData) 方法:
<script>
export default {
    // rest of component
    data() {
        return {
            formData: {}
        }
    },
    methods: {
        update(formData) {
            this.formData = formData
        }
    }
    // rest of component
}
</script>
接下来,我们需要将 update() 绑定到 AppProfileForm 发出的提交事件。我们将使用 @submit 简写和神奇的事件对象表示法 update($event) 来完成此操作:
<template>
    <!-- rest of template -->
    <AppProfileForm @submit="update($event)" />
    <!-- rest of template -->
</template>
要在 AppProfileDisplay 中显示名称,我们需要添加 formData 作为 prop:
<script>
export default {
    props: {
        formData: {
            type: Object,
            default() {
                return {}
            }
        }
    }
}
</script>
我们还需要使用 formData.name 显示名称。我们将在容器中添加一个 p-12 类来改善组件的外观:
<template>
    <section class="md:w-1/3 h-64 bg-blue-200 flex p-12">
        <!-- Profile Card -->
        <h3 class="font-bold font-lg">{{ formData.name }}</h3>
    </section>
</template>
最后,App 需要将 formData 作为 prop 传递给 AppProfileDisplay:
<template>
<!-- rest of template -->
<AppProfileDisplay :form-data="formData" />
<!-- rest of template -->
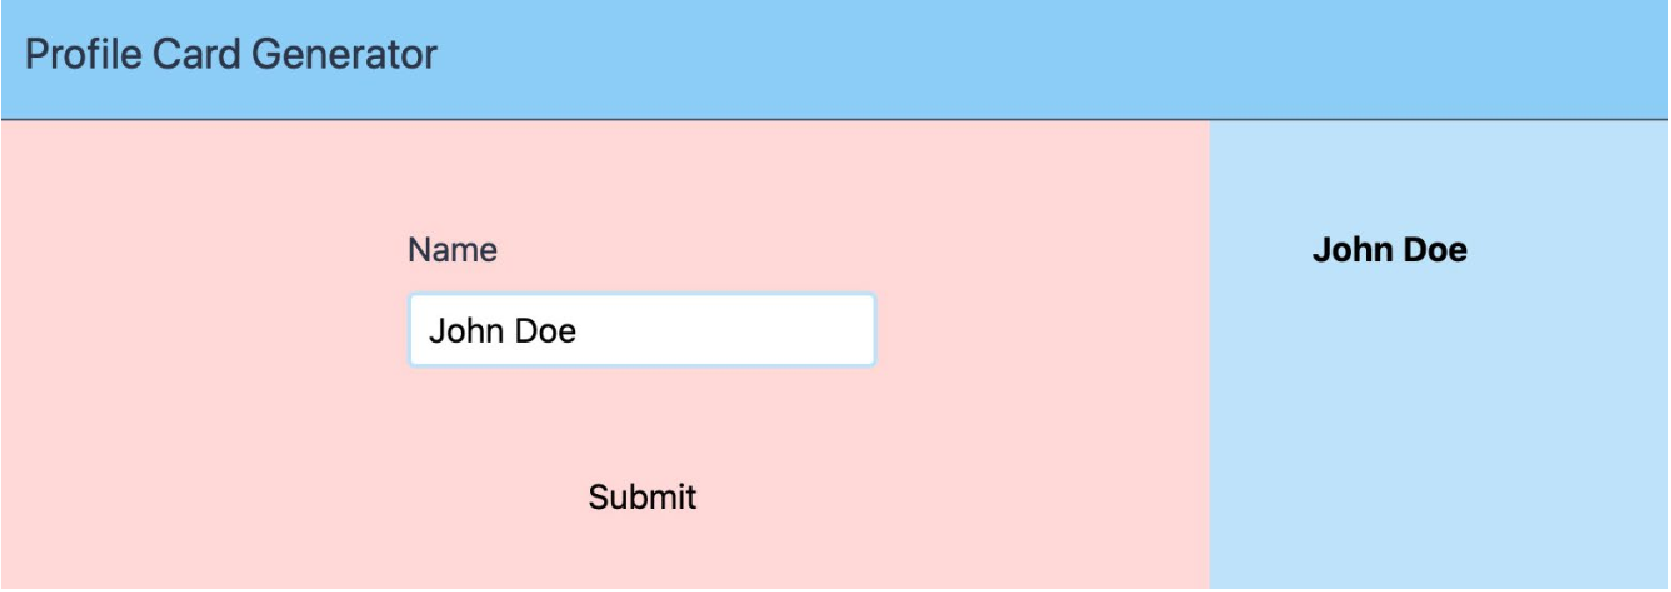
</template>我们现在可以更新表单上的姓名。当您单击 Submit 按钮时,它将在个人资料卡显示屏中显示姓名,如下所示:
我们现在已经了解了如何在 App 组件上存储共享状态以及如何从 AppProfileForm 更新它并在 AppProfileDisplay 中显示它。
在下一个主题中,我们将了解如何向个人资料卡生成器添加附加字段。
练习 8.01:向个人资料卡生成器添加 occupation 字段
继存储名称(name)共享状态的示例之后,在个人资料卡(profile card)中捕获的另一个有趣的字段是个人的职业。为此,我们将在 AppProfileForm 中添加一个职业(occupation)字段来捕获这个额外的状态,并将其显示在 AppProfileDisplay 中。
要访问本练习的代码文件,请参阅 https://packt.live/32VUbuH 。
-
首先开始的地方是添加新的职业(occupation)字段到 src/components/AppProfileForm。我们还将借此机会从部分(section)元素中删除 h-64 和 bg-red-200 类(如果它们存在),这意味着表单显示时没有背景且没有设置高度:
<template>
    <section class="md:w-2/3 flex flex-col p-12 items-center">
        <!-- rest of template -->
        <div class="flex flex-col mt-2">
            <label class="flex text-gray-800 mb-2" for="occupation">Occupation</label>
            <input
                id="occupation"
                type="text"
                name="occupation"
                class="border-2 border-solid border-blue-200 rounded
                px-2 py-1"
            />
        </div>
        <!-- rest of template -->
    </section>
</template>
上述代码的输出如下:
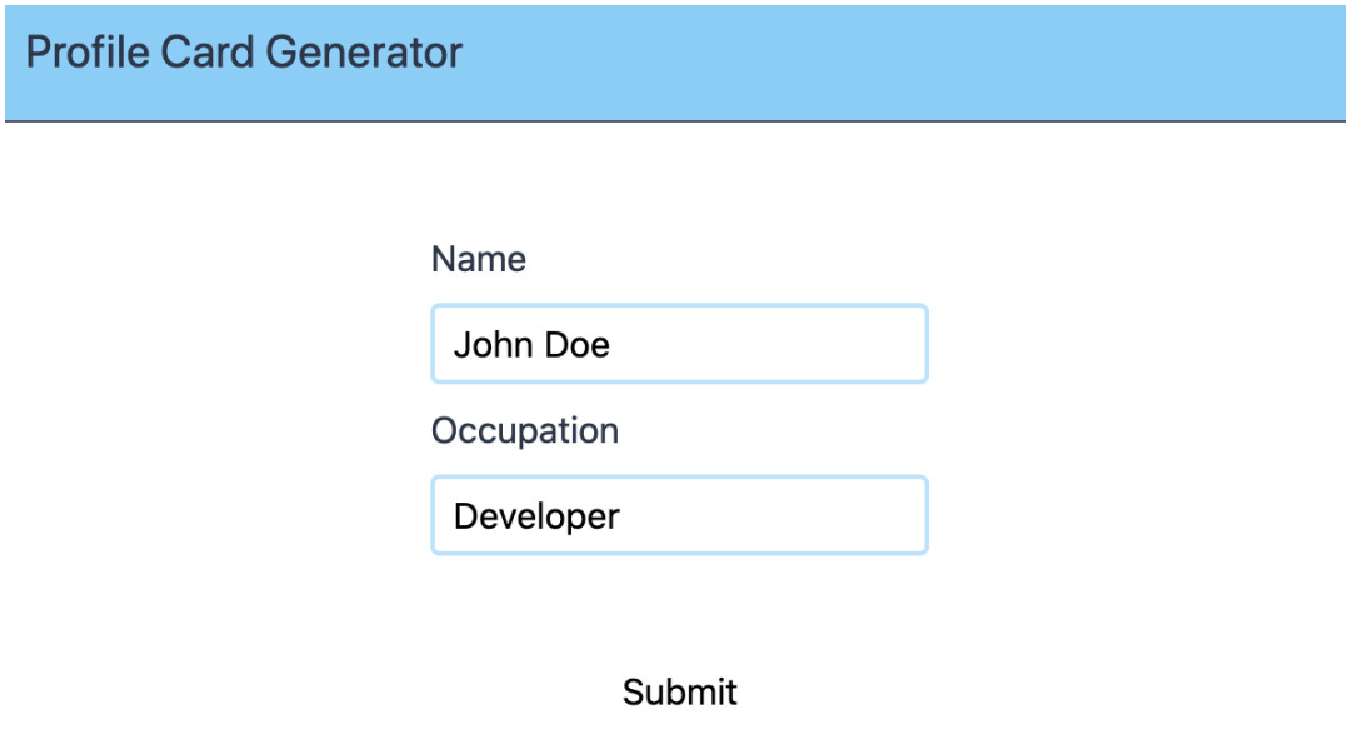 Figure 8. Figure 8.10: AppProfileForm with the new Occupation field
 -
为了通过双向数据绑定跟踪 occupation 值,我们将在 data() 属性的输出中添加一个新属性:
<script> export default { // rest of component data() { return { // other data properties occupation: '', } }, // rest of component } -
现在,我们将使用 v-model 应用从 occupation 反应数据属性到职业输入的双向数据绑定:
<template> <!-- rest of template --> <input id="occupation" type="text" name="occupation" v-model="occupation" class="border-2 border-solid border-blue-200 rounded px-2 py-1" /> <!-- rest of template --> </template> -
对于单击提交时要传输的 occupation 值,我们需要将其作为 submit 事件负载的属性添加到 submitForm 方法中:
<script> export default { // rest of component methods: { submitForm() { this.$emit('submit', { // rest of event payload occupation: this.occupation }) } } } </script> -
添加此字段的最后一步是将其显示在 AppProfileDisplay 组件中。 我们添加一个带有几个样式类的段落。 我们还将借此机会从容器中删除 h-64 和 bg-blue-200 类(如果存在):
<template>
<section class="md:w-1/3 flex flex-col p-12">
<!-- rest of template -->
<p class="mt-2">{{ formData.occupation }}</p>
</section>
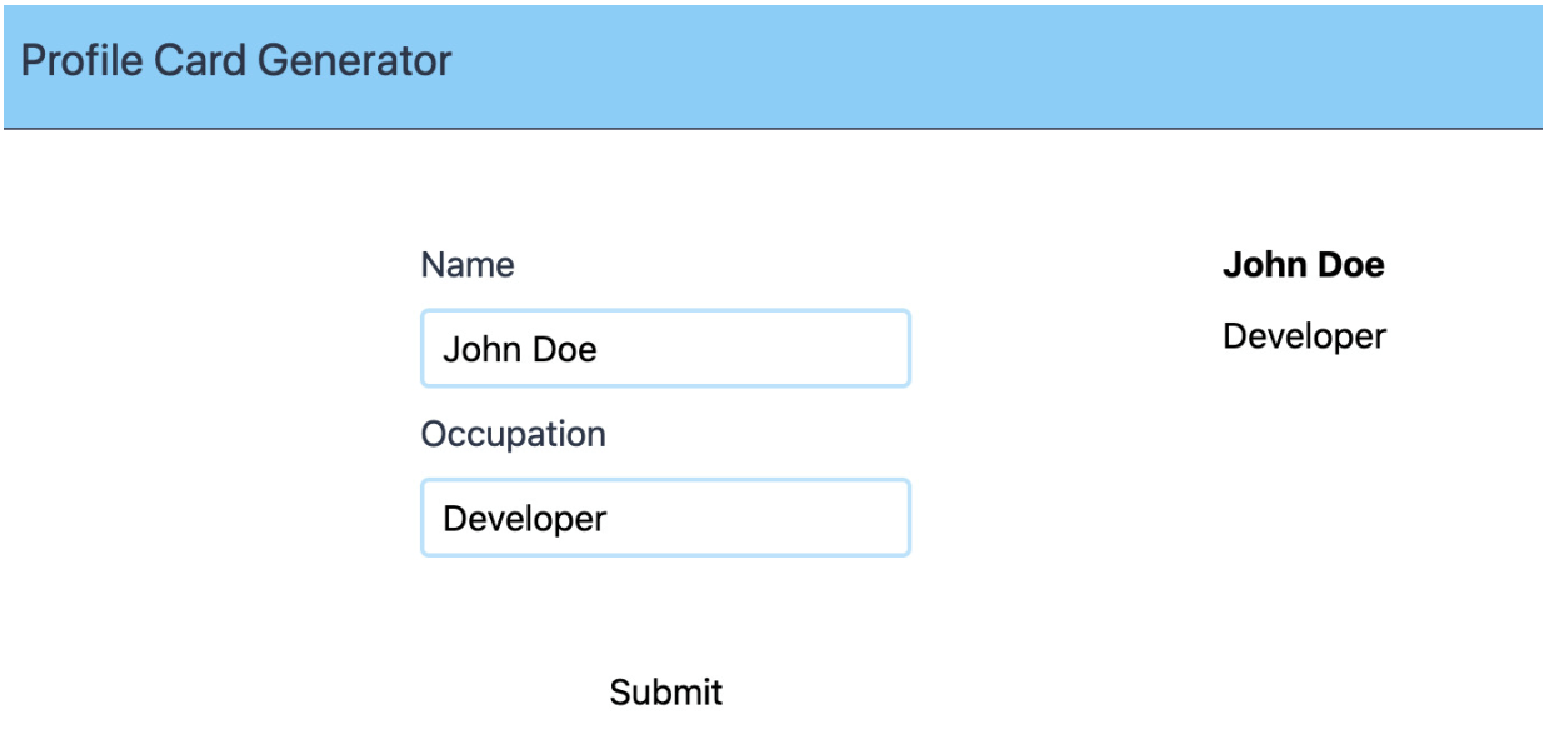
</template>我们的浏览器应该如下所示:
正如我们刚刚看到的,使用共同祖先来管理状态添加新字段是在事件中向上传递数据并在 props 中向下传递到读取组件的情况。
现在,我们将了解如何使用 Clear 按钮重置表单和配置文件显示。
练习 8.02:向配置文件卡生成器添加清除按钮
当使用我们的应用程序创建新的配置文件时,能够重置配置文件非常有用。为此,我们将添加一个 Clear 按钮。
Clear 按钮应重置表单中以及 AppProfileDisplay 中的数据。要访问本练习的代码文件,请参阅 https://packt.live/2INsE7R 。
现在让我们看看执行此练习的步骤:
-
我们希望显示一个
Clear按钮。我们将借此机会改进Clear和Submit按钮的样式(在src/components/AppProfileForm.vue中)<template> <!-- rest of template --> <div class="w-1/2 flex md:flex-row mt-12"> <button class="flex md:w-1/2 justify-center" type="button"> Clear </button> <button class="flex md:w-1/2 justify-center" type="submit" @click="submitForm()" > Submit </button> </div> <!-- rest of template --> </template> -
要清除表单,我们需要重置姓名(name)和职业(occupation)字段。我们可以创建一个
clear方法来执行此操作(在src/components/AppProfileForm.vue中):<script> export default { // rest of the component methods: { // other methods clear() { this.name = '' this.occupation = '' } } // rest of the component } -
我们想要将 clear 方法绑定到 Clear 按钮上的单击事件以重置表单(在 src/components/AppProfileForm.vue 中):
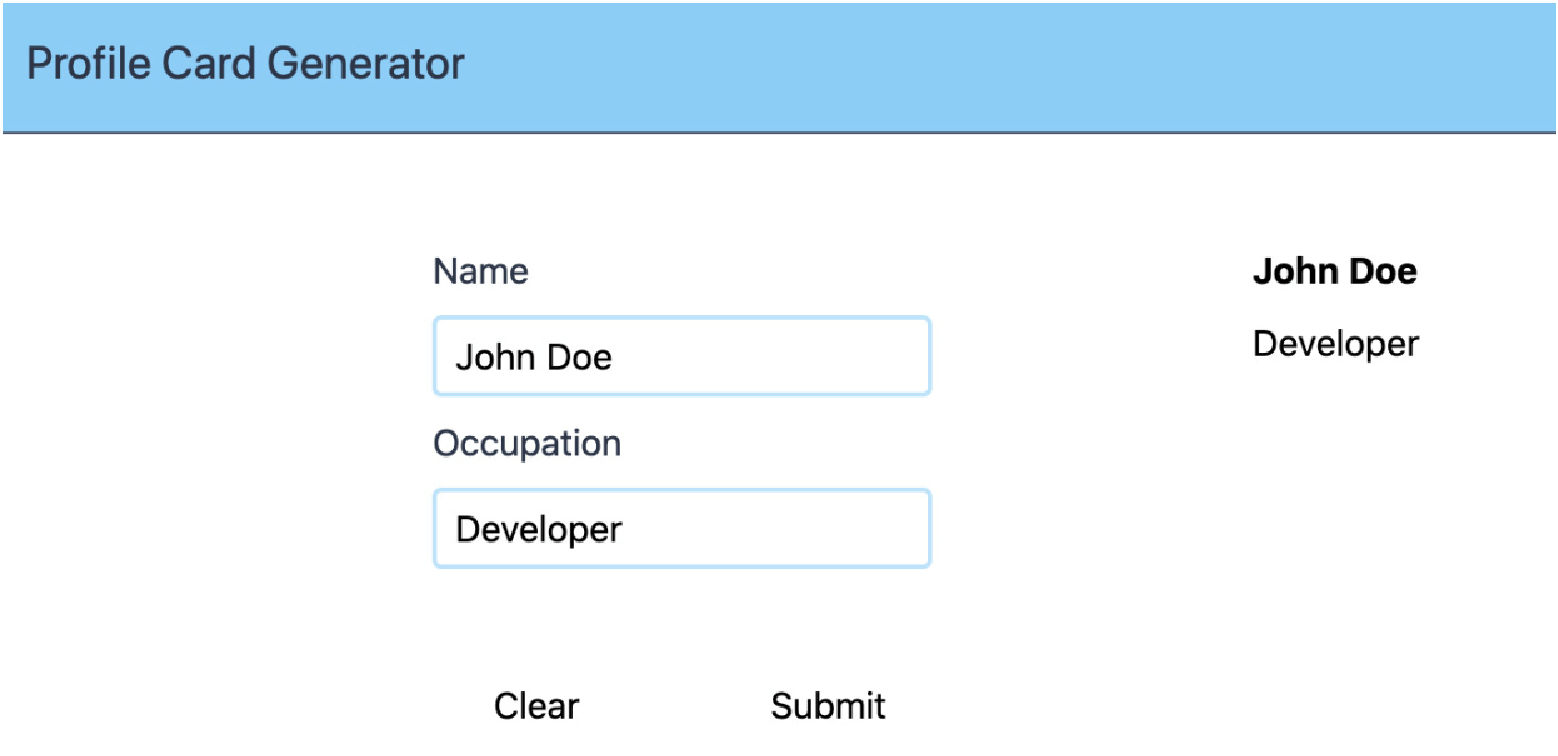
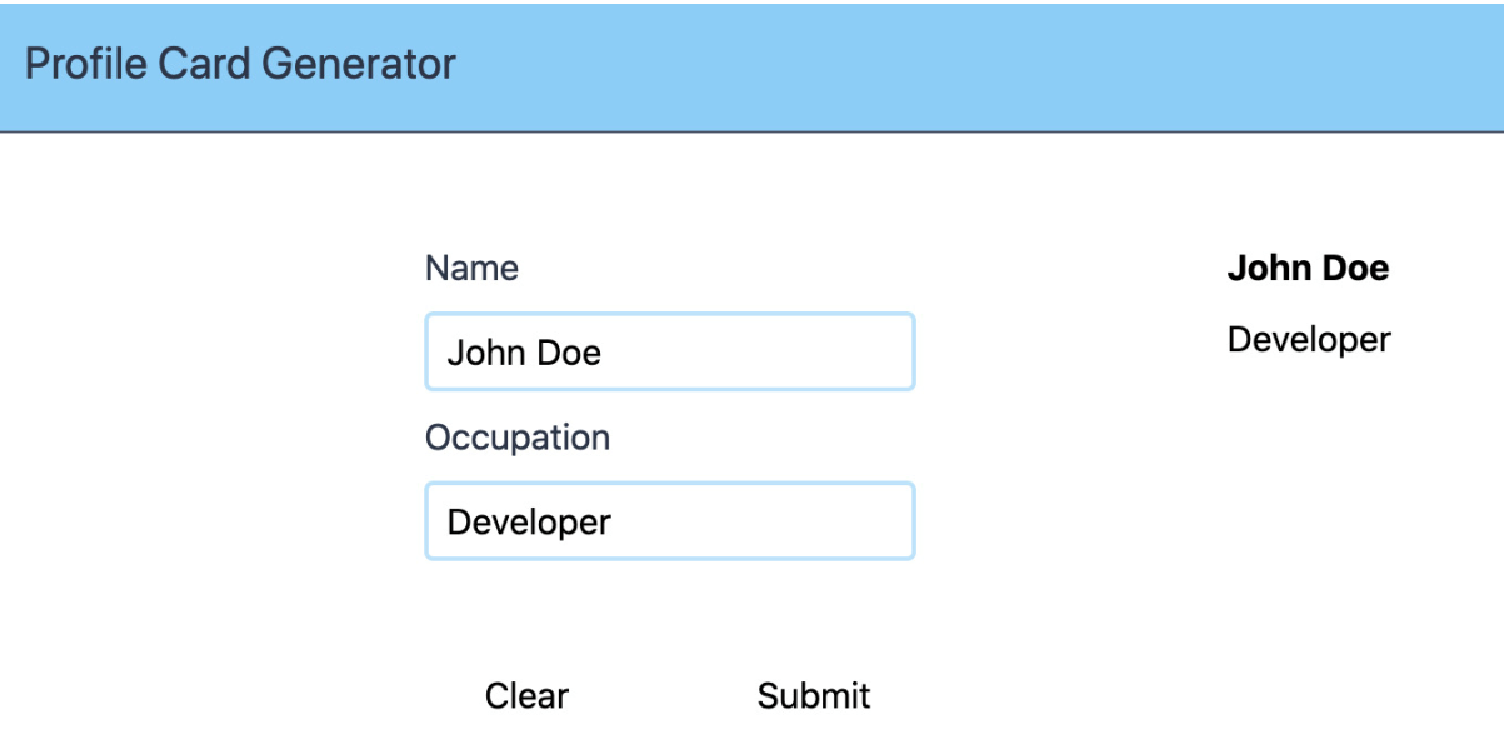
<template>
    <!-- rest of template -->
    <button
        class="flex md:w-1/2 justify-center"
        type="button"
        @click="clear()"
    >
    Clear
    </button>
    <!-- rest of template -->
</template>
因此,我们现在可以在表单中输入数据并按照以下屏幕截图提交:
 Figure 10. Figure 8.12: AppProfileForm with Name and Occupation fields filled in
单击“提交”按钮后,它将把数据传播到 AppProfileDisplay,如下所示:
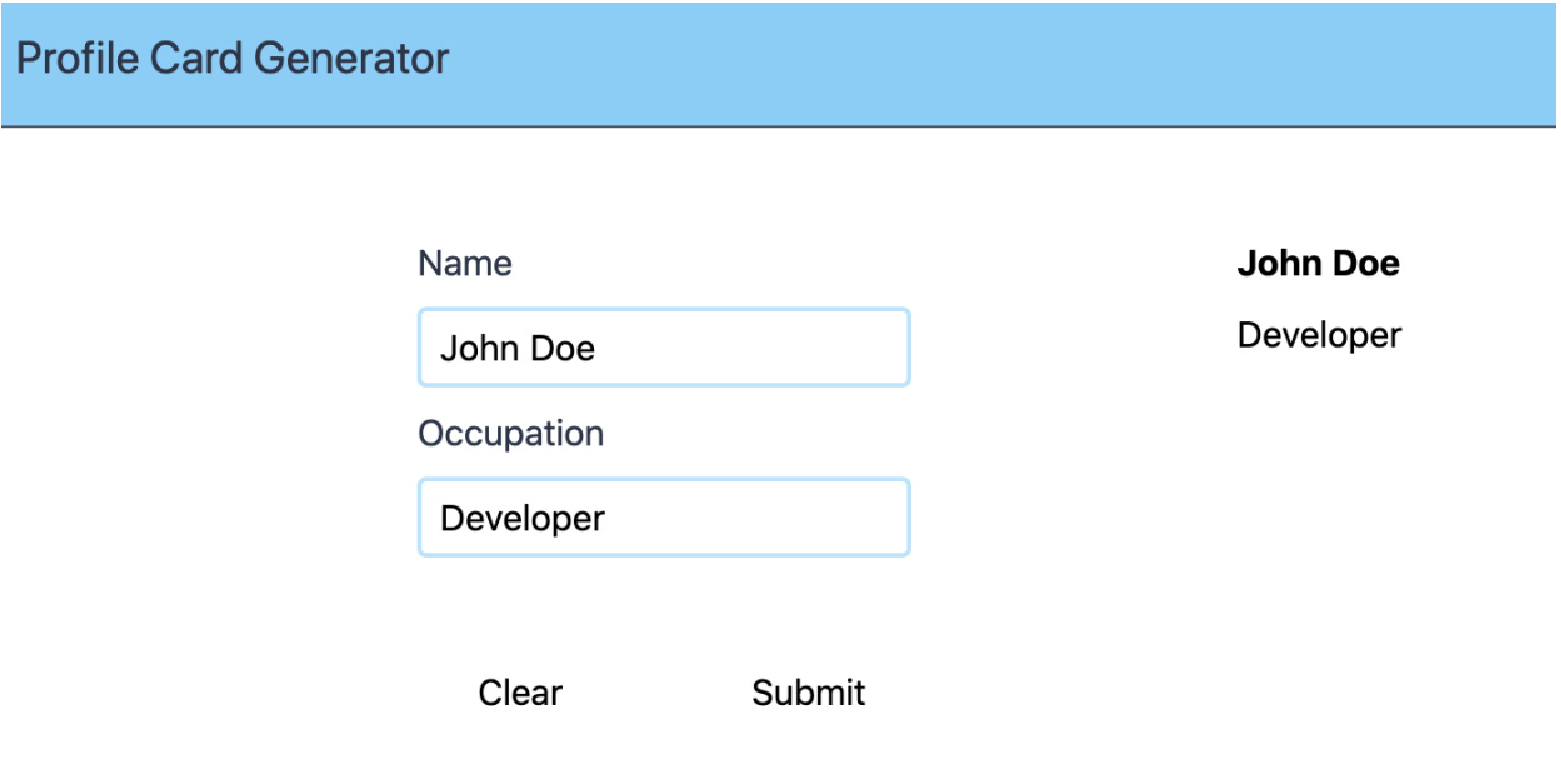 Figure 11. Figure 8.13: AppProfileForm and AppProfileDisplay with data filled in and submitted with a Clear button
不幸的是,AppProfileDisplay 仍然有陈旧的数据,如下面的屏幕截图所示:
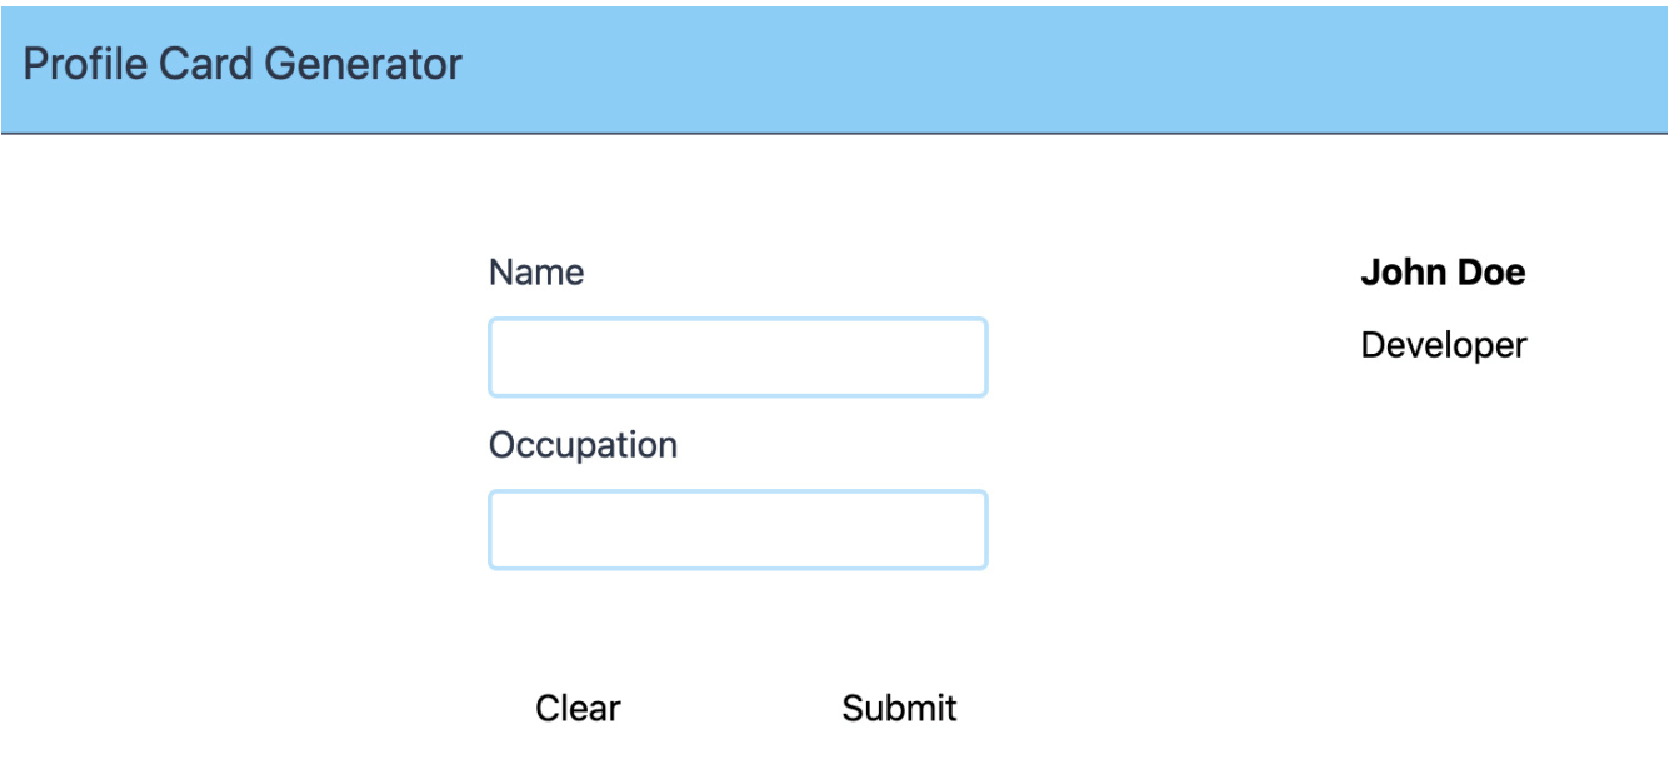 Figure 12. Figure 8.14: AppProfileForm and AppProfileDisplay with only AppProfileForm cleared AppProfileDisplay still has stale data
 -
为了还清除 AppProfileDisplay 的内容,我们需要通过在 src/components/AppProfileForm.vue 中发出一个带有空负载的提交(submit)事件来更新 App.vue 中的 formData:
<script>
export default {
    // rest of component
    methods: {
        // other methods
        clear() {
            // rest of the clear() method
            this.$emit('submit', {})
        }
    }
}
</script>
当我们填写表单并提交时,它将如下所示:
我们可以单击 Clear 并重置 AppProfileDisplay 和 AppProfileForm 中显示的数据,如下所示:

我们现在已经了解了如何通过共同祖先在兄弟组件之间建立通信。
|
要跟踪需要在整个应用程序中保持同步的所有状态,需要进行大量的笔记和脑力劳动。 |
在下一节中,我们将了解什么是事件总线以及它如何帮助缓解我们遇到的一些问题。
Event Bus
我们要考虑的第二个场景是存在全局事件总线的情况。
事件总线是我们可以在其上发布和订阅事件的实体。这允许应用程序的所有不同部分保持自己的状态并保持同步,而无需将事件向上传递给共同祖先或从共同祖先向下传递事件。
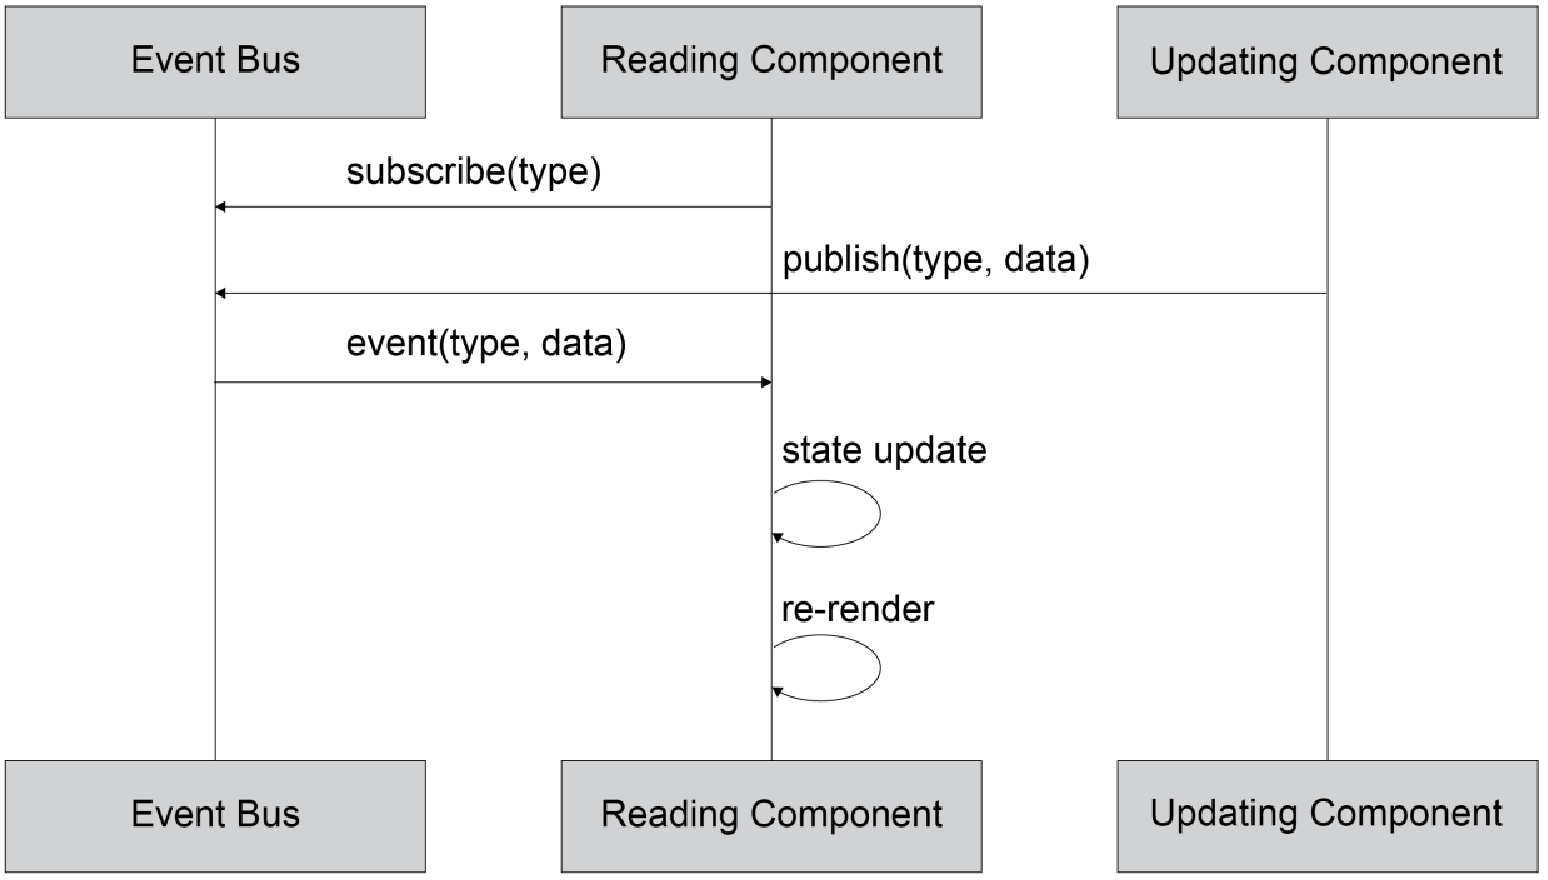
为此,我们的事件总线需要提供订阅(subscribe)方法和发布(publish)方法。能够取消订阅也很有用。
Vue 实例是一个事件总线,因为它提供了三个关键操作:发布(publish)、订阅(subscribe)和取消(unsubscribe)订阅。我们可以在 main.js 文件中创建一个事件总线,如下所示:
import Vue from 'vue'

const eventBus = new Vue()
我们的事件总线有几个方法,即 $on,它是订阅操作,支持两个参数 - 要订阅的事件的名称(作为字符串)和事件将通过发布操作传递到的回调。我们可以使用 $on(eventName,callback) 添加订阅者:
// rest of main.js file
console.log('Registering subscriber to "fieldChanged"')
eventBus.$on('fieldChanged', (event) => {
    console.log(`Received event: ${JSON.stringify(event)}`)
})
然后我们可以使用 $emit 来触发订阅者回调。 $emit(eventName, Payload) 是事件总线的发布操作。$emit 支持两个参数——事件的名称(作为字符串)和有效负载,有效负载是可选的,可以是任何对象。它可以按如下方式使用:
// rest of main.js file
console.log('Triggering "fieldChanged" for "name"')
eventBus.$emit('fieldChanged', {
    name: 'name',
    value: 'John Doe'
})

console.log('Triggering "fieldChanged" for "occupation"')
eventBus.$emit('fieldChanged', {
    name: 'occupation',
    value: 'Developer'
})
在浏览器中运行此文件将产生以下控制台输出,其中首先注册订阅者,然后在每个 $emit 上触发回调:

$off(取消订阅操作,unsubscribe)需要使用与调用订阅操作(subscribe)相同的参数来调用。即,两个参数,事件名称(作为字符串)和回调(在每个事件发布上以事件作为参数运行)。 为了正确使用它,我们需要使用对函数的引用来注册订阅者(而不是内联匿名函数):
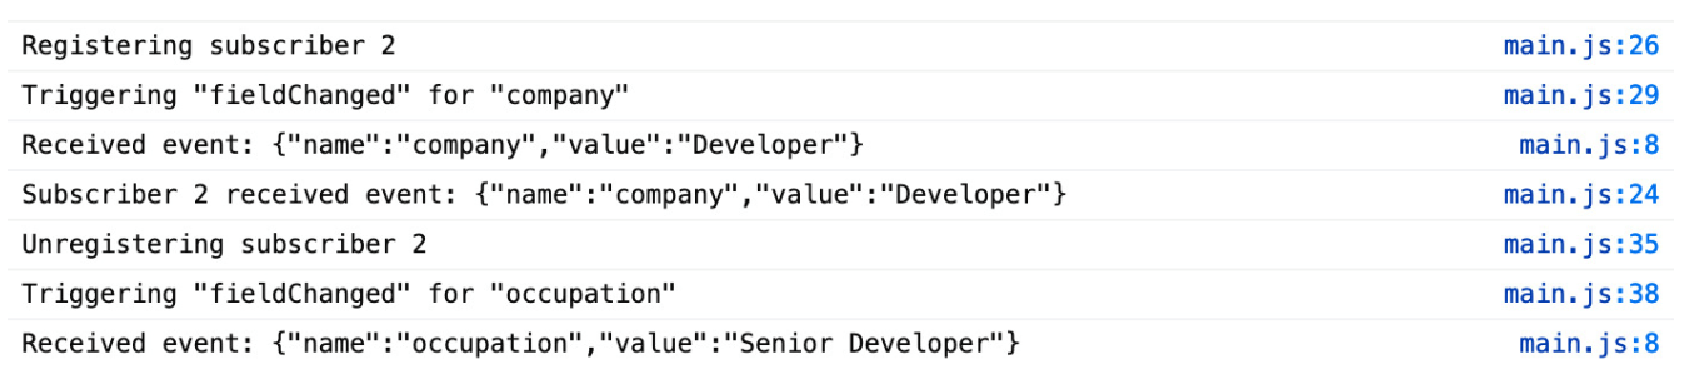
// rest of main.js, including other subscriber
const subscriber = (event) => {
    console.log('Subscriber 2 received event: ${JSON.stringify(event)}')
}
console.log('Registering subscriber 2')
eventBus.$on('fieldChanged', subscriber)

console.log('Triggering "fieldChanged" for "company"')
eventBus.$emit('fieldChanged', {
    name: 'company',
    value: 'Developer'
})
console.log('Unregistering subscriber 2')
eventBus.$off('fieldChanged', subscriber)

console.log('Triggering "fieldChanged" for "occupation"')
eventBus.$emit('fieldChanged', {
    name: 'occupation',
    value: 'Senior Developer'
})
请注意,一旦调用 $off,第二个订阅者不会触发,但第一个订阅者会触发。 在浏览器中运行时,控制台输出将如下所示:
通过在 event-bus.js 文件中设置事件总线,我们可以避免必须将数据发送到 App 组件(共同祖先)的混乱:
import Vue from 'vue'

export default new Vue()
我们可以在提交表单时将 $emit profileUpdate 事件从 AppProfileForm.vue 文件发送到事件总线,而不是使用 this.$emit:
<script>
import eventBus from '../event-bus'
export default {
    // rest of component
    methods: {
        submitForm() {
            eventBus.$emit('profileUpdate', {
                name: this.name,
                occupation: this.occupation
            })
        },
        clear() {
            this.name = ''
            this.occupation = ''
            eventBus.$emit('profileUpdate', {})
        }
    }
}
</script>
在 AppProfileDisplay.vue 文件中,我们可以使用 $on 订阅 profileUpdate 事件并更新 state 中的 formData。请注意,我们已经删除了 formData 属性。我们使用 Mounted() 和 beforeDestroy() 钩子来订阅和取消订阅事件总线:
<script>
import eventBus from '../event-bus'

export default {
    mounted() {
        eventBus.$on('profileUpdate', this.update)
    },
    beforeDestroy() {
        eventBus.$off('profileUpdate', this.update)
    },
    data() {
        return {
            formData: {}
        }
    },
    methods: {
        update(formData) {
            this.formData = formData
        }
    }
}
</script>
该应用程序按预期工作。以下屏幕截图显示了您的屏幕外观:
由于我们已经删除了 AppProfileDisplay 的 formData 属性,因此我们可以停止在 App.vue 文件中传递它。由于我们不依赖 AppProfileForm 中的提交事件,因此我们还可以删除该绑定:
<template>
    <!-- rest of template -->
    <AppProfileForm />
    <AppProfileDisplay />
    <!-- rest of template -->
</template>
我们还可以从 App 中删除未使用的 App update 和 data 方法。vue 文件,这意味着整个 App 脚本部分如下(仅注册组件(components),不注册状态或处理程序):
<script>
import AppHeader from './components/AppHeader.vue'
import AppProfileForm from './components/AppProfileForm.vue'
import AppProfileDisplay from './components/AppProfileDisplay.vue'

export default {
    components: {
        AppHeader,
        AppProfileForm,
        AppProfileDisplay,
    }
}
</script>
现在,我们通过使用事件总线而不是将共享状态存储在公共祖先组件中来简化了应用程序数据流。 现在,我们将了解如何将“清除”按钮移至个人资料卡生成器中的应用程序标题。
练习 8.03:将清除按钮移至应用程序标头配置文件卡生成器
在我们的个人资料卡生成器应用程序中,“清除” 按钮可清除整个应用程序中的状态。 它在表单中的存在使得 “清除” 按钮的功能不清楚,因为它看起来可能只影响表单。
为了反映 “清除” 按钮是全局功能的事实,我们将其移至标题中。
要访问本练习的代码文件,请参阅 https://packt.live/2UzFvwZ 。
以下步骤将帮助我们执行此练习:
-
我们首先在
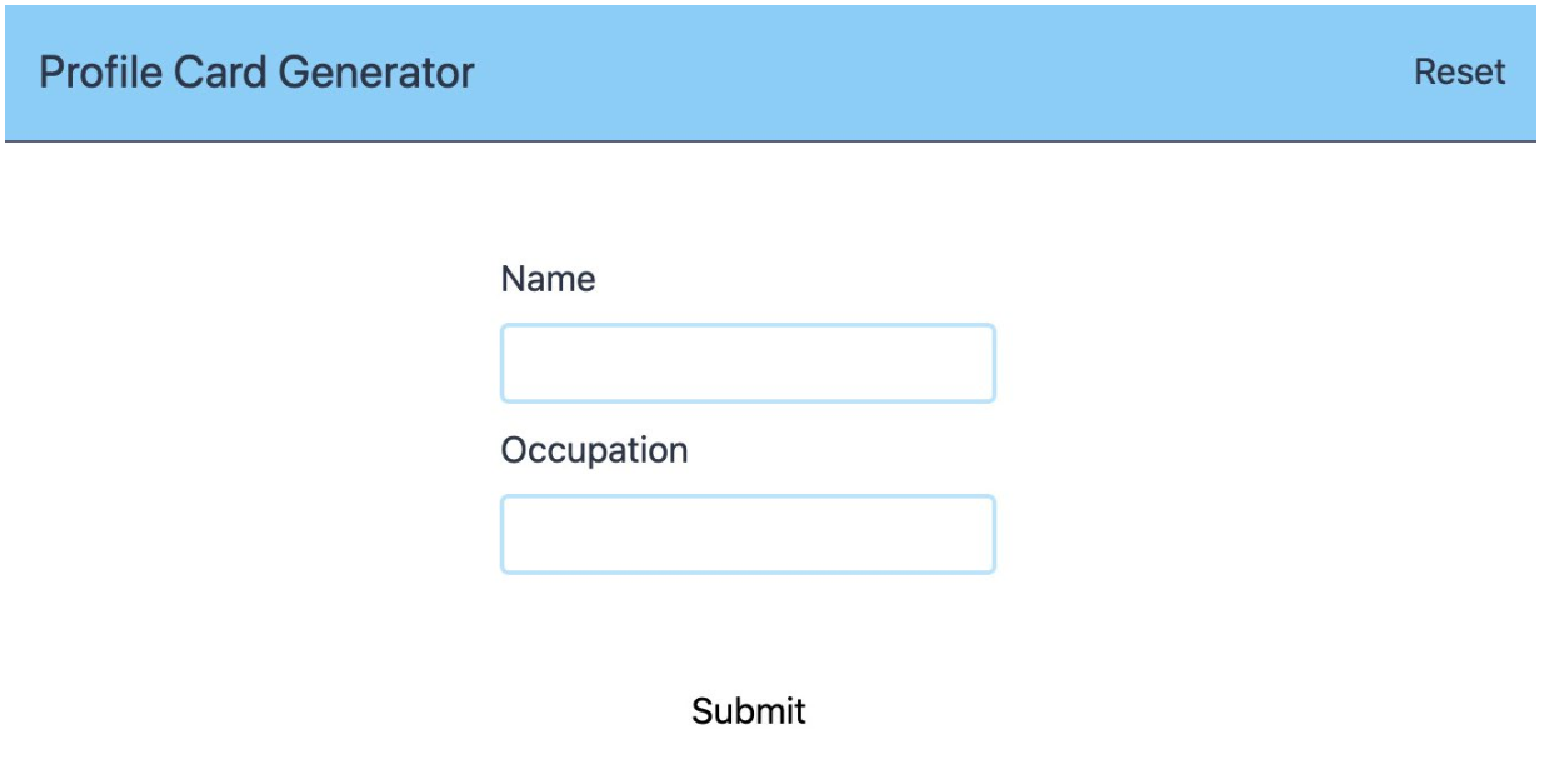
src/components/AppHeader.vue中创建一个按钮:<template> <header class="w-full flex flex-row p-4 border-b bg-blue-300 border-gray-700"> <h2 class="text-xl flex text-gray-800">Profile Card Generator</h2> <button class="flex ml-auto text-gray-800 items-center"> Reset </button> </header> </template> -
我们可以导入事件总线并在 AppHeader 中创建一个 clear() 处理程序,在其中我们将触发一个带有空负载的更新事件(在
src/components/AppHeader.vue中):<script> import eventBus from '../event-bus' export default { methods: { clear() { eventBus.$emit('profileUpdate', {}) } } } </script> -
我们应该将 clear() 函数绑定到按钮(在
src/components/AppHeader.vue中):<template> <!-- rest of template --> <button @click="clear()" class="flex ml-auto text-gray-800 items-center" > Reset </button> <!-- rest of template --> </template>在此阶段,我们应该能够填写表格,并且应该出现 “重置” 按钮,如下所示:
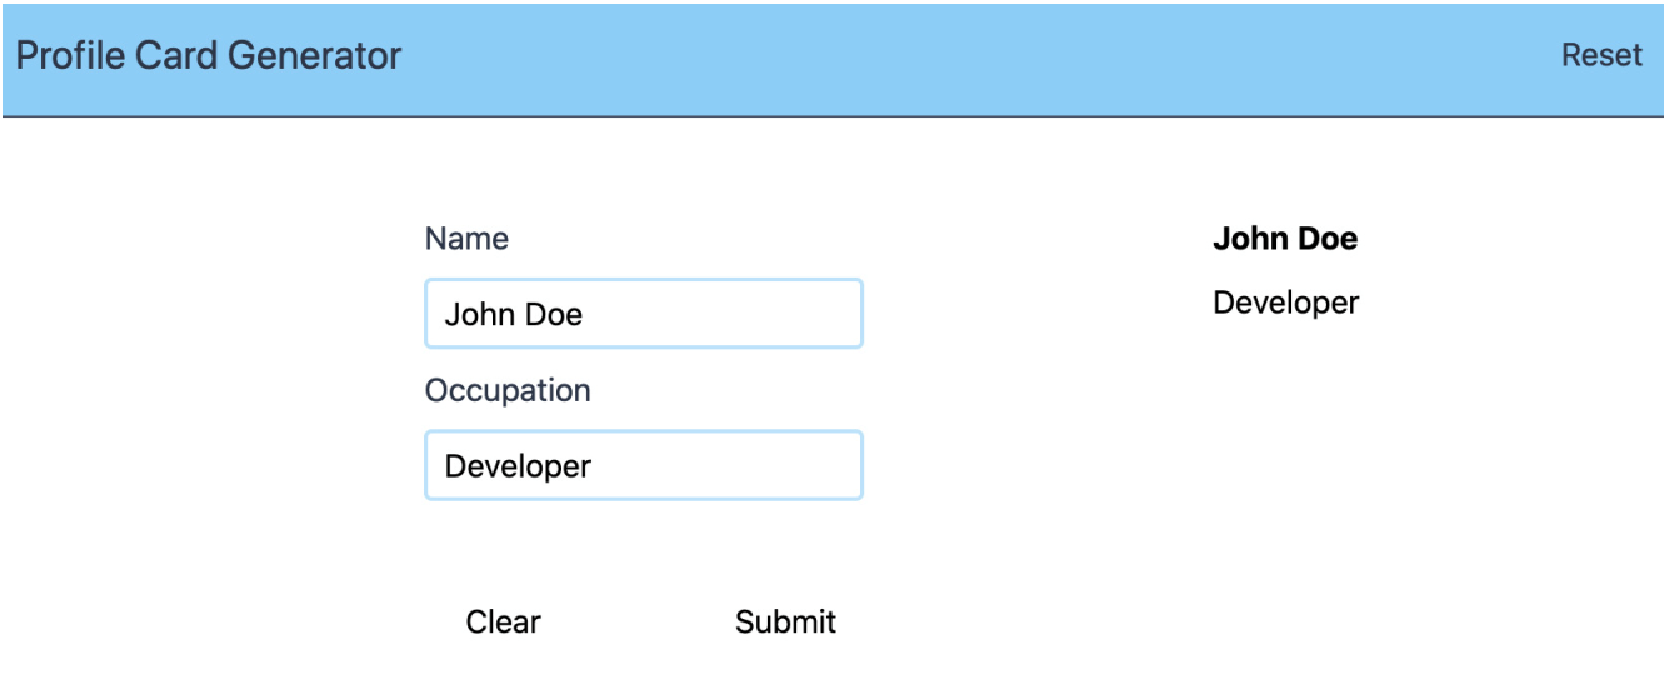 Figure 19. Figure 8.21: Form filled out and the Reset button in the header
Reset 按钮仅重置 AppProfileDisplay 数据:
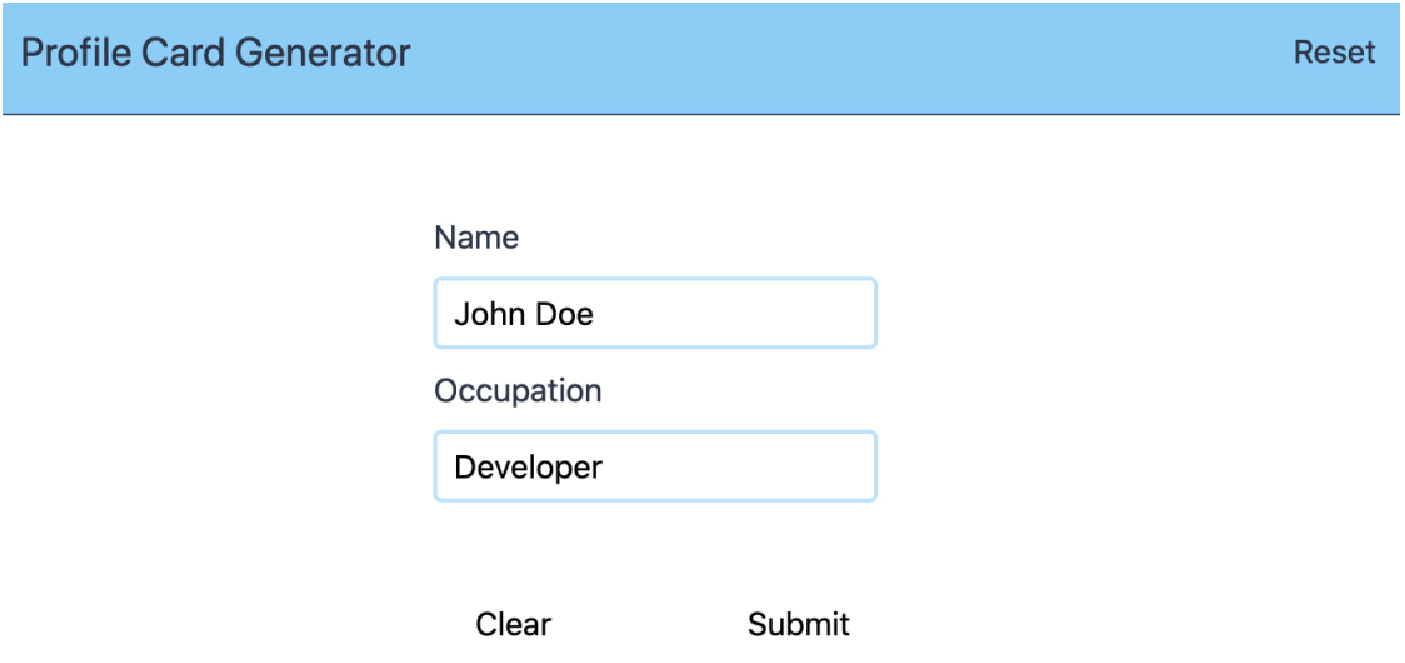 Figure 20. Figure 8.22: Form filled out, but the card section has been cleared
 -
为了通过 Reset 清除表单,我们需要在 AppProfileForm 的已安装生命周期方法中订阅 profileUpdate 事件,并通过重置表单(使用 handleProfileUpdate)对所述事件做出反应:
<script> import eventBus from '../event-bus' export default { mounted() { eventBus.$on('profileUpdate', this.handleProfileUpdate) }, beforeDestroy() { eventBus.$off('profileUpdate', this.handleProfileUpdate) }, // rest of component methods: { // other methods handleProfileUpdate(formData) { this.name = formData.name || '' this.occupation = formData.occupation || '' } } } </script> -
我们也借此机会删除 Clear 按钮并调整 Submit 按钮:
<template>
    <!-- rest of template -->
    <div class="flex align-center mt-12">
        <button
            type="submit"
            @click="submitForm()"
        >
        Submit
        </button>
    </div>
    <!-- rest of template -->
</template>
填写并提交后,表单如下所示:
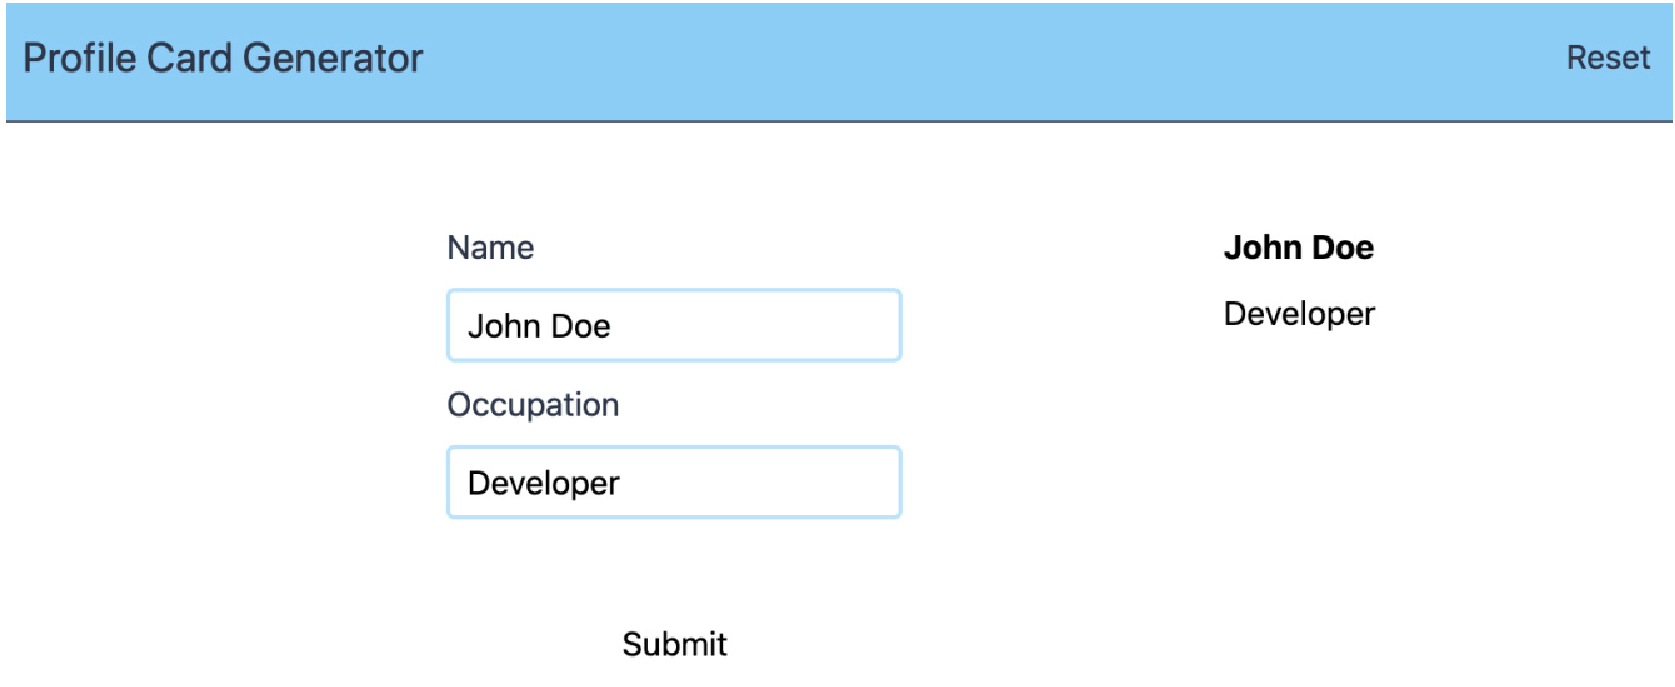
现在重置表单会清除表单字段以及 AppProfileDisplay:
使用事件总线、触发事件并侦听同一事件的最后一步是封装事件和状态更新的 Vuex 模式基础的一部分。