测试组件
组件是 Vue.js 应用程序的核心。使用 vue-test-utils 和 Jest 为它们编写单元测试非常简单。对大多数组件进行测试可以让您确信它们的行为符合设计。理想的组件单元测试运行快速且简单。
我们将继续构建博客应用程序示例。我们现在已经构建了标题,但博客通常还需要显示帖子列表。
我们将创建一个 PostList 组件。目前,它只会渲染一个 div 包装器并支持 posts Array 属性:
<template>
    <div class="flex flex-col w-full"></div>
</template>

<script>
export default {
    props: {
        posts: {
            type: Array,
            default: () => []
        }
    }
}
</script>
我们可以在 App 组件中添加一些数据:
<script>
export default {
    data() {
        return {
            posts: [
                {
                    title: 'Vue.js for React developers',
                    description: 'React has massive popularity here are the key benefits of Vue.js over it.',
                    tags: ['vue', 'react'],
                },
                {
                    title: 'Migrating an AngularJS app to Vue.js',
                    description: 'With many breaking changes, AngularJS developers have found it easier to retrain to Vue.js than Angular 2',
                    tags: ['vue', 'angularjs']
                }
            ]
        }
    }
}
</script>
现在我们有了一些帖子(posts),我们可以将它们作为绑定 prop 从 App 组件传递到 PostList 组件:
<template>
    <!-- rest of template -->
    <PostList :posts="posts" />
    <!-- rest of template -->
</template>

<script>
import PostList from './components/PostList.vue'

export default {
    components: {
        PostList
    },
    // rest of component properties
}
我们的 PostList 组件将渲染 PostListItem 组件中的每个帖子,我们将按如下方式创建该组件。
PostListItem 有两个属性:title(是一个字符串)和 description(也是一个字符串)。 它将它们分别呈现在 h3 标签和 p 标签中:
<template>
    <div class="flex flex-col m-auto w-full md:w-3/5 lg:w-2/5 mb-4">
        <h3 class="flex text-md font-semibold text-gray-700">
            {{ title }}
        </h3>
        <p class="flex leading-relaxed">{{ description }}</p>
    </div>
</template>

<script>
export default {
    props: {
        title: {
            type: String
        },
        description: {
            type: String
        }
    }
}
</script>
现在我们需要循环遍历帖子并渲染出 PostListItem 组件,并在 PostList.vue 组件中绑定相关的 props:
<template>
!-- rest of template -->
<PostListItem
v-for="post in posts"
:key="post.slug"
:title="post.title"
:description="post.description"
/>
<!-- rest of template -->
</template>
<script>
import PostListItem from './PostListItem.vue'
export default {
components: {
PostListItem,
},
// rest of component properties
}
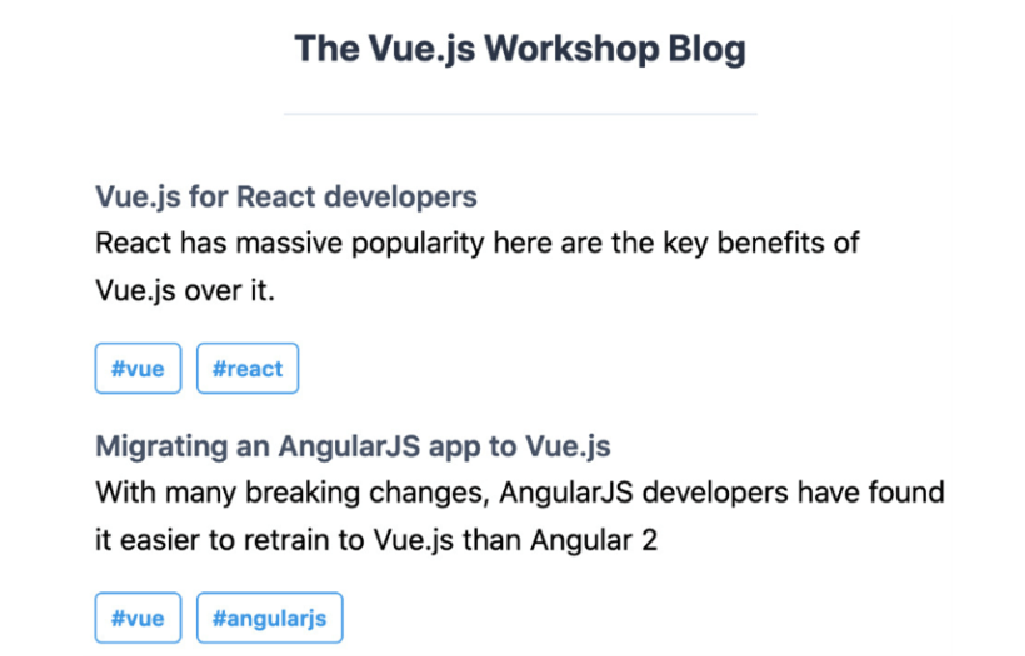
</script>我们现在可以在应用程序中看到标题和帖子列表:
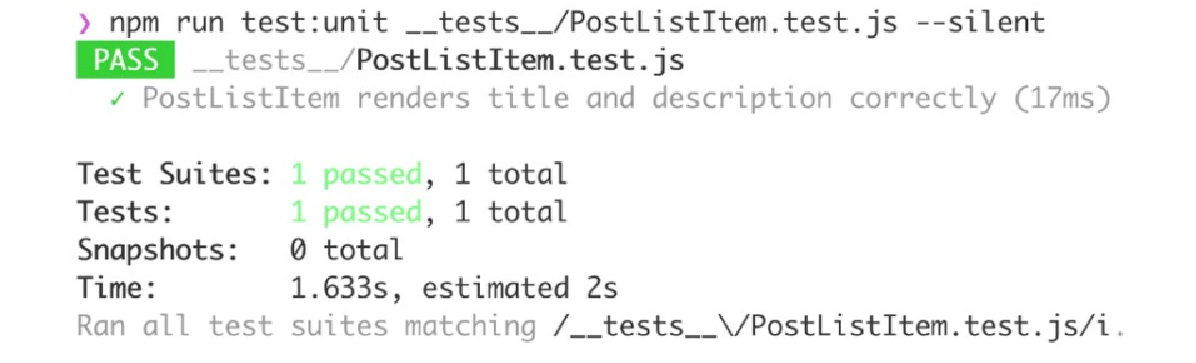
The Vue.js Workshop blog为了测试 PostListItem 组件,我们可以使用一些任意标题(title)和描述(description)属性集进行浅层渲染,并检查它们是否被渲染:
import { shallowMount } from '@vue/test-utils'
import PostListItem from '../src/components/PostListItem.vue'

test('PostListItem renders title and description correctly', () => {
    const wrapper = shallowMount(PostListItem, {
        propsData: {
            title: 'Blog post title',
            description: 'Blog post description'
        }
    })
    expect(wrapper.text()).toMatch("Blog post title")
    expect(wrapper.text()).toMatch("Blog post description")
})
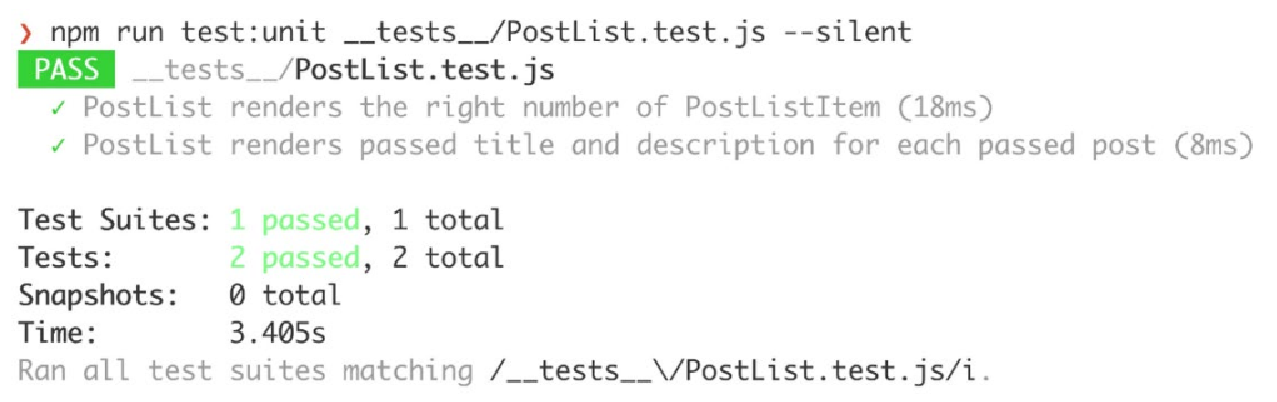
接下来,我们将看到浅层渲染的陷阱之一。在测试 PostList 组件时,我们所能做的就是测试它渲染的 PostListItem 组件的数量:
import { shallowMount } from '@vue/test-utils'
import PostList from '../src/components/PostList.vue'
import PostListItem from '../src/components/PostListItem.vue'

test('PostList renders the right number of PostListItem', () => {
    const wrapper = shallowMount(PostList, {
        propsData: {
            posts: [
                {
                    title: "Blog post title",
                    description: "Blog post description"
                }
            ]
        }
    })
    expect(wrapper.findAll(PostListItem)).toHaveLength(1)
})
这通过了,但我们正在测试用户不会直接交互的东西,即 PostList 中渲染的 PostListItem 实例的数量,如下面的屏幕截图所示:
更好的解决方案是使用 mount 函数,它渲染完整的组件树,而浅层函数只会渲染正在渲染的组件的子组件。通过 mount,我们可以断言标题和描述已渲染到页面上。
这种方法的缺点是我们要测试 PostList 组件和 PostListItem 组件,因为 PostList 组件不渲染标题或描述;它渲染一组 PostListItem 组件,这些组件又渲染相关的标题和描述。
代码如下:
import { shallowMount, mount } from '@vue/test-utils'
import PostList from '../src/components/PostList.vue'
// other imports and tests

test('PostList renders passed title and description for each passed post', () => {
    const wrapper = mount(PostList, {
        propsData: {
            posts: [
                {
                    title: 'Title 1',
                    description: 'Description 1'
                },
                {
                    title: 'Title 2',
                    description: 'Description 2'
                }
            ]
        }
    })
    const outputText = wrapper.text()
    expect(outputText).toContain('Title 1')
    expect(outputText).toContain('Description 1')
    expect(outputText).toContain('Title 2')
    expect(outputText).toContain('Description 2')
})
新测试按照 npm run test:unit __tests__/PostList.vue 的以下输出通过:
我们现在已经了解了如何使用 Jest 和 vue-test-utils 为 Vue.js 组件编写单元测试。这些测试可以经常运行,并且测试运行可以在几秒钟内完成,这为我们在处理新的或现有的组件时提供了近乎即时的反馈。
练习 12.01:构建标签列表组件并对其进行单元测试
在为帖子(posts)创建固定装置(fixture)时,我们用 vue、angularjs 和 React 填充了标签(tags)字段,但没有显示它们。为了使标签有用,我们将在帖子列表中显示标签。
要访问本练习的代码文件,请参阅 https://packt.live/2HiTFQ1 :
-
我们可以首先编写一个单元测试,该测试将解释我们期望
PostListItem组件在传递一组标签作为props时执行的操作。它期望每个标签都会在其前面添加一个主题标签来渲染;例如,react 标签将显示为 #react。在__tests__/PostListItem. test.js文件中,我们可以添加一个新的测试:// rest of tests and imports test('PostListItem renders tags with a # prepended to them', () => { const wrapper = shallowMount(PostListItem, { propsData: { tags: ['react', 'vue'] } }) expect(wrapper.text()).toMatch('#react') expect(wrapper.text()).toMatch('#vue') })当使用
npm run test:unit __tests__/ PostListItem.test.js运行时,此测试失败: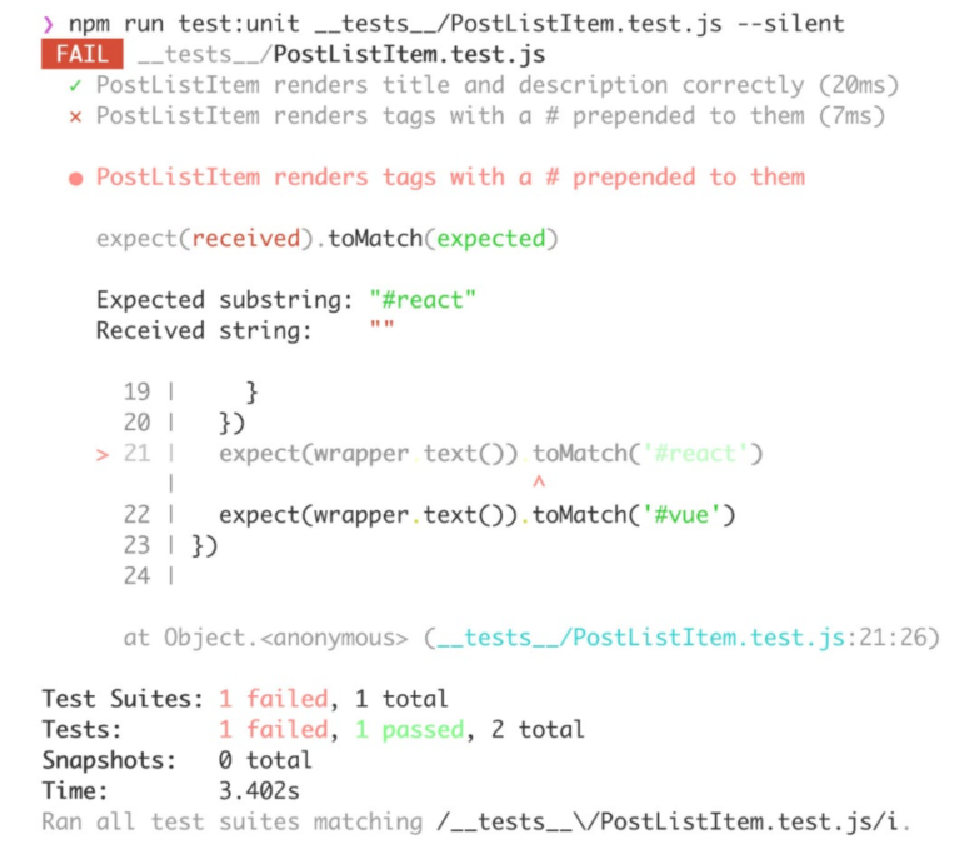 Figure 4. Figure 12.7: Tag test for PostListItem failing
 -
接下来,我们应该在
src/components/PostListItem.vue中实现标签列表渲染。我们将添加标签作为Array类型的props并使用v-for渲染标签:<template> <!-- rest of template --> <div class="flex flex-row flex-wrap mt-4"> <a v-for="tag in tags" :key="tag" class="flex text-xs font-semibold px-2 py-1 mr-2 rounded border border-blue-500 text-blue-500" > #{{ tag }} </a> </div> <!-- rest of template --> </template> <script> export default { props: { // rest of props tags: { type: Array, default: () => [] } } } </script>实现
PostListItem组件后,单元测试现在应该通过: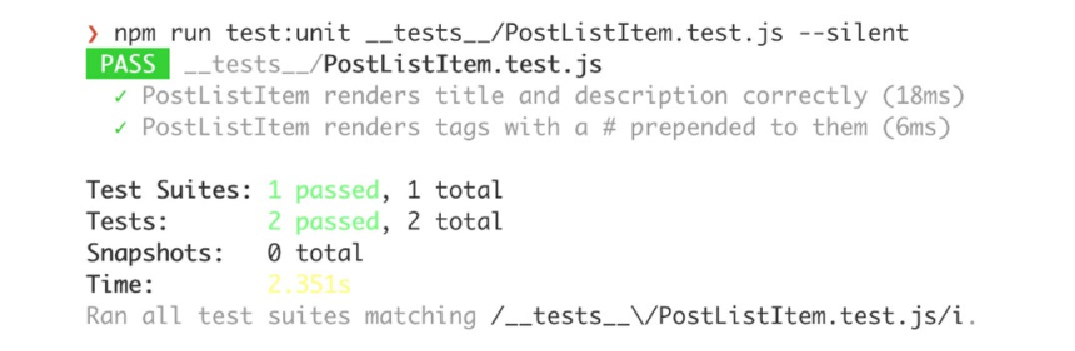 Figure 5. Figure 12.8: PostListItem unit test passing
但是,标签不会显示在应用程序中:
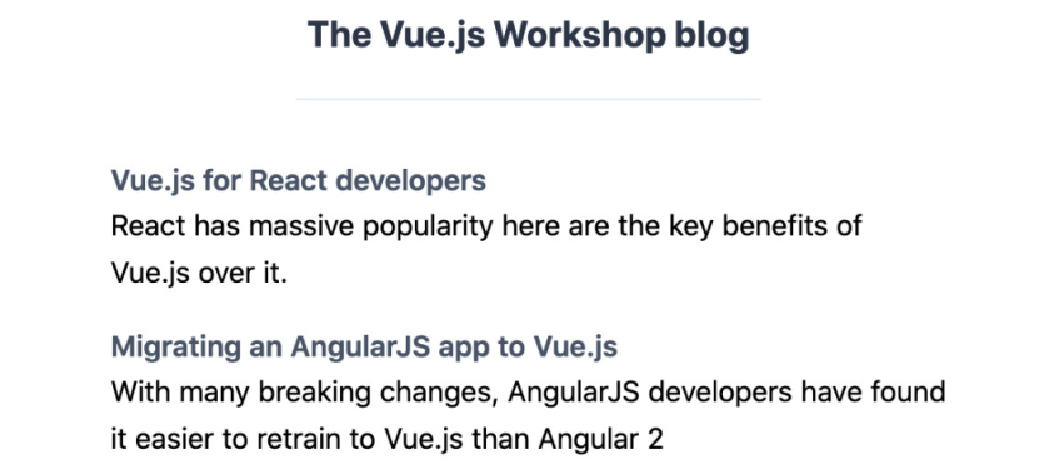 Figure 6. Figure 12.9: PostList displaying without tags despite the correct PostListItem implementation
 -
我们可以为
PostList编写一个单元测试来显示这种行为。本质上,我们将在帖子列表中传递一些标签,并运行与PostListItem.test.js文件中已存在的相同的断言。 我们将在__tests__/PostList.test.js中执行此操作:// rest of tests and imports test('PostList renders tags for each post', () => { const wrapper = mount(PostList, { propsData: { posts: [ { tags: ['react', 'vue'] }, { tags: ['html', 'angularjs'] } ] } }) const outputText = wrapper.text() expect(outputText).toContain('#react') expect(outputText).toContain('#vue') expect(outputText).toContain('#html') expect(outputText).toContain('#angularjs') })根据我们的应用程序输出,使用
npm run test:unit __tests__/PostList.test.js运行时测试失败: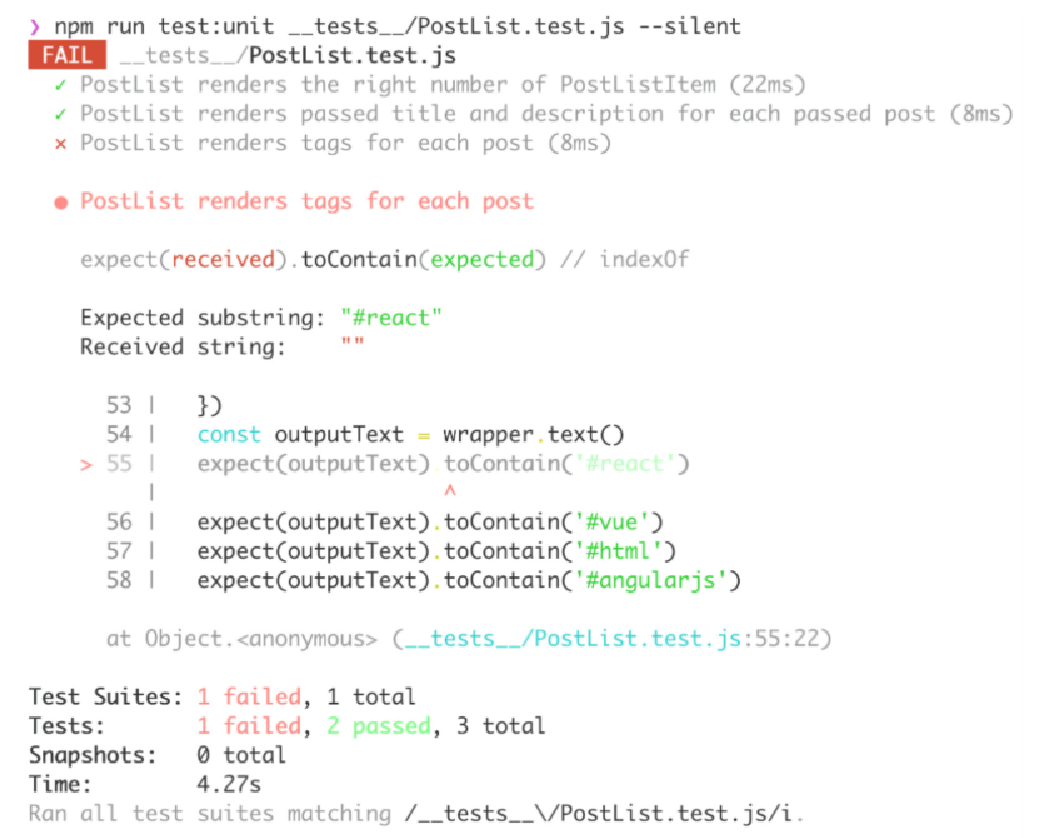 Figure 7. Figure 12.10: PostList tags test failing
 -
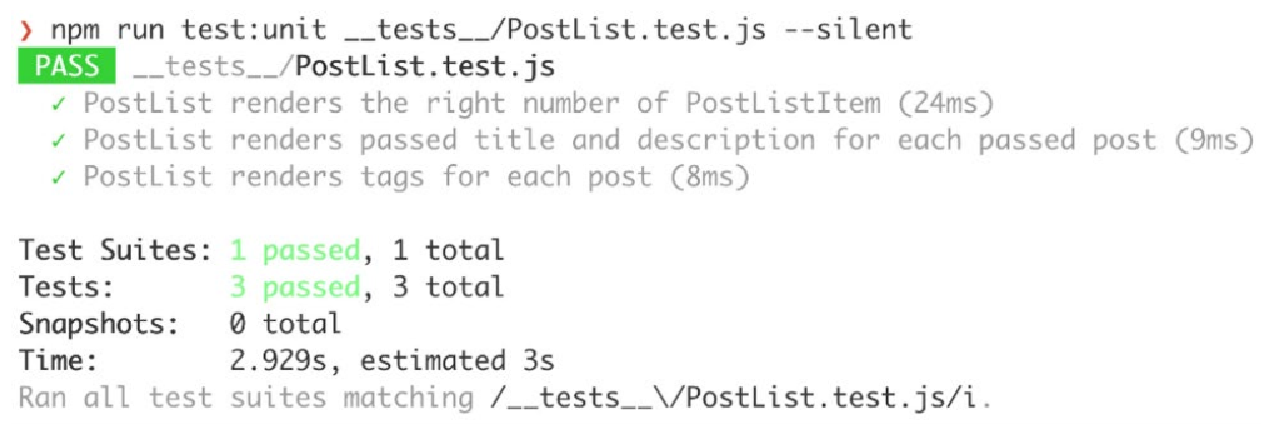
为了修复这个测试,我们可以在
src/components/PostList.vue中找到问题,其中PostListItem的Tags属性没有绑定。通过更新src/components/PostList.vue来绑定 Tags prop,我们可以修复单元测试:<template> <!-- rest of template--> <PostListItem v-for="post in posts" :key="post.slug" :title="post.title" :description="post.description" :tags="post.tags" /> <!-- rest of template --> </template>
失败的单元测试现已通过,如下图所示:
这些标签也出现在应用程序中,如以下屏幕截图所示:
我们现在已经了解了如何通过浅层渲染和组件安装来测试渲染的组件输出。让我们简要了解一下每个术语的含义:
-
浅层渲染(Shallow rendering):渲染深度为 1,这意味着如果子组件是组件,它们将仅被渲染为组件标签;他们的模板将不会运行。
-
安装(Mounting):这会以与在浏览器中渲染类似的方式渲染完整的组件树。
接下来,我们将了解如何测试组件方法。