测试 Vuex
为了展示如何测试依赖于 Vuex(Vue.js 的官方全局状态管理解决方案)的组件,我们将实现并测试一个时事通讯订阅横幅(banner)。
首先,我们要创建 banner 模板。banner 将包含订阅时事通讯的 action 和关闭图标:
<template>
    <div class="text-center py-4 md:px-4">
        <div
            class="py-2 px-4 bg-indigo-800 items-center text-indigo-100
            leading-none md:rounded-full flex md:inline-flex"
            role="alert"
        >
            <span
                class="font-semibold ml-2 md:mr-2 text-left flex-auto"
            >
                Subscribe to the newsletter
            </span>
            <svg
                class="fill-current h-6 w-6 text-indigo-500"
                role="button"
                xmlns="http://www.w3.org/2000/svg"
                viewBox="0 0 20 20"
            >
                <title>Close</title>
                <path
                    d="M14.348 14.849a1.2 1.2 0 0 1-1.697 0L10 11.819l-2.651
                    3.029a1.2 1.2 0 1 1-1.697-1.697l2.758-3.15-2.759-3.152a1.
                    2
                    1.2 0 1 1 1.697-1.697L10 8.183l2.651-3.031a1.2 1.2 0 1 1
                    1.697 1.697l-2.758 3.152 2.758 3.15a1.2 1.2 0 0 1 0 1.
                    698z"
                />
            </svg>
        </div>
    </div>
</template>
我们可以在 App.vue 文件中显示 NewsletterBanner 组件,如下所示:
<template>
    <!-- rest of template -->
    <NewsletterBanner />
    <!-- rest of template -->
</template>

<script>
import NewsletterBanner from './components/NewsletterBanner.vue'

export default {
    components: {
        NewsletterBanner
    },
    // other component properties
}
</script>
然后我们将使用 npm install --save vuex 命令安装 Vuex。安装 Vuex 后,我们可以在 store.js 文件中初始化我们的 store,如下所示:
import Vue from 'vue'
import Vuex from 'vuex'

Vue.use(Vuex)

export default new Vuex.Store({
    state: {},
    mutations: {}
})
我们的 Vuex store 也注册在 main.js 文件中:
// other imports
import store from './store'
// other configuration
new Vue({
    // other vue options
    store
}).$mount('#app')
为了决定是否应显示时事通讯 banner,我们需要向 store 添加初始状态:
// imports and configuration
export default new Vuex.Store({
    state: {
        dismissedSubscribeBanner: false
    }
})
要关闭 banner,我们需要一个突变,将 DismissedSubscribeBanner 设置为 true:
// imports and configuration
export default new Vuex.Store({
    // other store configuration
    mutations: {
        dismissSubscribeBanner(state) {
            state.dismissedSubscribeBanner = true
        }
    }
})
我们现在可以使用 store 状态和 dismissSubscribeBanner 突变来决定是否显示横幅(使用 v-if)以及是否关闭它(绑定到 close 按钮上的单击):
<template>
<div v-if="showBanner" class="text-center py-4 md:px-4">
<!-- rest of template -->
<svg
@click="closeBanner()"
class="fill-current h-6 w-6 text-indigo-500"
role="button"
xmlns=http://www.w3.org/2000/svg
viewBox="0 0 20 20"
>
<!-- rest of the template -->
</div>
</template>
<script>
export default {
methods: {
closeBanner() {
this.$store.commit('dismissSubscribeBanner')
}
},
computed: {
showBanner() {
return !this.$store.state.dismissedSubscribeBanner
}
}
}
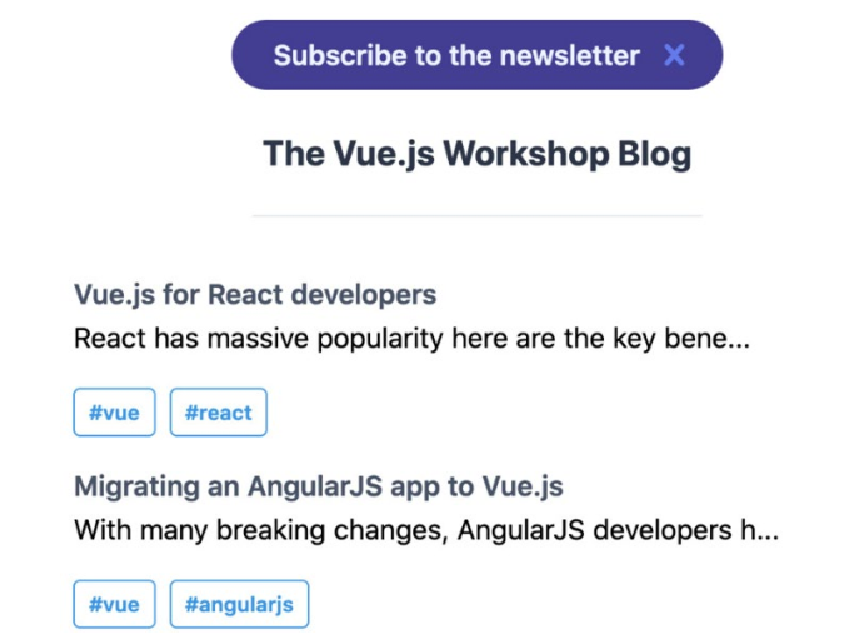
</script>此时,横幅在浏览器中看起来像这样:
为了编写单元测试,我们将使用 Vue 测试库,它提供了注入 Vuex 存储的工具。我们需要导入 store 和 NewsletterBanner 组件。
我们可以从健全性检查开始,默认情况下会显示时事通讯 banner:
import {render, fireEvent} from '@testing-library/vue'
import NewsletterBanner from '../src/components/NewsletterBanner.vue'
import store from '../src/store'

test('Newsletter Banner should display if store is initialised with it not dismissed', () => {
    const {queryByText} = render(NewsletterBanner, { store })
    expect(queryByText('Subscribe to the newsletter')).toBeTruthy()
})
下一个检查应该是,如果 store 具有 SubscribeBanner: true,则不应显示 banner:
// imports and other tests
test('Newsletter Banner should not display if store is initialised with it dismissed', () => {
    const {queryByText} = render(NewsletterBanner, { store: {
        state: {
            dismissedSubscribeBanner: true
        }
    } })
    expect(queryByText('Subscribe to the newsletter')).toBeFalsy()
})
我们要编写的最后一个测试是确保单击 banner 的关闭按钮会向 store 提交更改。我们可以通过注入一个存根作为 dismissSubscribeBanner 突变并检查它在单击关闭按钮时是否被调用来做到这一点:
// imports and other tests
test('Newsletter Banner should hide on "close" button click',
async () => {
const dismissSubscribeBanner = jest.fn()
const {getByText} = render(NewsletterBanner, {
store: {
...store,
mutations: {
dismissSubscribeBanner
}
}
})
await fireEvent.click(getByText('Close'))
expect(dismissSubscribeBanner).toHaveBeenCalledTimes(1)
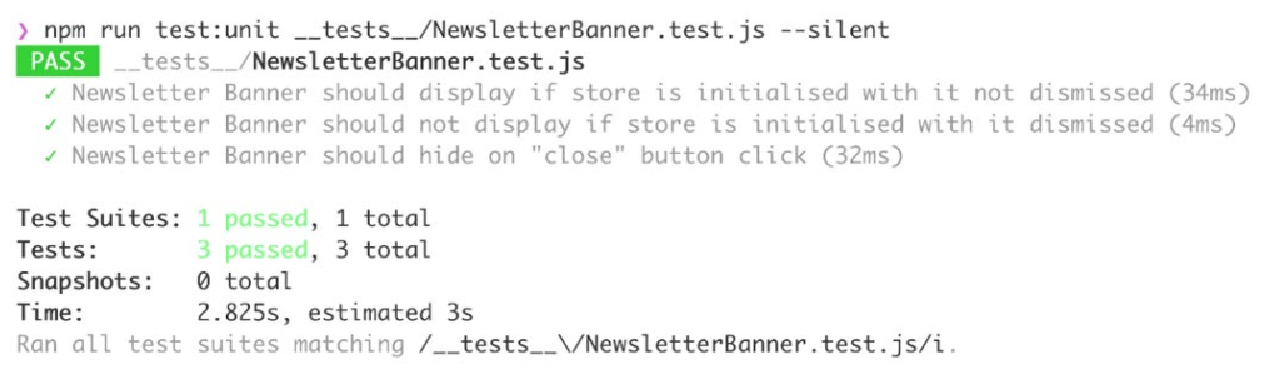
})现在,当使用 npm run test:unit __tests__/ NewsletterBanner.test.js 运行时,测试将通过,如下所示:
我们现在已经了解了如何使用 Vue.js 测试库来测试 Vuex 驱动的应用程序功能。
练习 12.04:构建和测试 Cookie 免责声明 Banner (Vuex)
现在我们将了解如何使用 Vuex 实现 cookie 免责声明横幅(banner)以及如何使用 Vue.js 测试库对其进行测试。
我们将存储 cookie 横幅是否在 Vuex 中显示(默认为 true);当横幅关闭时,我们会将其存储在 Vuex 中。
使用模拟 Vuex store 测试此打开/关闭。要访问本练习的代码文件,请参阅 https://packt.live/36UzksP :
-
创建一个绿色
Cookie横幅,其中包含粗体的Cookie免责声明标题、免责声明和我同意按钮。我们将在src/components/CookieBanner.vue中创建它:<template> <div class="flex flex-row bg-green-100 border text-center border-green-400 text-green-700 mt-8 px-4 md:px-8 py-3 rounded relative" role="alert" > <div class="flex flex-col"> <strong class="font-bold w-full flex">Cookies Disclaimer</strong> <span class="block sm:inline">We use cookies to improve your experience</span> </div> <button class="ml-auto align-center bg-transparent hover:bg-green-500 text-green-700 font-semibold font-sm hover:text-white py-2 px-4 border border-green-500 hover:border-transparent rounded" > I agree </button> </div> </template> -
接下来,我们将在
src/App.vue中的 router-view 下面导入、注册并渲染CookieBanner:<template> <!-- rest of template --> <CookieBanner /> <!-- rest of template --> </template> <script> // other imports import CookieBanner from './components/CookieBanner.vue' export default { components: { // other components CookieBanner }, // other component properties } </script> -
添加
state切片来控制是否显示cookie横幅。在我们的 Vuex 存储中,我们将这个acceptedCookie字段初始化为false:// imports and configuration export default new Vuex.Store({ state: { // other state fields acceptedCookie: false }, // rest of vuex configuration }) -
我们还需要一个
acceptCookie突变来关闭横幅:// imports and configuration export default new Vuex.Store({ // rest of vuex configuration mutations: { // other mutations acceptCookie(state) { state.acceptedCookie = true } } }) -
接下来,我们将存储状态公开为
acceptedCookie计算属性。我们将创建一个触发acceptCookie突变的acceptCookie函数:export default { methods: { acceptCookie() { this.$store.commit('acceptCookie') } }, computed: { acceptedCookie() { return this.$store.state.acceptedCookie } } } </script> -
当
cookie尚未被接受时,我们将使用v-if来显示横幅。通过切换AcceptCookie单击 “我同意” 按钮将关闭横幅:<template> <div v-if="!acceptedCookie" class="flex flex-row bg-green-100 border text-center border-green-400 text-green-700 mt-8 px-4 md:px-8 py-3 rounded relative" role="alert" > <!-- rest of template --> <button @click="acceptCookie()" class="ml-auto align-center bg-transparent hover:bg-green-500 text-green-700 font-semibold font-sm hover:text-white py-2 px-4 border border-green-500 hover:border-transparent rounded" > I agree </button> </div> </template>现在,我们已经得到了一个
cookie横幅,该横幅会一直显示,直到单击 “我同意” 为止,如以下屏幕截图所示: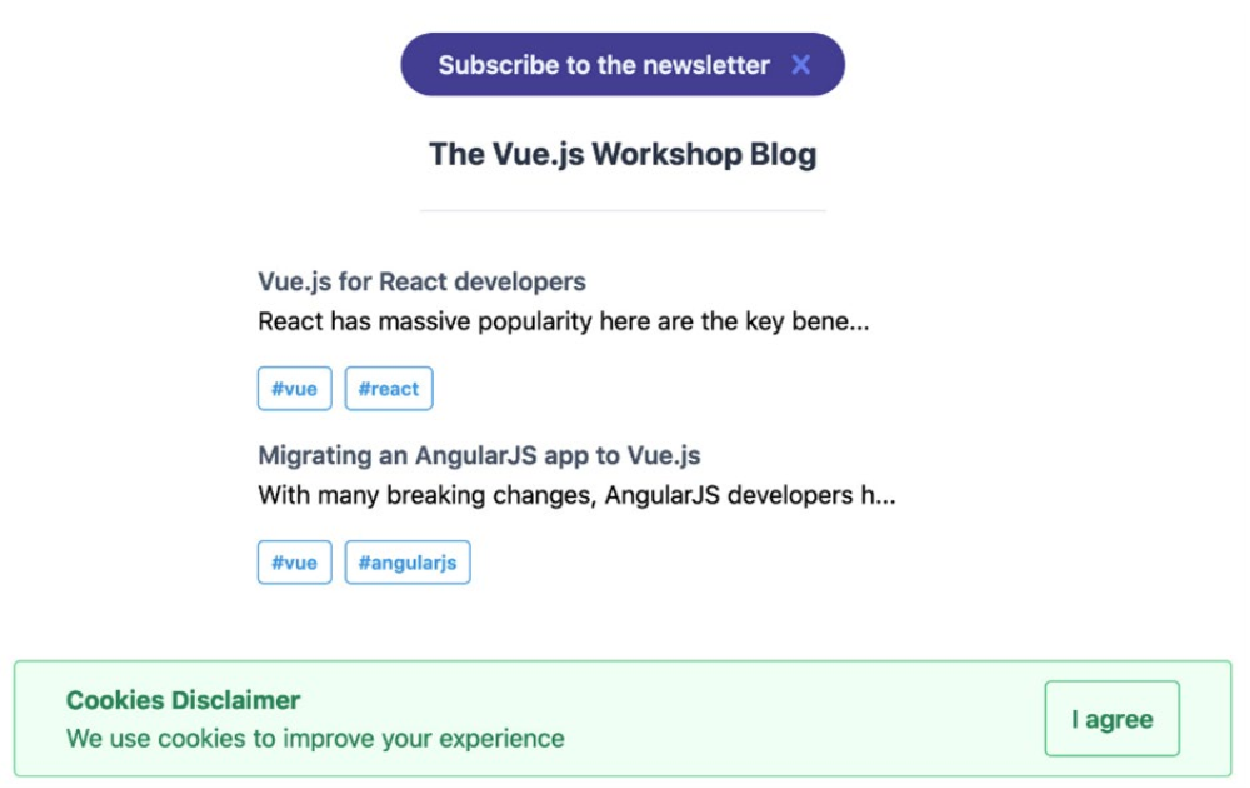 Figure 3. Figure 12.25: Cookie banner displayed in the browser
 -
我们现在将编写一个测试来检查
CookieBanner组件是否默认显示:import {render, fireEvent} from '@testing-library/vue' import CookieBanner from '../src/components/CookieBanner.vue' import store from '../src/store' test('Cookie Banner should display if store is initialised with it not dismissed', () => { const {queryByText} = render(CookieBanner, { store }) expect(queryByText('Cookies Disclaimer')).toBeTruthy() }) -
我们还将编写一个测试来检查如果
store中的acceptedCookie为true,则不会显示cookie横幅:test('Cookie Banner should not display if store is initialised with it dismissed', () => { const {queryByText} = render(CookieBanner, { store: { state: { acceptedCookie: true } } }) expect(queryByText('Cookies Disclaimer')).toBeFalsy() }) -
最后,我们要检查当单击 “我同意” 按钮时,是否会触发
AcceptCookie突变:test('Cookie Banner should hide on "I agree" button click', async () => { const acceptCookie = jest.fn() const {getByText} = render(CookieBanner, { store: { ...store, mutations: { acceptCookie } } }) await fireEvent.click(getByText('I agree')) expect(acceptCookie).toHaveBeenCalledTimes(1) })
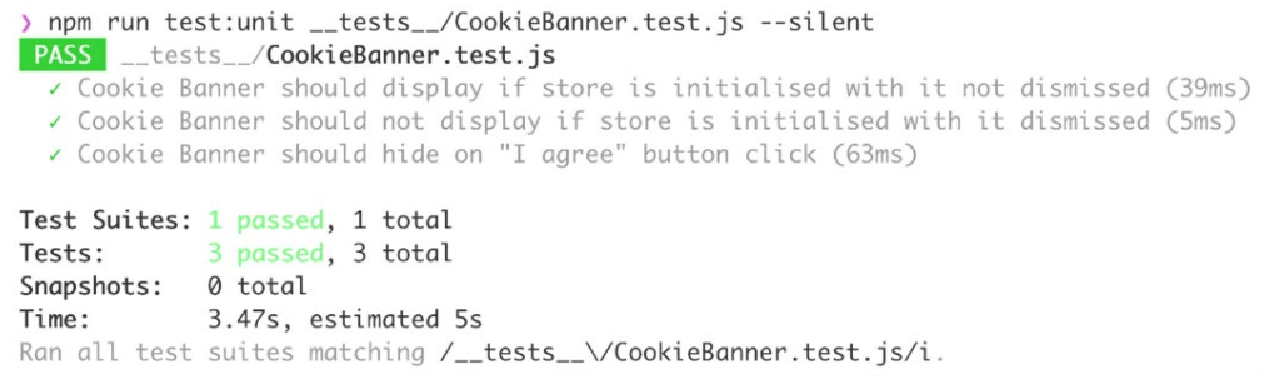
我们编写的三个测试在使用 npm run test:unit __tests__/CookieBanner.test.js 运行时通过,如下:
我们现在已经了解了如何测试依赖 Vuex 进行状态和更新的组件。
接下来,我们将了解快照测试并了解它如何简化渲染输出的测试。